The Aphrodite Project (Cagiva Planet 125 RD 350 YPVS 421 Conversion)
-
Propa OG that m8 looks mint awesome design can't wait to see her all running
")
-
@yeolderaver Cheers bro, yeah it's slowing down at the moment as someone crashed into my car on my drive and didn't bother to leave a note, (it's a private drive 30+ metres off the road!) so I got that to repair this month

I wouldn't mind, but I don't even drive the car, it just sits on my drive. I've done 1000 miles in it in the 5 years I've had it.
Anyway, it was cheaper to buy these as an item of 5 as they have to set up the CNC machine, so figured I may as well get a few extras and float them on the forums see if anyone is interested...
-
Aww thats savage hope you get some good luck from it all somehow. And yeh keep hold of them collectors piece indeed are there many of these conversions about? as first I heard here from you did show one my friends and he says looks epic hes been building chops n rats for many years and says thats going to be a top ride once completed so thanks for sharing your journey with us all bro wish I had funds for another project mot failed on DT wiring and brakes its not been right since some lil menace stole it so lucky I got it back but she aint the same now.
Must be a reason for our woes must make us better in the long run or something hope some cash comes your way soon so you can get this girl on the tarmac
-
@yeolderaver Cheers bro, yeah it's slowing down at the moment as someone crashed into my car on my drive and didn't bother to leave a note, (it's a private drive 30+ metres off the road!) so I got that to repair this month
I wouldn't mind, but I don't even drive the car, it just sits on my drive. I've done 1000 miles in it in the 5 years I've had it.
Anyway, it was cheaper to buy these as an item of 5 as they have to set up the CNC machine, so figured I may as well get a few extras and float them on the forums see if anyone is interested...
@Calum Sorry to hear about your car bud. +1 for I'd keep hold of those extra clutch cover inserts if I were you, they look ace and are a part that can get rubbed/scratched just from riding so it would be cool to be able to just bung on a fresh one as and when.
-
Been saving for months to purchase this!
With Christmas and what not it was a difficult item to purchase.
Athena 392cc big bore, with the hot rods kit this will take this up to 421ccs.
Brand new gearbox layshaft and a 1st gear tall conversion to duot.
Always Originate, Never Pirate!
-
Been saving for months to purchase this!
With Christmas and what not it was a difficult item to purchase.
Athena 392cc big bore, with the hot rods kit this will take this up to 421ccs.
Brand new gearbox layshaft and a 1st gear tall conversion to duot.
@Calum That kit looks ace, I've never seen one of those before.
Spare a thought for the man somewhere in Europe on one of the TDR250 Facebook pages who tried to make it 340cc using two Athena DTR 170 kits. Barrel stud locations slightly different on the TDR crankcases so he filed them out to match, and then he noticed they were too wide to mount side by side. His solution? Just machine off the offending water jackets from the inside of both cylinders, then plug the holes with a whole packet of JB Weld. This was a few years ago so not sure where that bike is now...
-
@Calum That kit looks ace, I've never seen one of those before.
Spare a thought for the man somewhere in Europe on one of the TDR250 Facebook pages who tried to make it 340cc using two Athena DTR 170 kits. Barrel stud locations slightly different on the TDR crankcases so he filed them out to match, and then he noticed they were too wide to mount side by side. His solution? Just machine off the offending water jackets from the inside of both cylinders, then plug the holes with a whole packet of JB Weld. This was a few years ago so not sure where that bike is now...
@HOTSHOT-III
 Would definitely like to see that. Would make for an interesting build for sure.
I was surprised to see cast pistons in this kit, but apparently I have to junk them anyway to go with the stroker kit I bought as the wrist pin offset is different.
So I've got a few more things to buy before this is called
done. -
Not a good weekend for projects sadly.
Today felt like a good time to tackle the the gearbox rebuild.
Input shaft stripped ready to lay the gears onto the 1st gear conversion.
All rebuild, new bearings, shims and circlips.
So far, so successful.
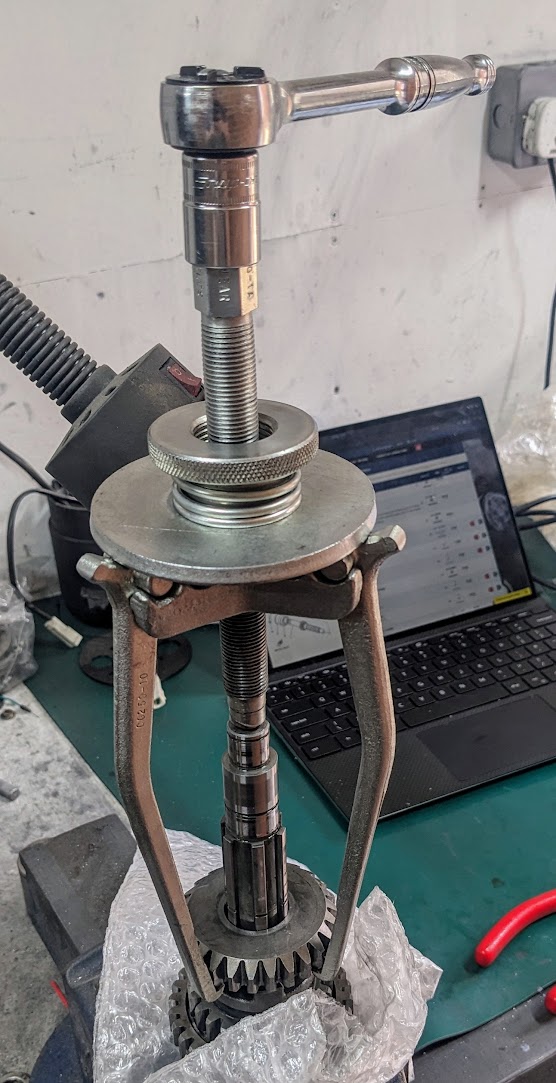
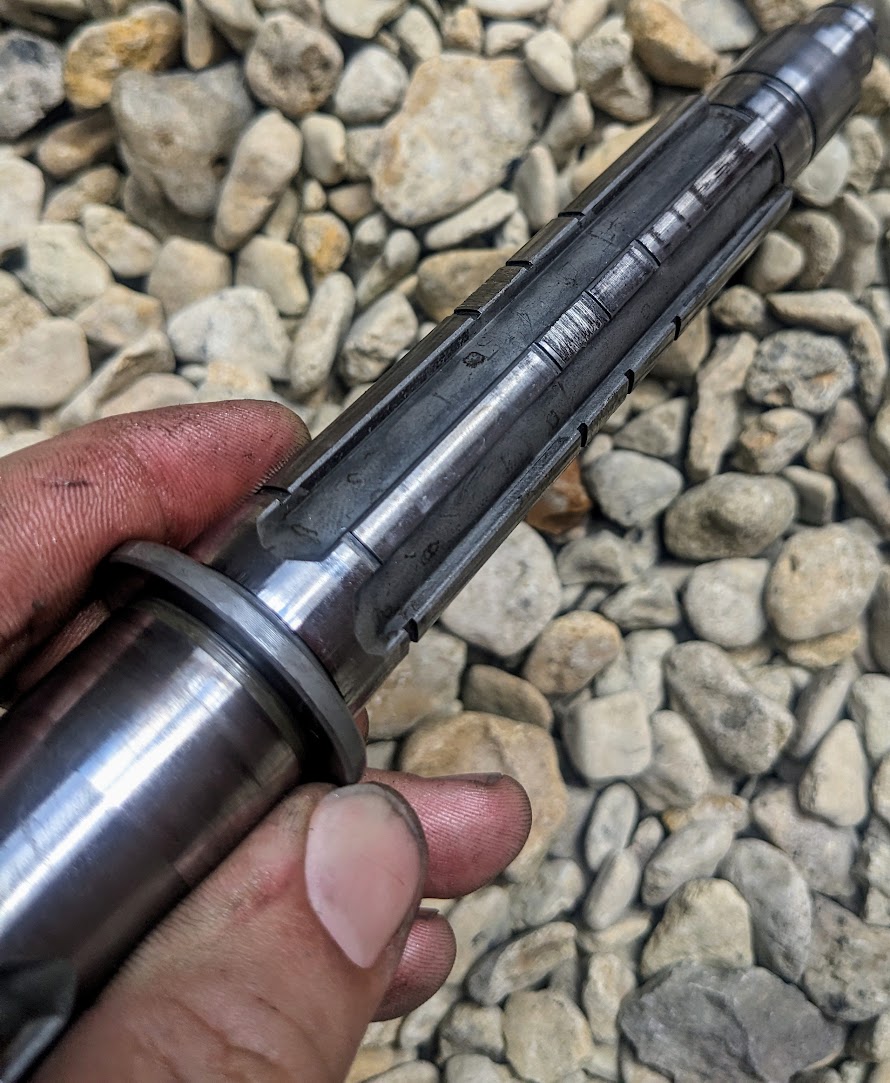
Next tackling the output shaft.
Was going extremely well...until it came to dismantle third.
This was not coming off and the prognosis wasn't good. Rough running third gear with swarf coming out of it.
The layshaft's damaged beyond repair and so was third gear.
Luckily the layshafts can be had brand new and I managed to find third gear.
So sadly that's the cost of a used gearbox, but then that tells me for scrimping on the gearbox.
The layshaft's coming from Japan so I'll have to park this rebuild for now.
-
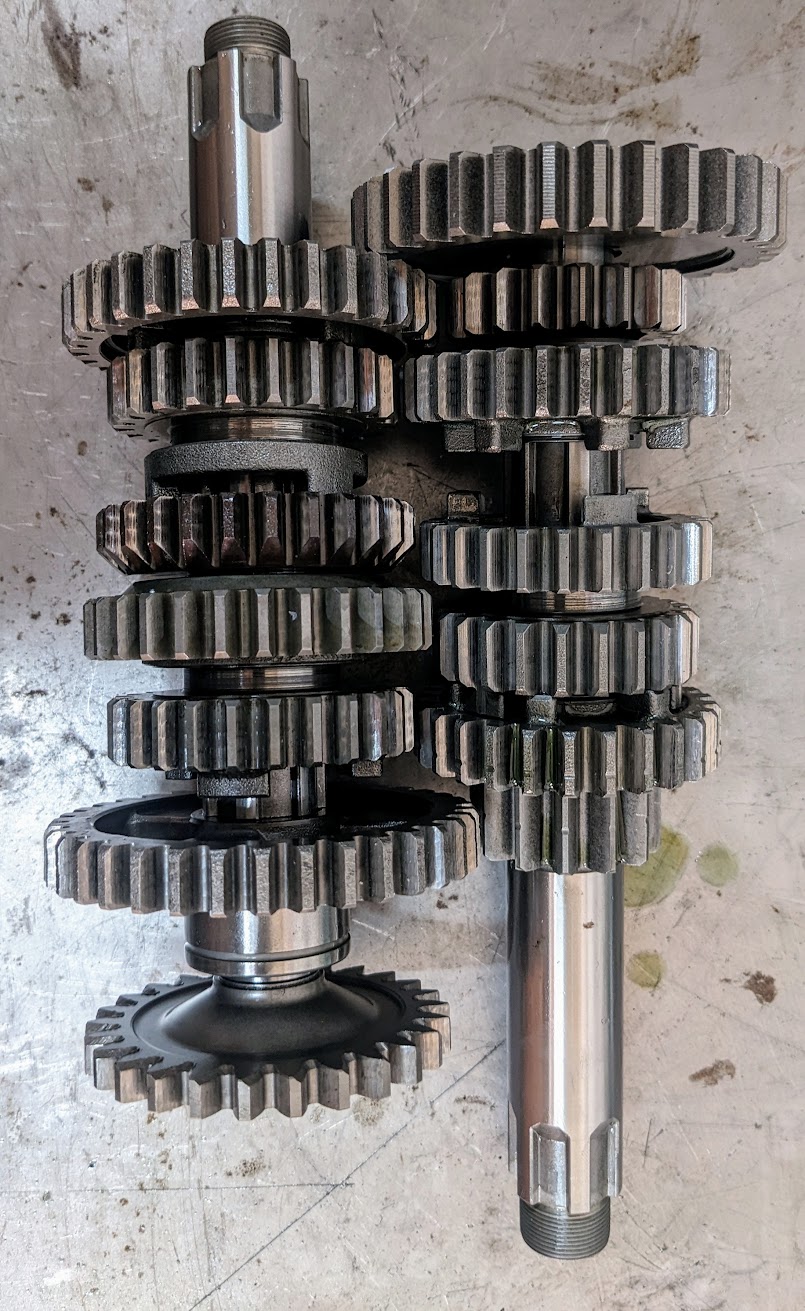
Okay...so some overnight parts from Japan and CMSNL and some others from Australia
 I've finished the gearbox rebuild.....
Brand new genuine output shaft from Japan and a brand new genuine 3rd gear....
This completes the output shaft rebuild.
New genuine shims, circlips and bearings.
Fingers cross that's all back together correctly, I'll have to remember to select all gears and test BEFORE firing up the motor, else this will be £8000 down the drain if it destroys the motor.
And whilst picking the shock spring up from the paints for my ETX, I also picked up the swinging arm for this bike too.
Should go without saying, all near bearings and a lovely carbon fibre chain guard which I bought about 5 years ago for the Raptor. I'll probably keep the Raptor bone stock and therefore it's not needed for that project and can go onto this beasty.
I did have some swinging arm spool spacers machined up but for the life of me I simply cannot find what I done with them. No doubt they'll turn up eventually.
-
Wow, it's really sad how long this project takes to come to fruition...
Maybe I'm spreading myself too thin with way too many concurrent projects, maybe it's because for the first time in my life I've been doing stuff other than motorbikes/cars, but in any event December saw lots of time off for me and I was able to drag what I've been accumulating out of the wardrobe and start with some head scratching and engine work assembly.
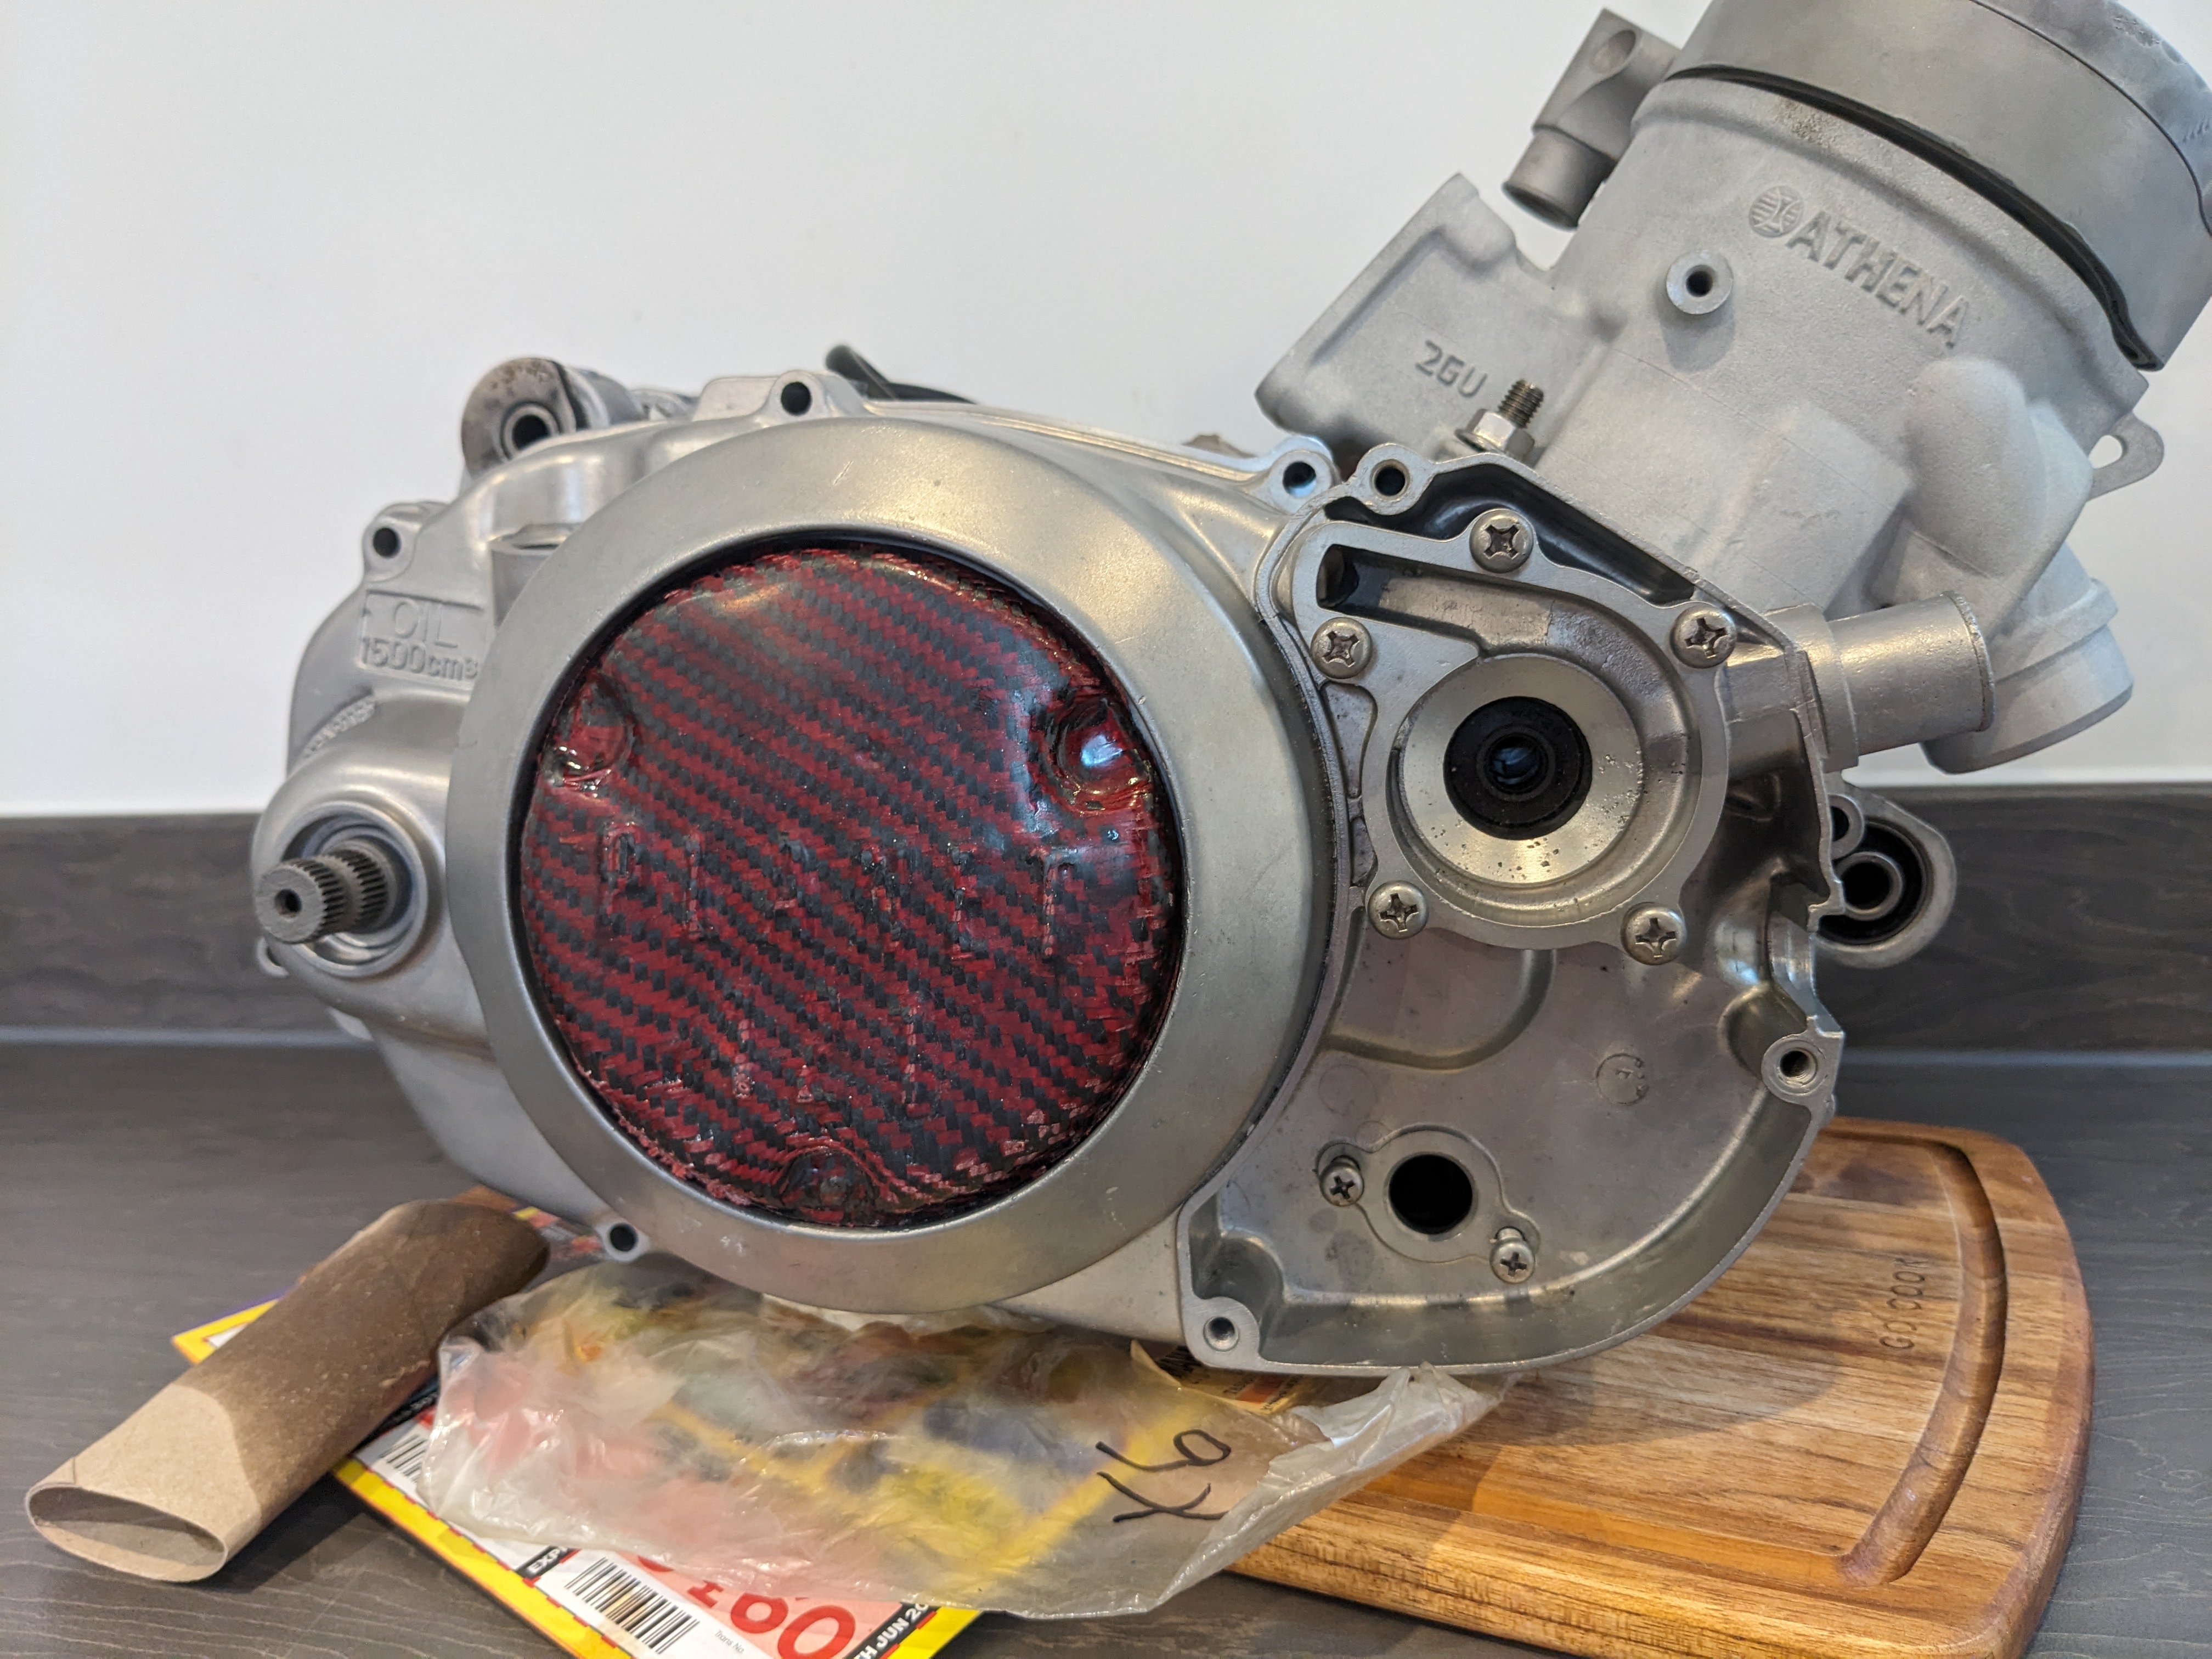
Banshee/RD 350 Athena 421 Bottom End Assembly
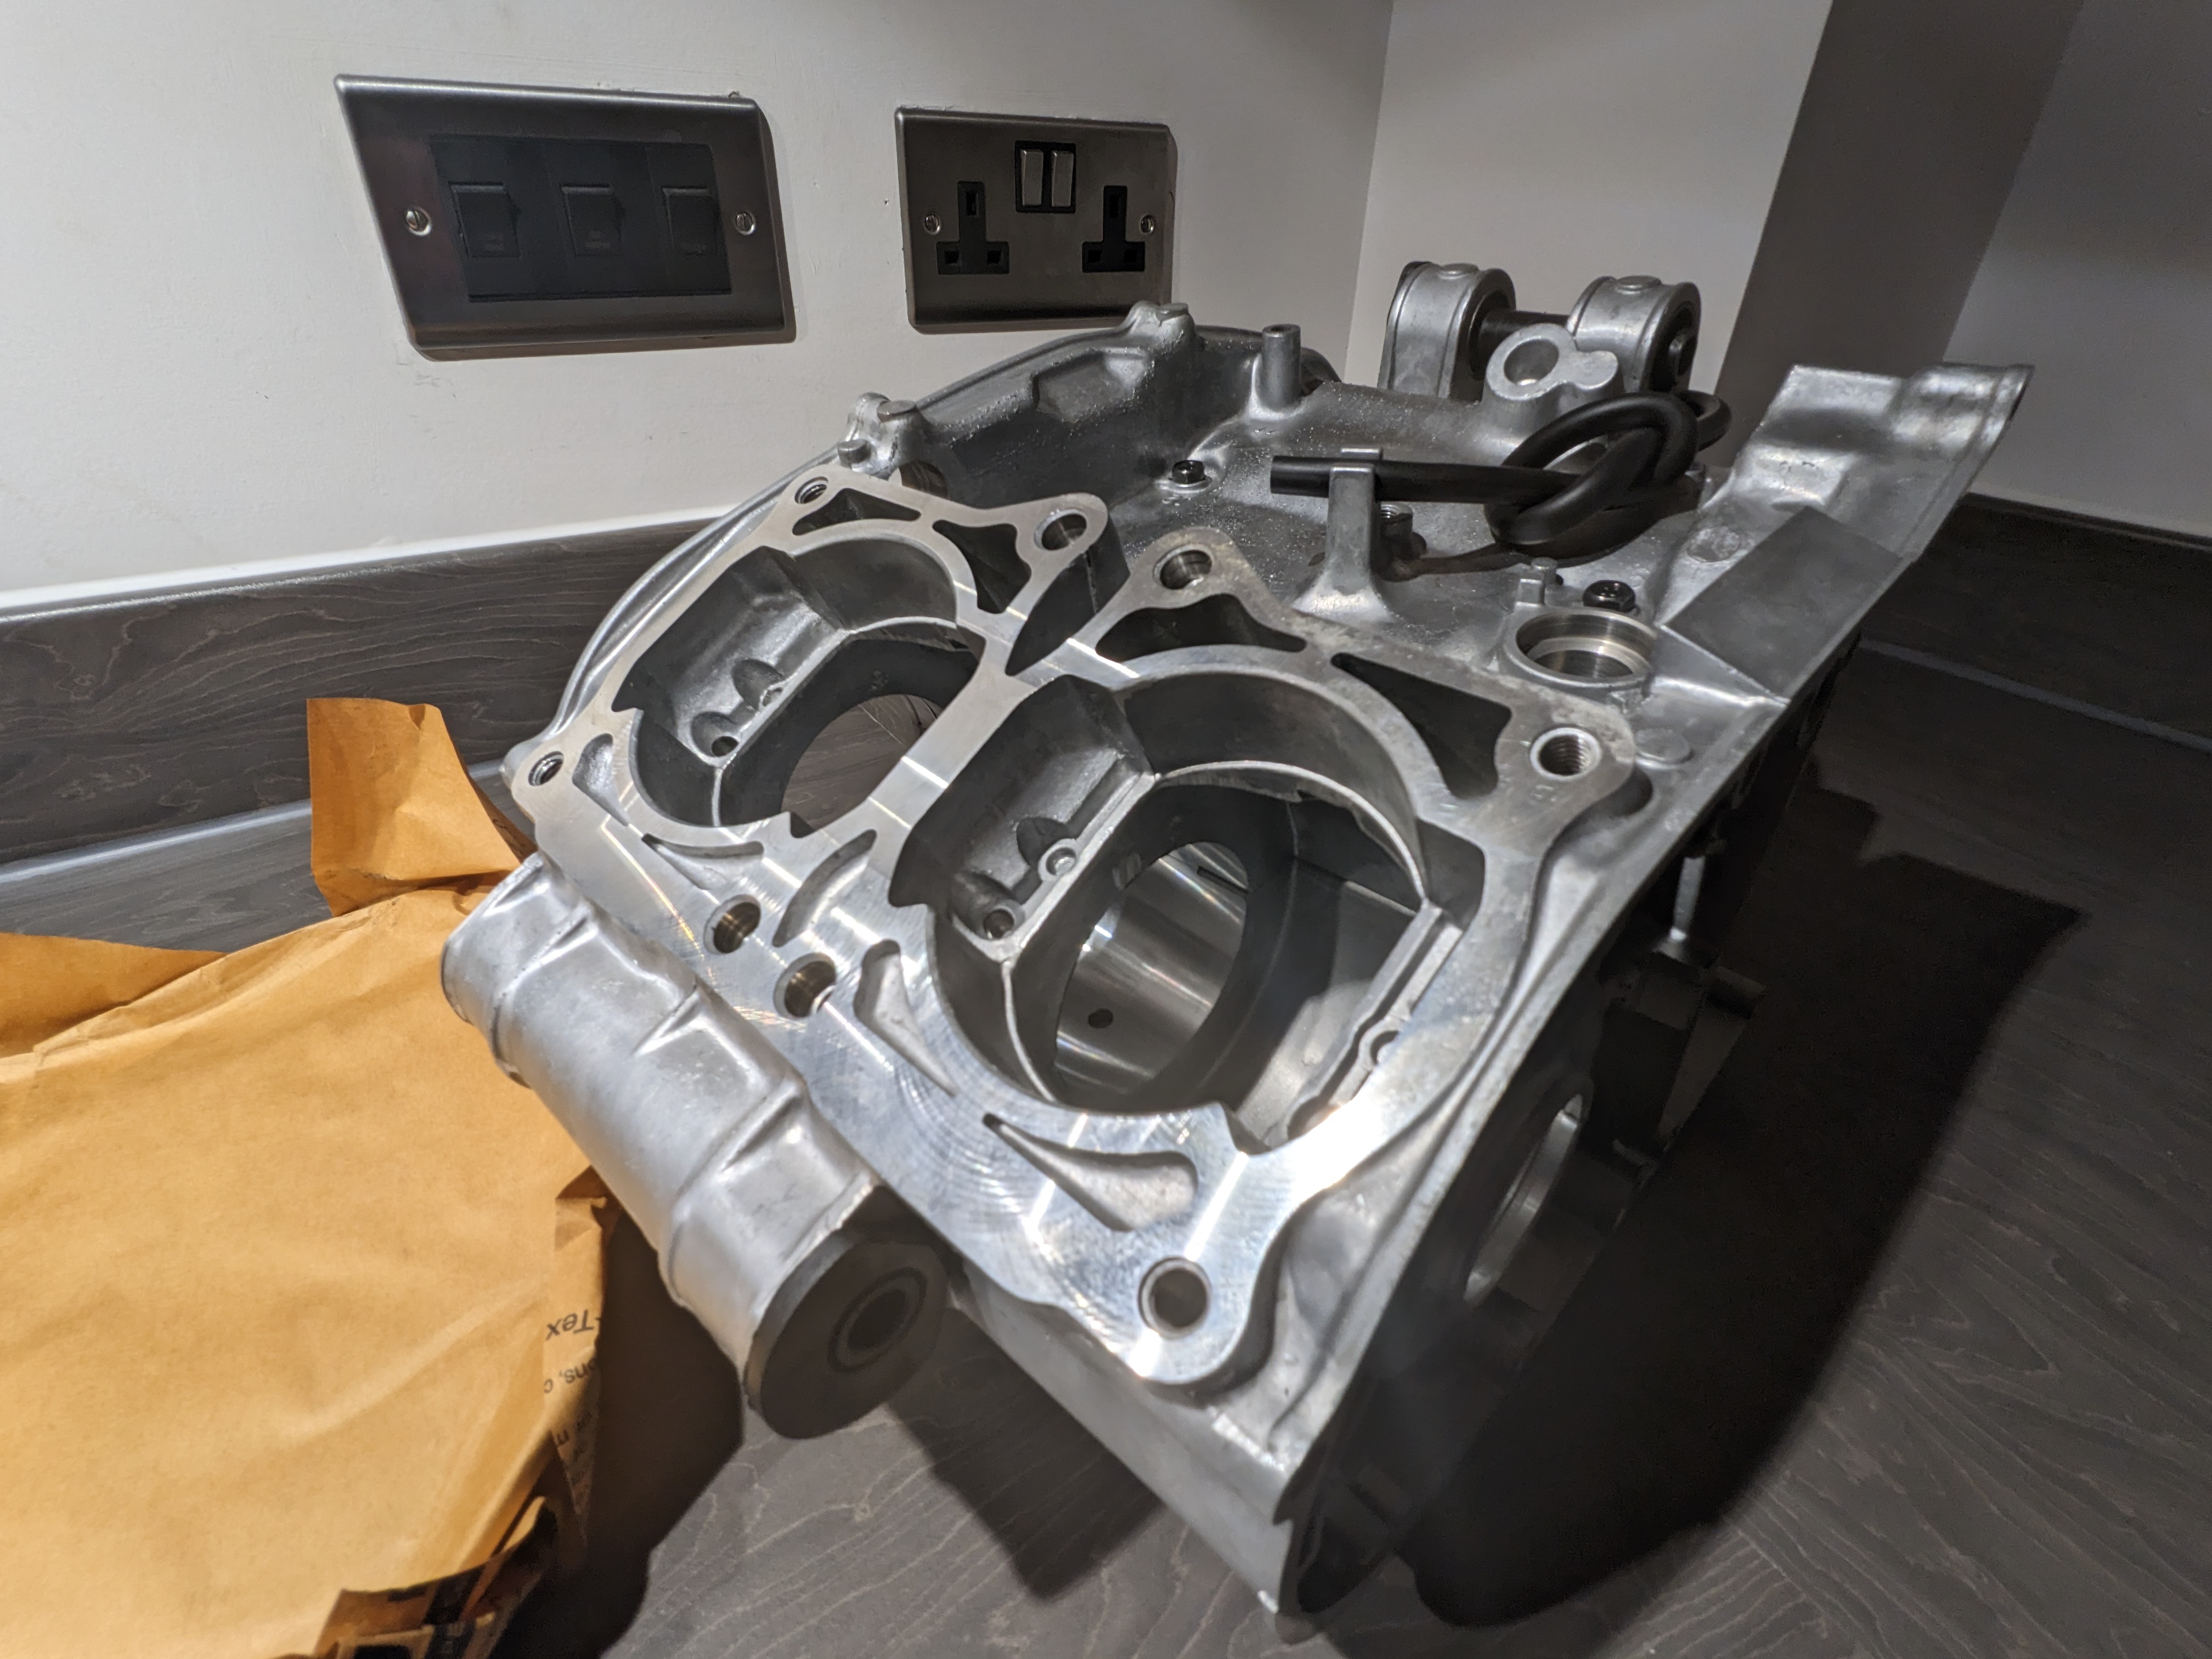
With that all said, this month I took stock of my inventory and I came to realise that I had virtually all of what I needed to close the crankcases up on my Banshee 350 motor, in preparation of assembling the Athena 392 kit.
As some of you may know, there is free performance to be made if you port your crankcase's transfers to match the transfer ports on the cylinders. The
Yamaha RD 350/Yamaha Bansheeengines are notorious for leaving steps in between the transfers for the bottom end and the cylinders. Since I intend to run the Athena Big Bore Kit, this step is even more exacerbated.In a nut shell, here I'll be marking out this discrepancy using some
Dykem Blueengineering fluid, then scoring a visible outline using myFacom Scribeand then with my die grinder, porting the bottom end to match.For reference again, the engine cases I bought were brand new direct from Yamaha. As such this gives a good example of how much, unmolested cases need to be grinded away.
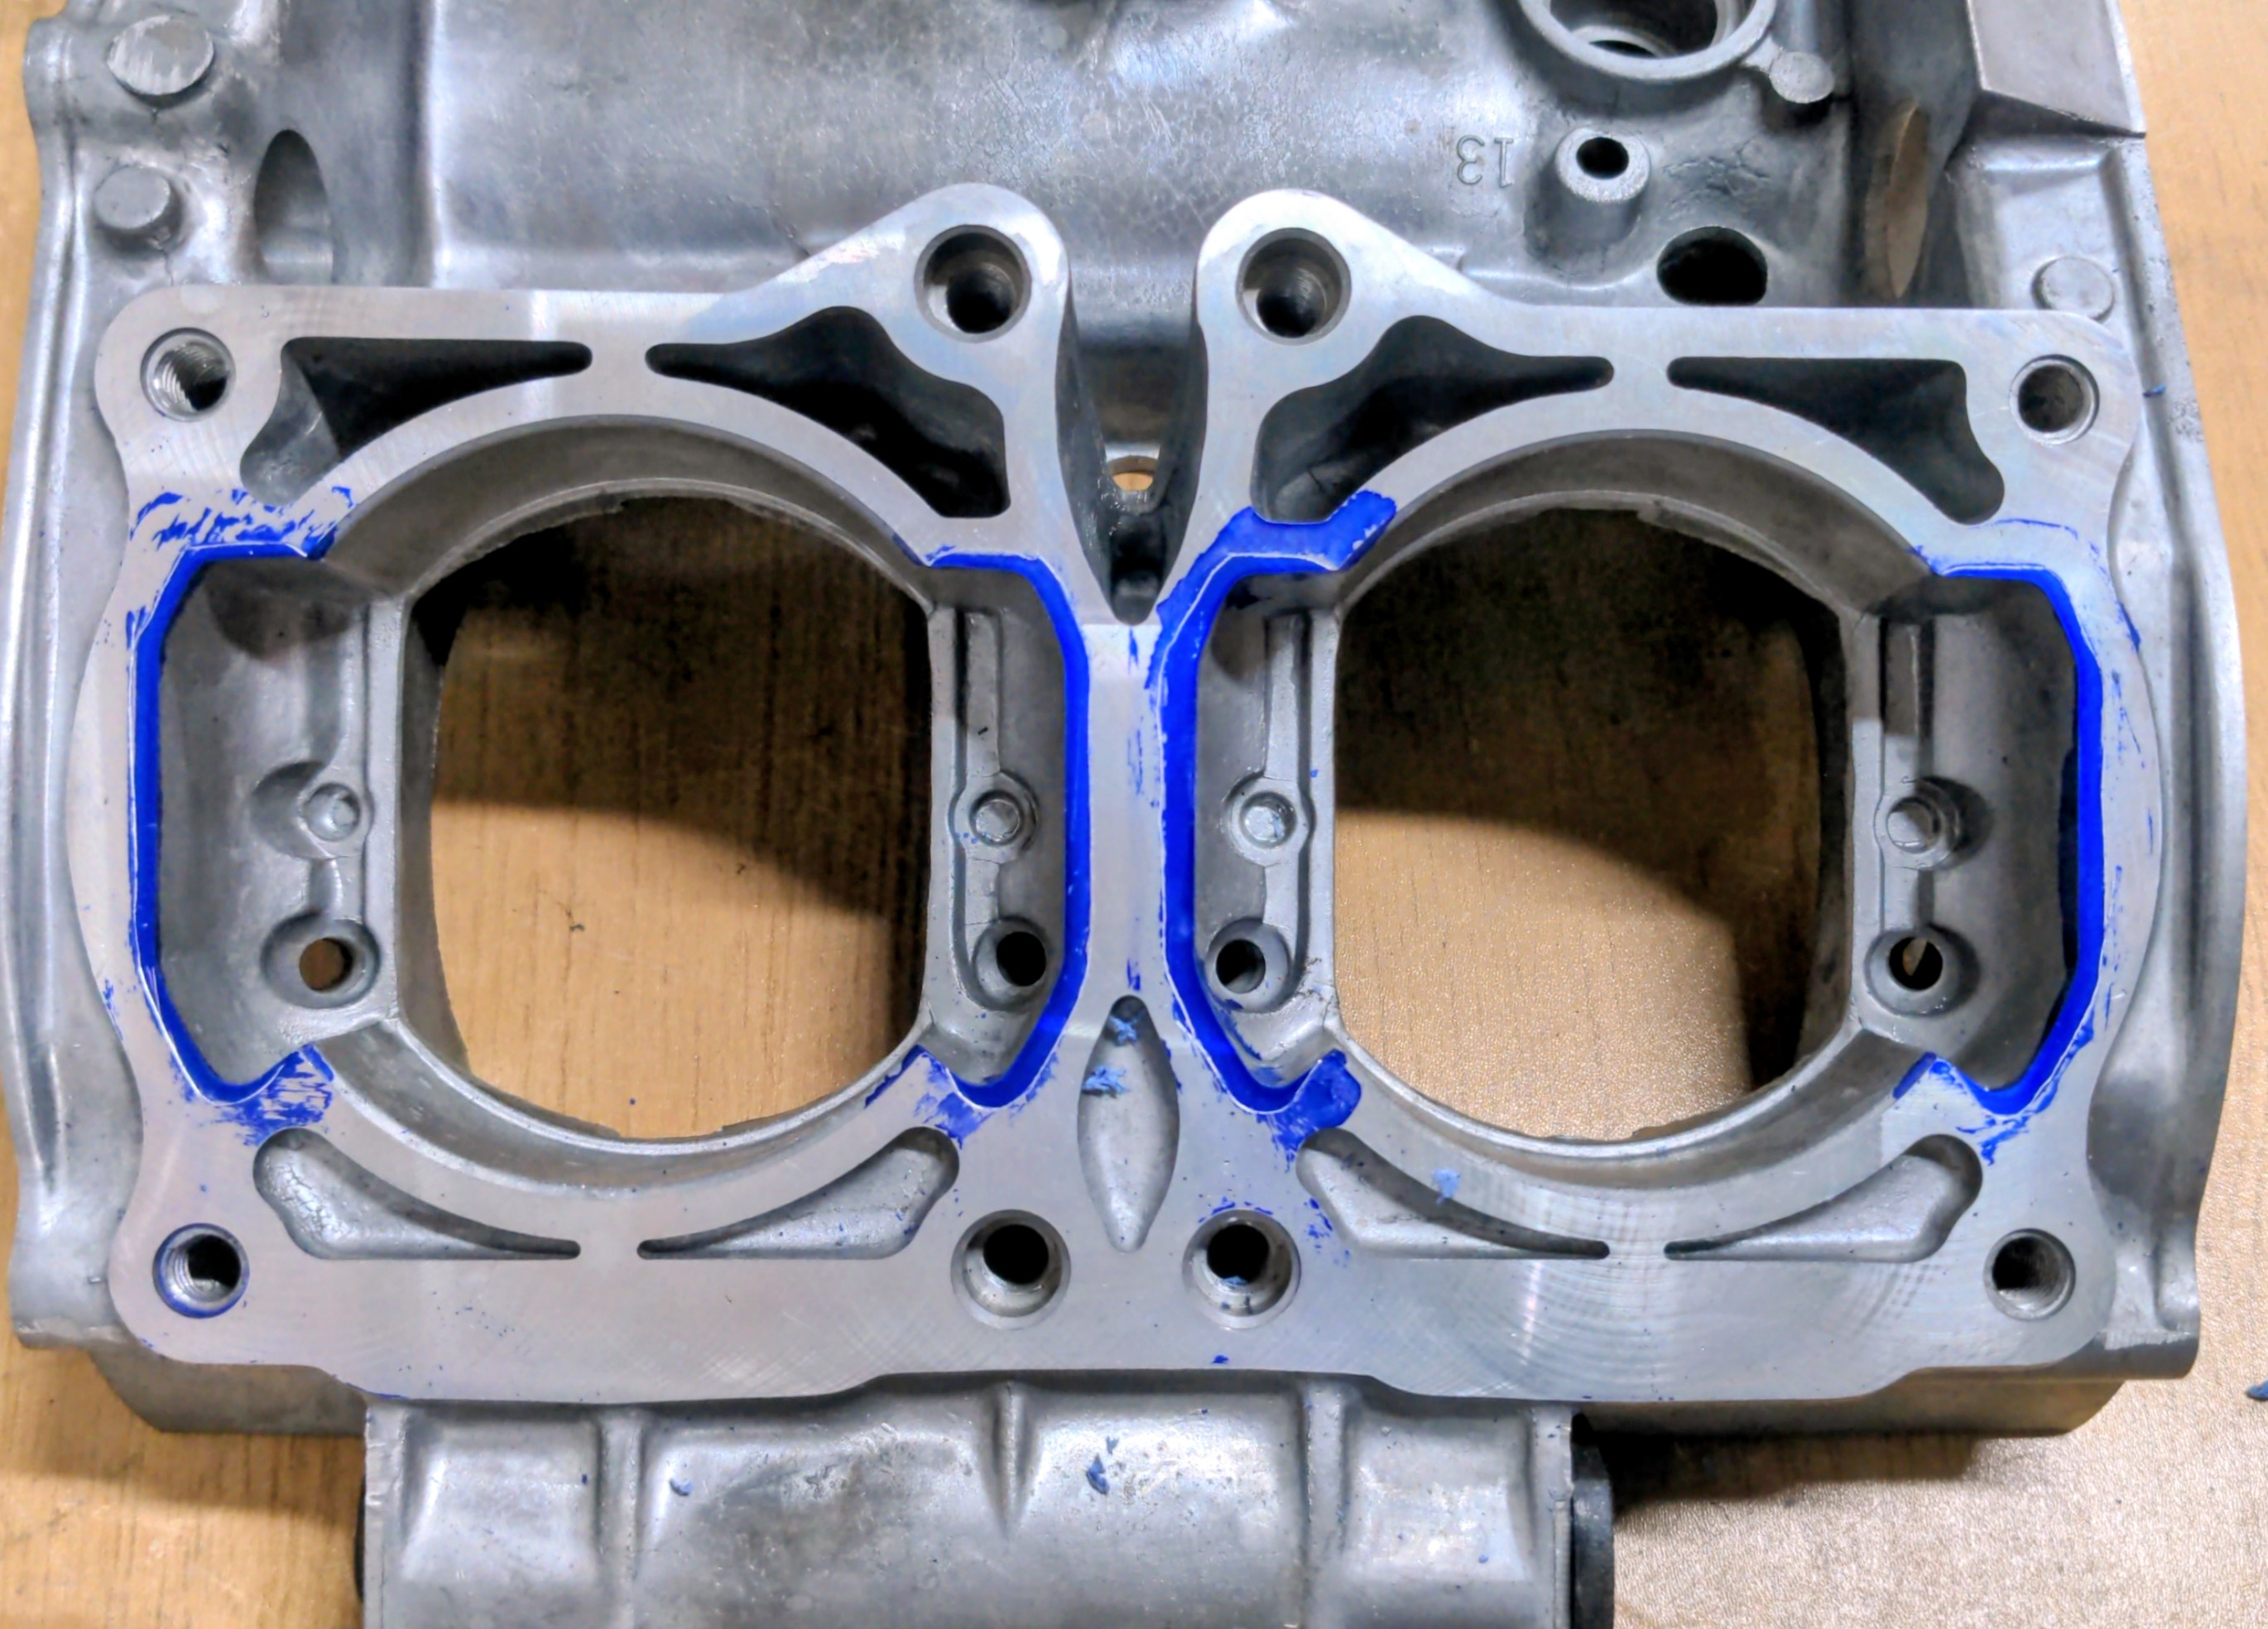
You can get a rough idea of what needs to be cut by overlaying the gasket over the bottom end and marking out the material that needs cutting out.
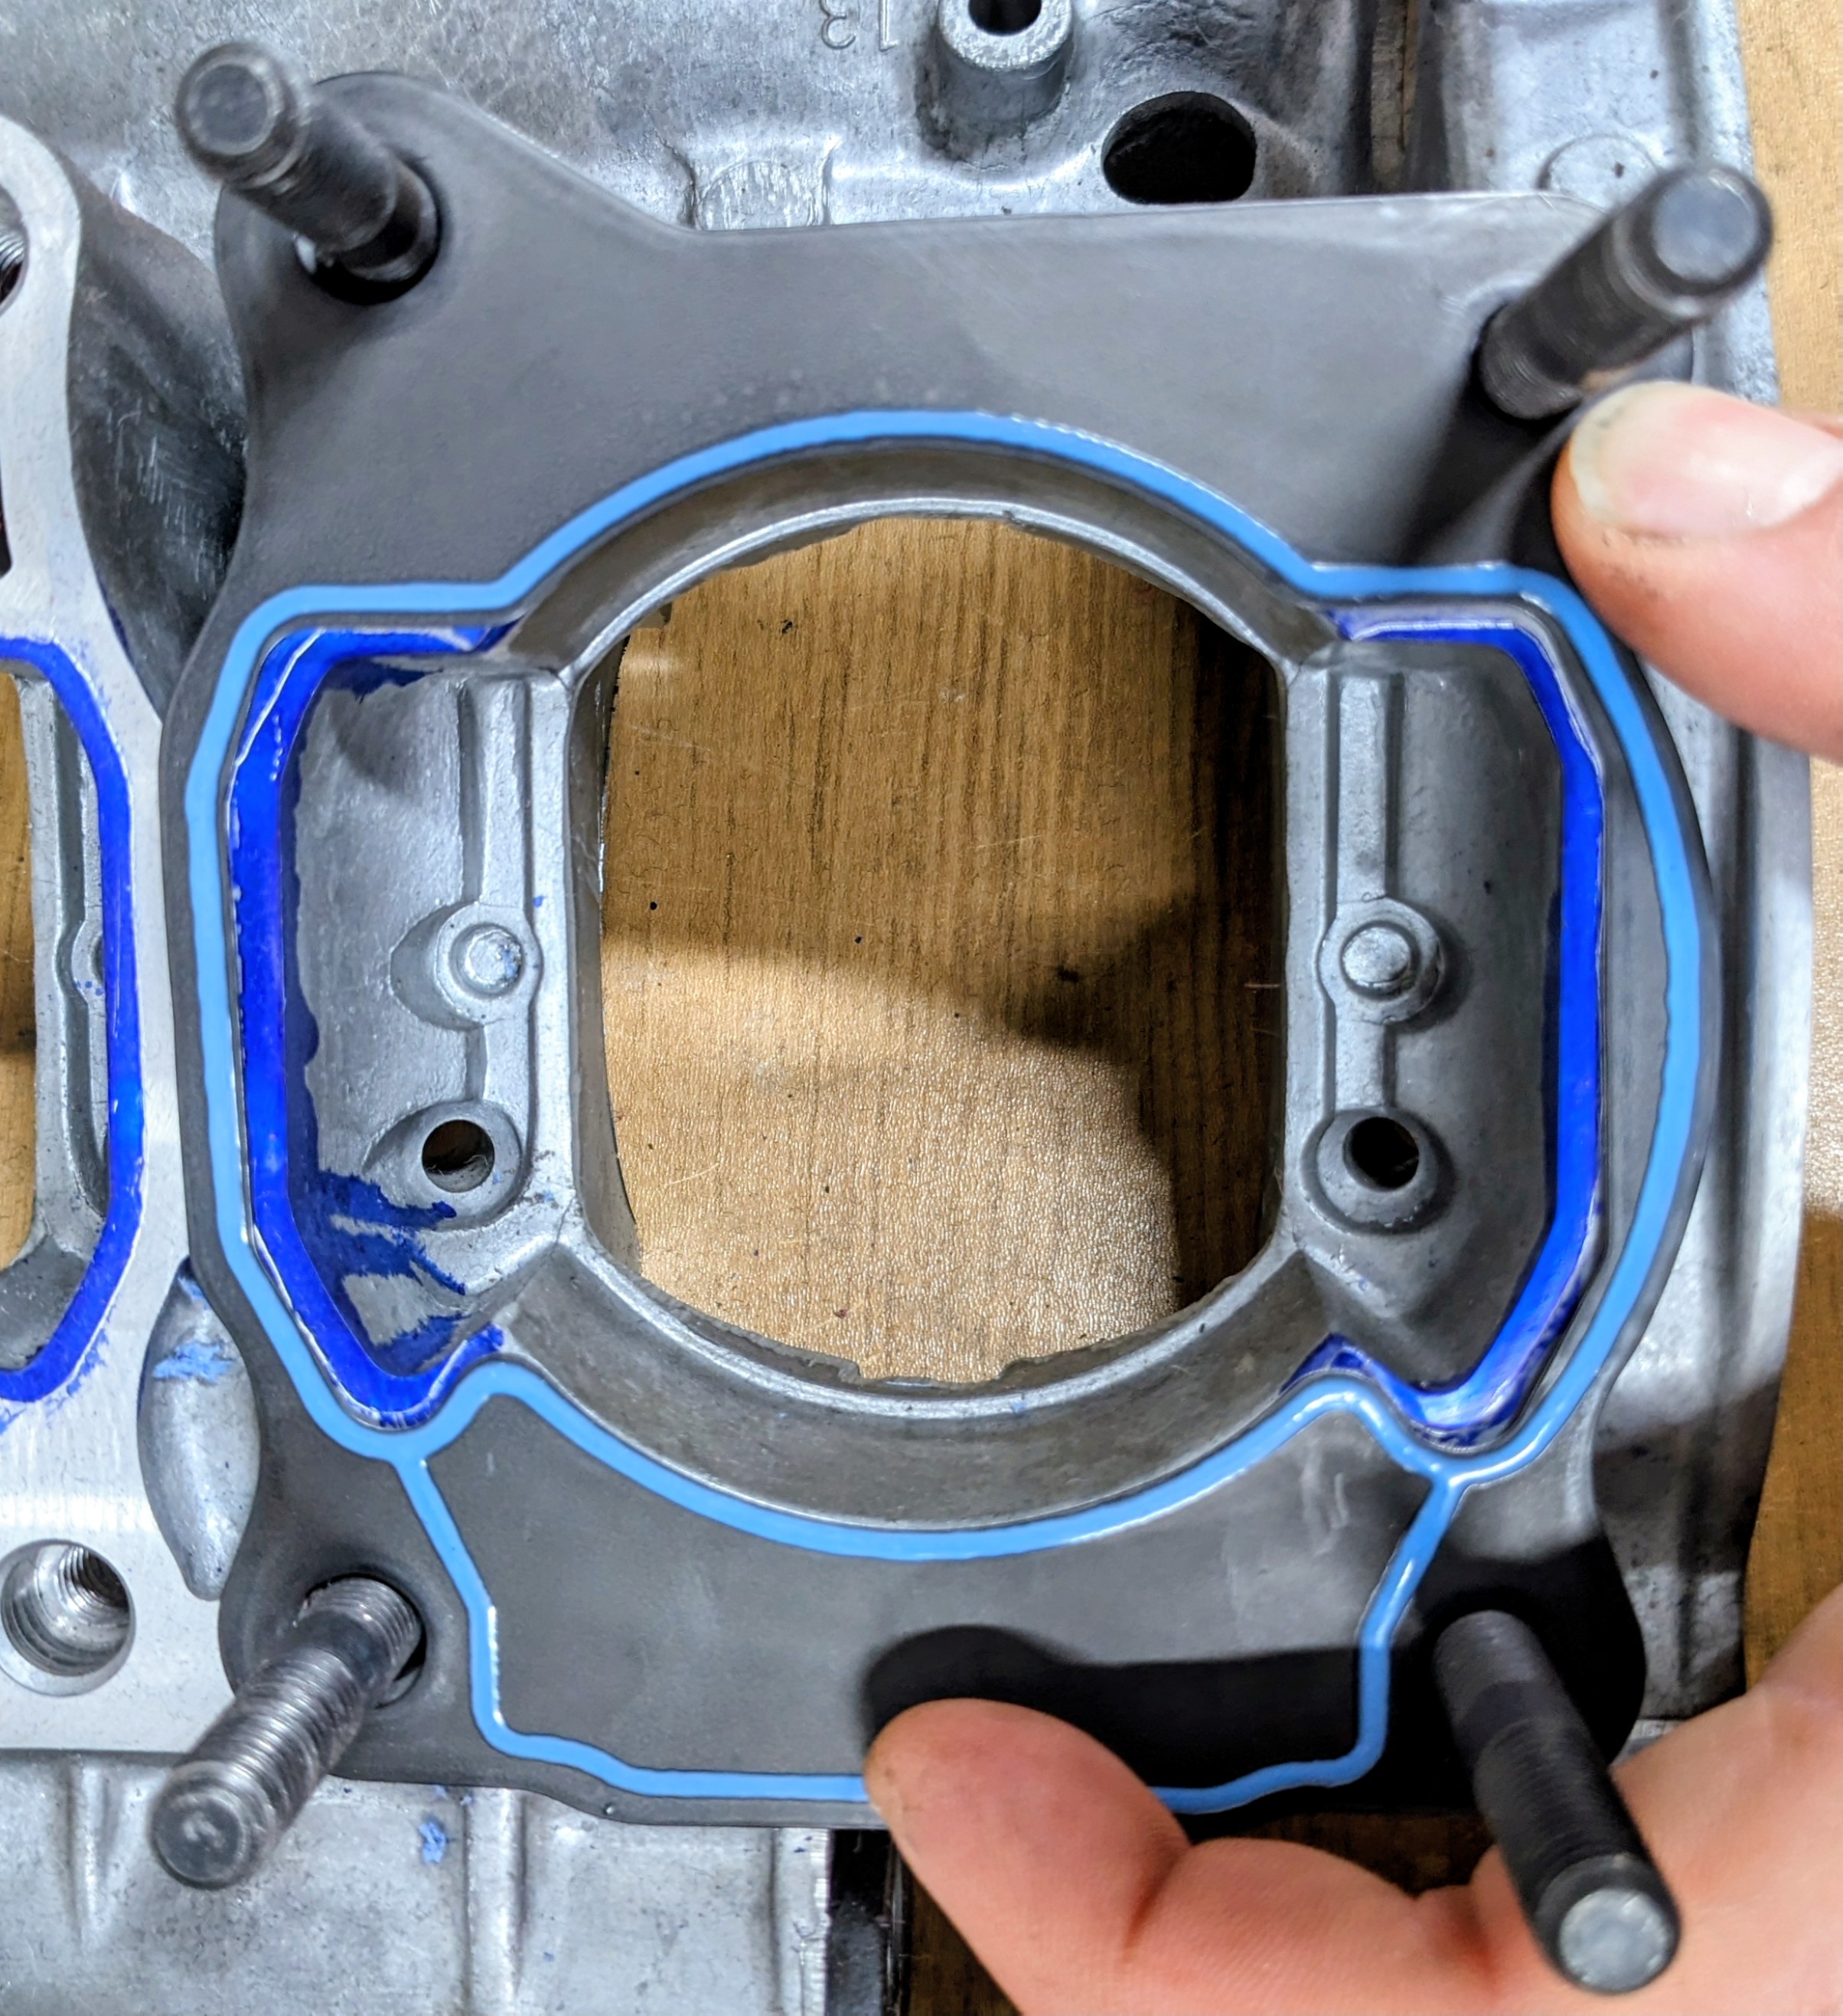
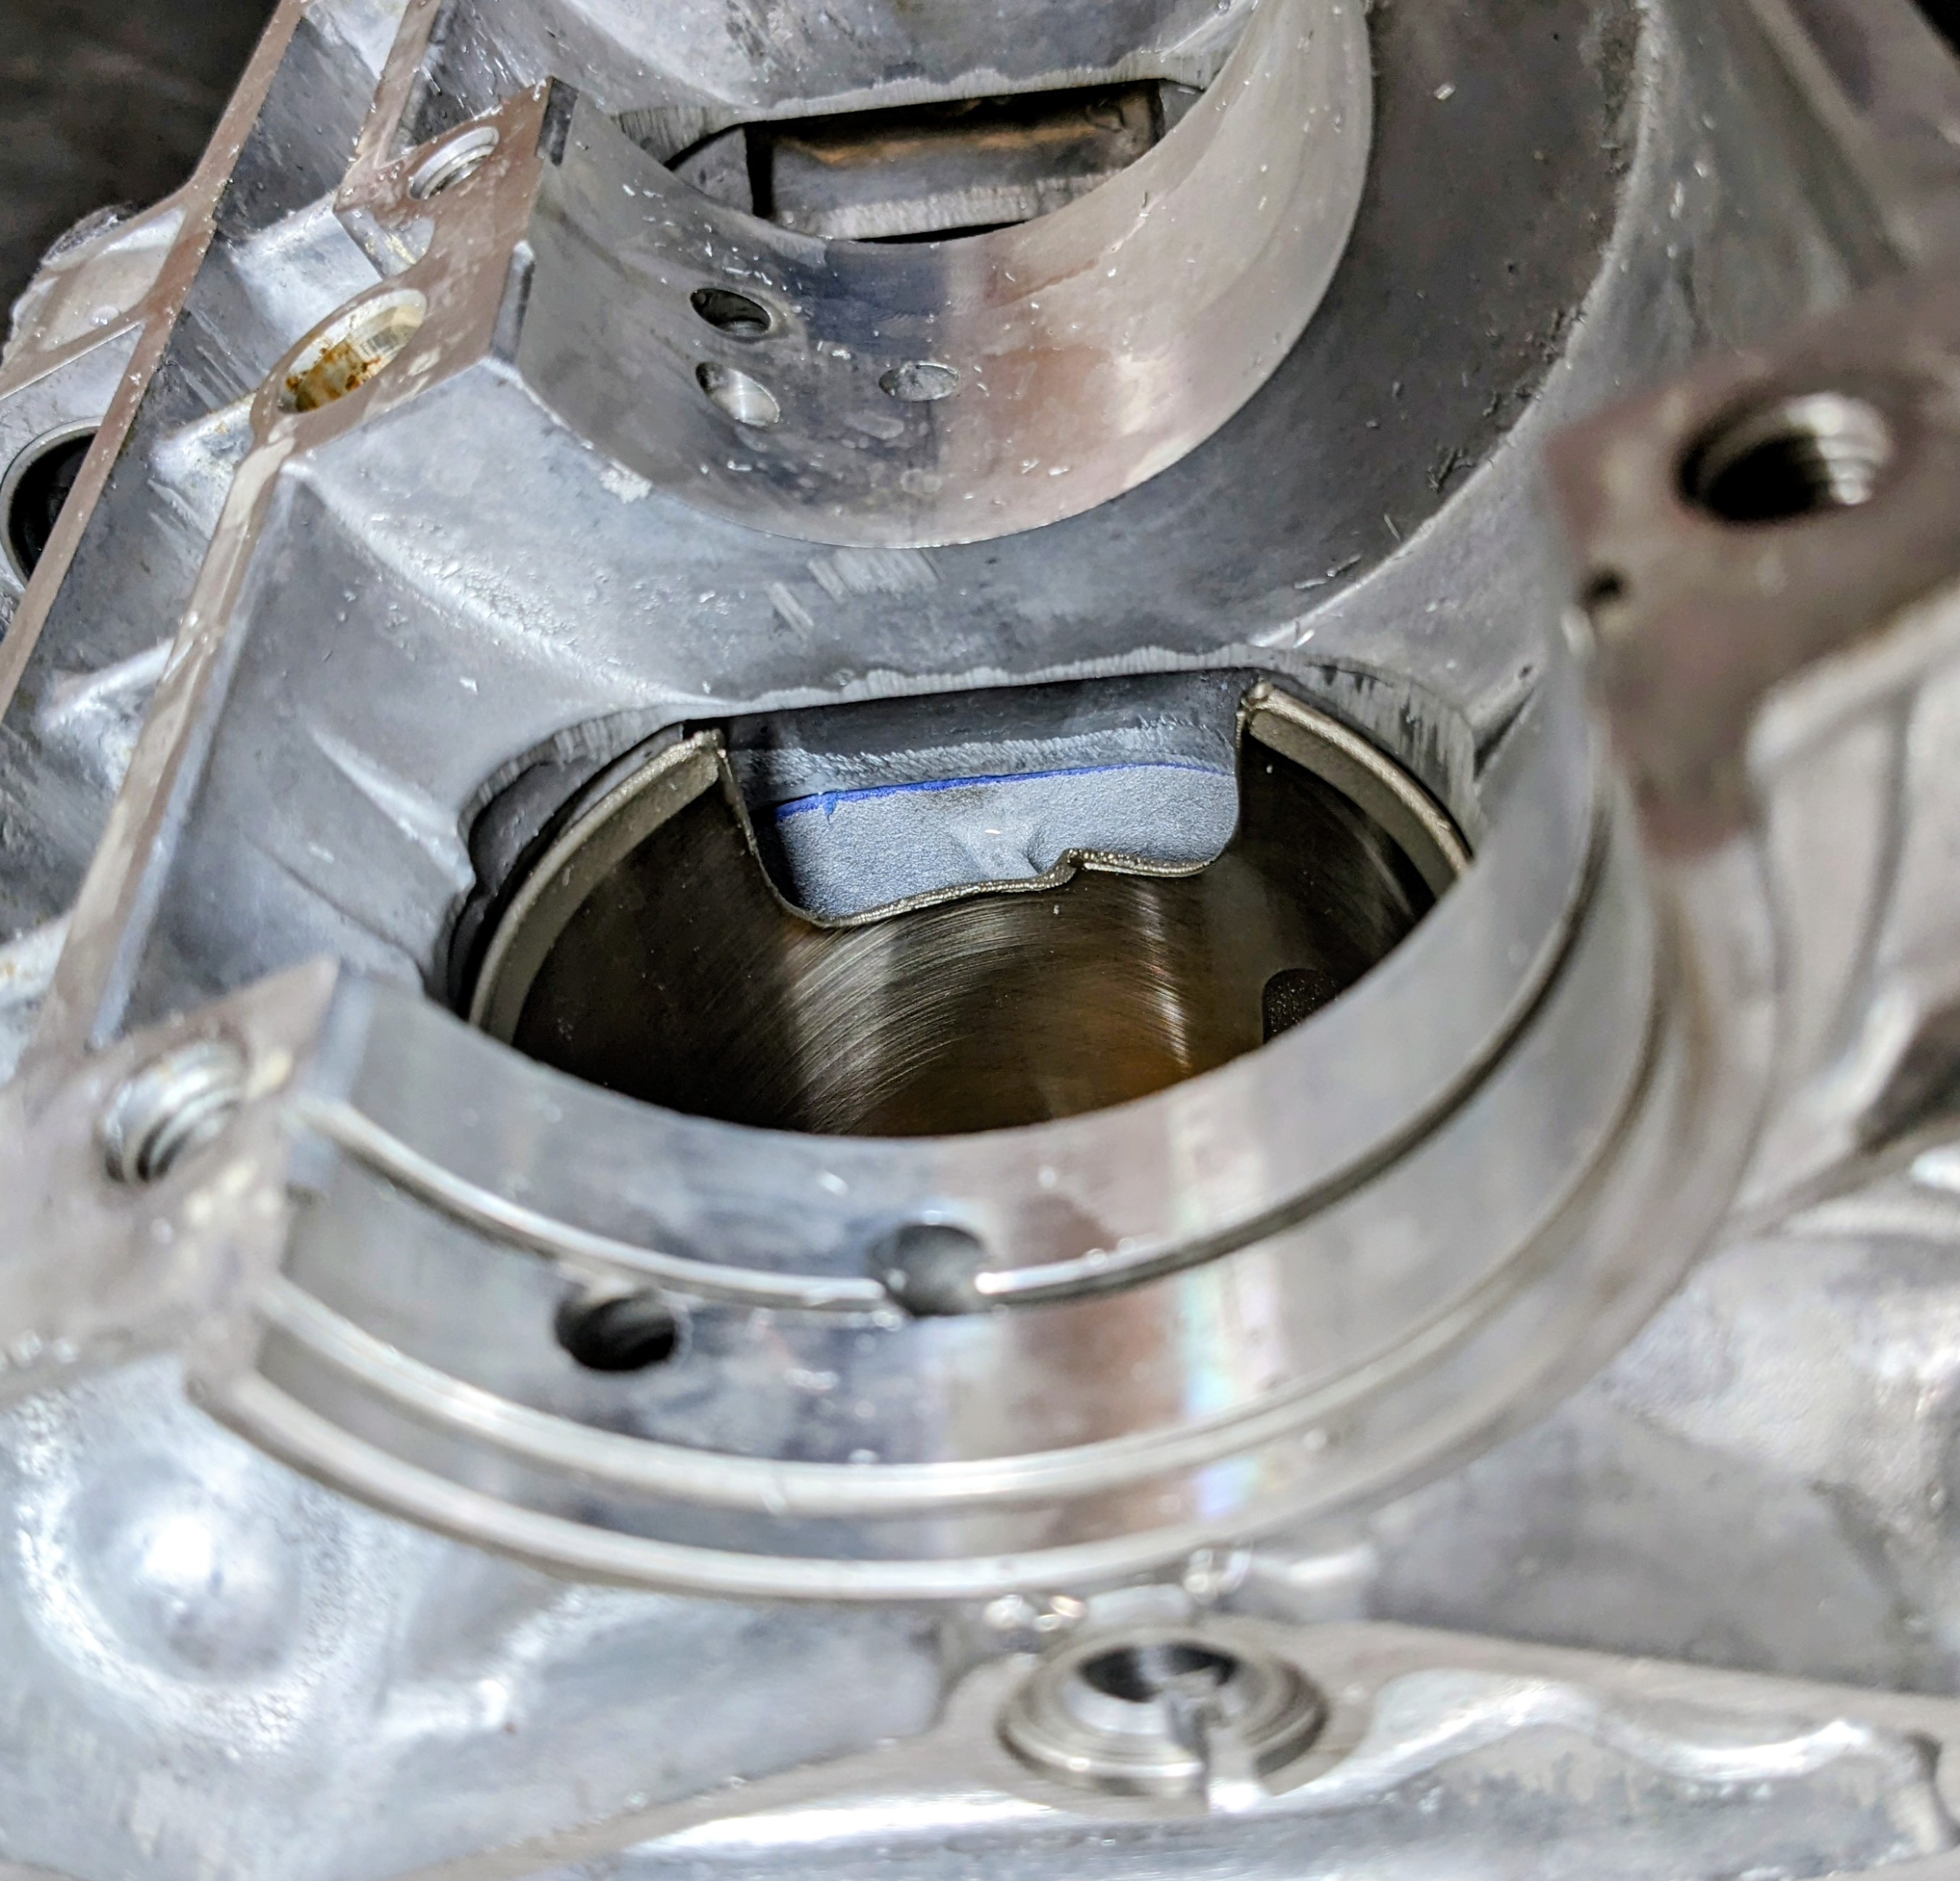
In my cases, I painted on the
Dykem Blueand assembled the cylinder to the bottom end. This squished out excess fluid and left a visible line of where the cases meet the cylinder.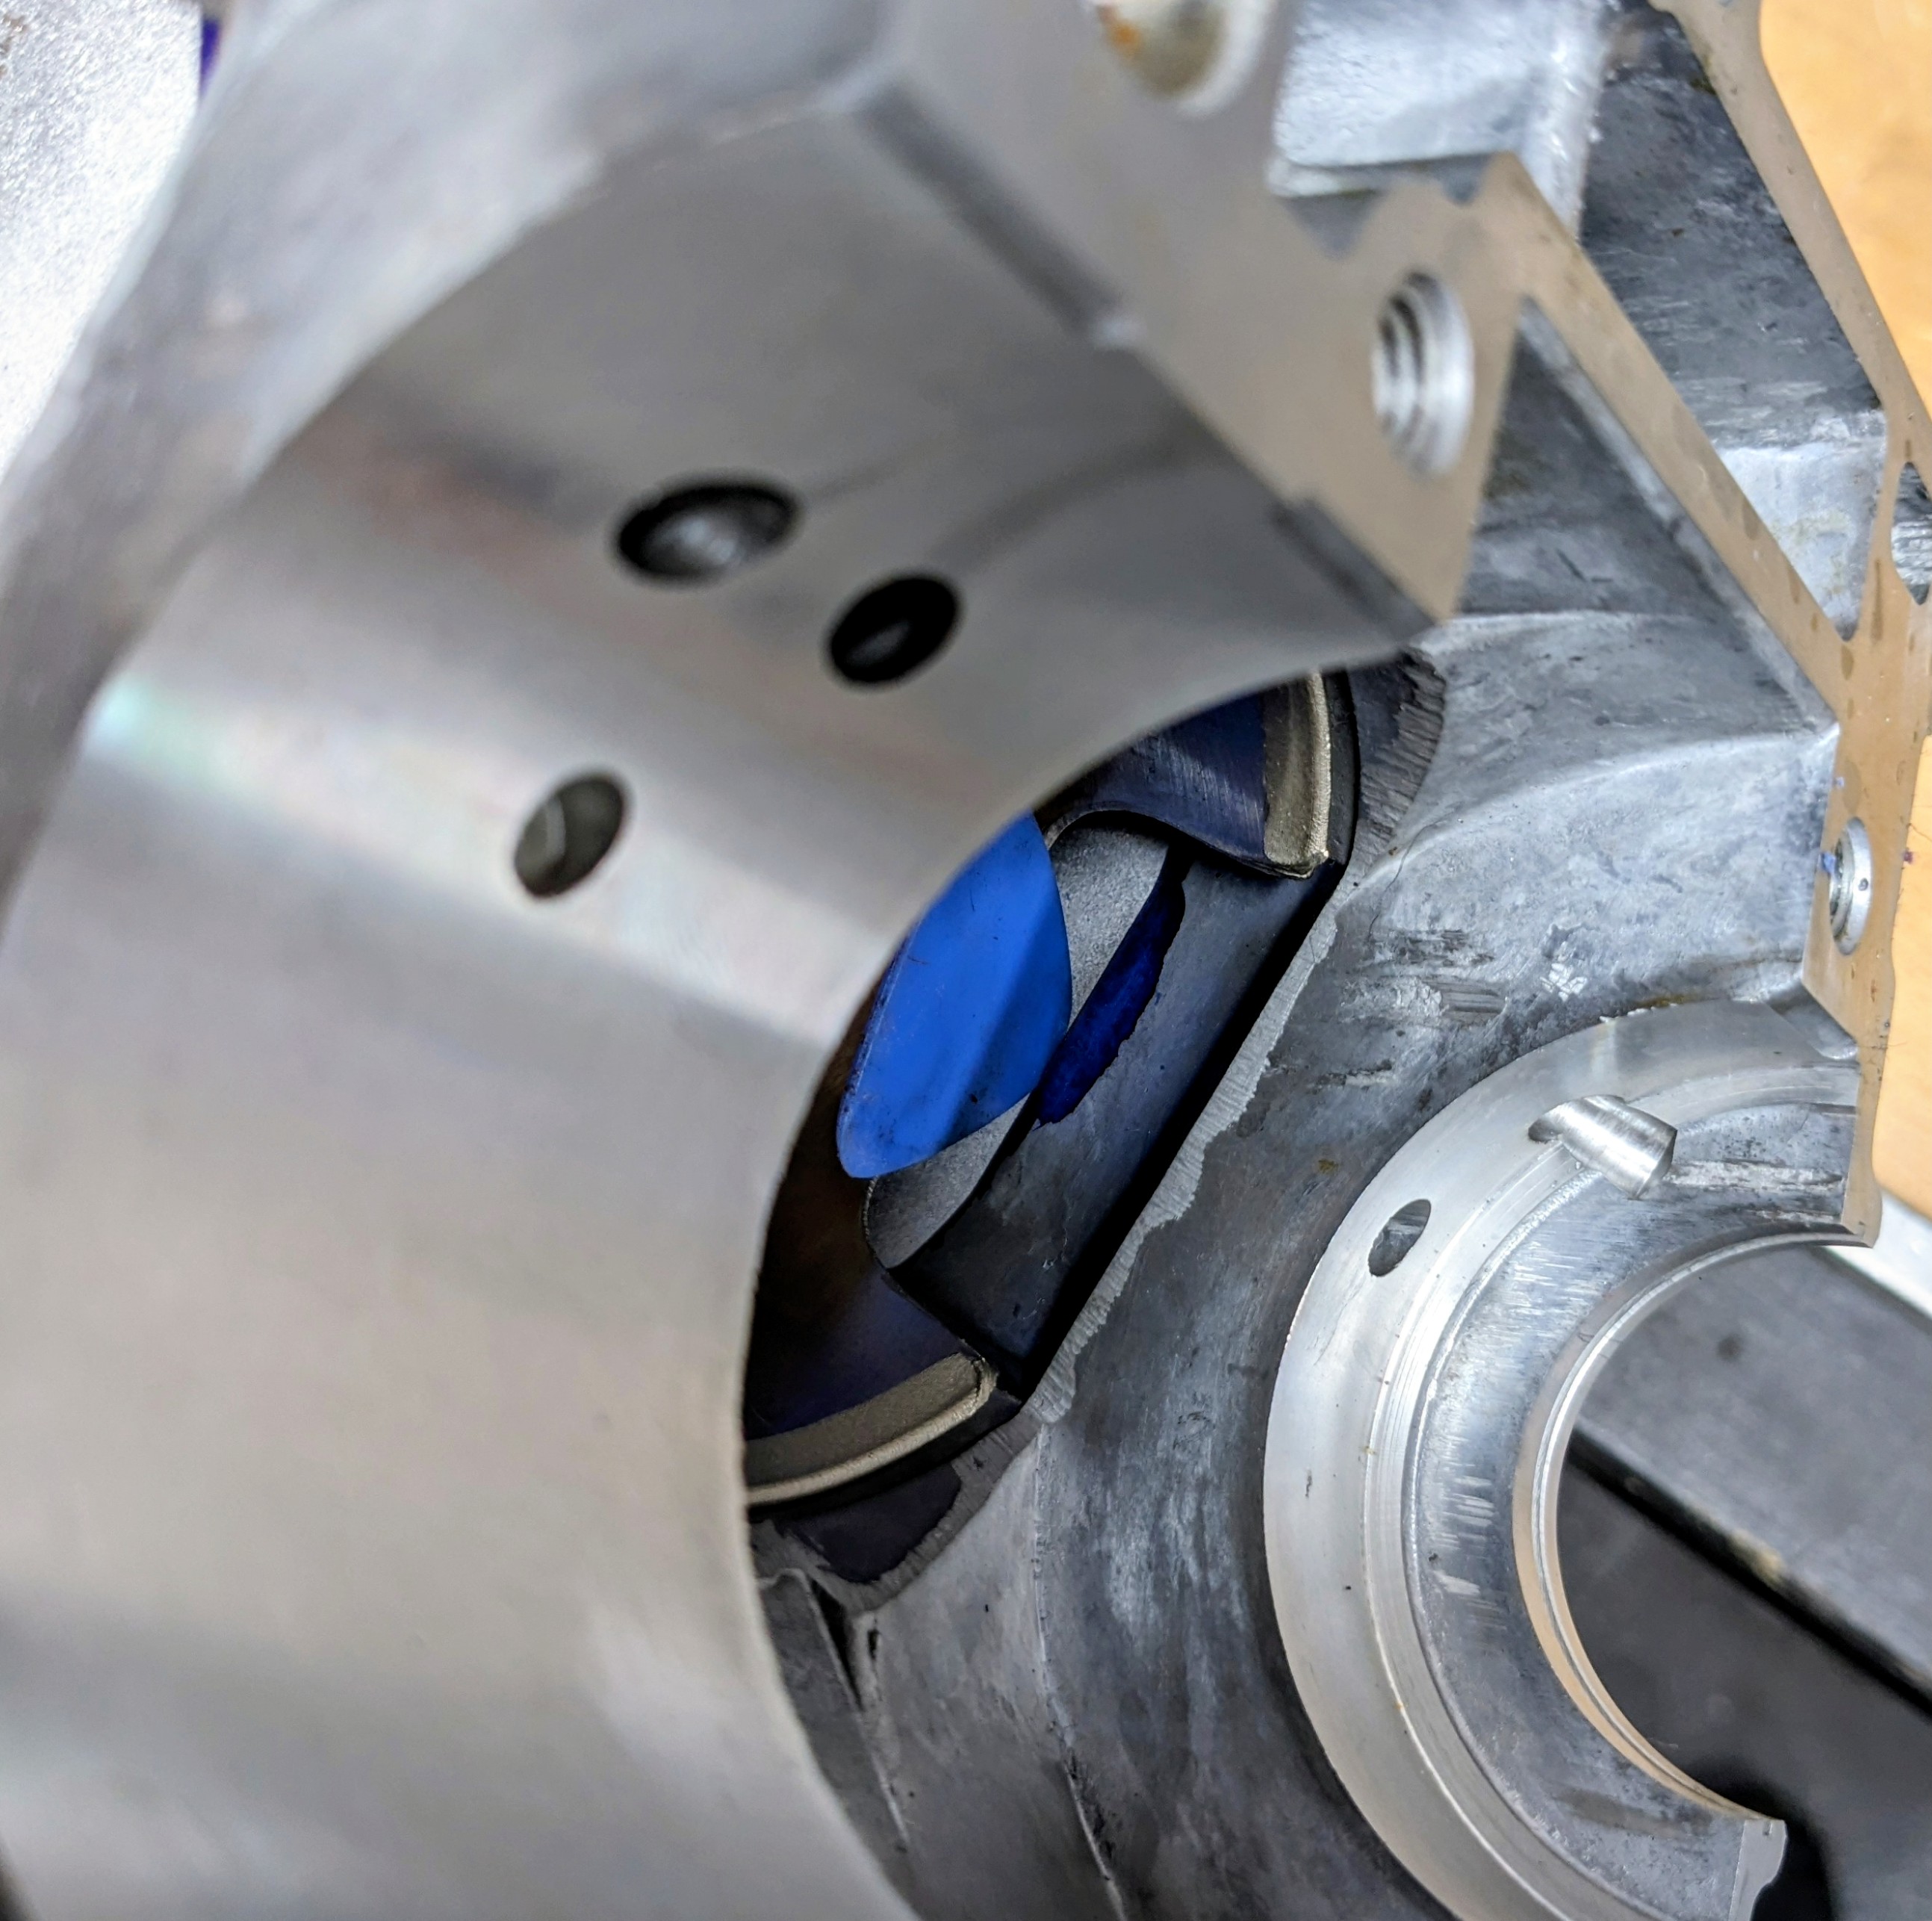
Here I've placed a guitar pick into the location of what we need to cut. There is a visible step here that should be machined away using a die grinder.

To ease the cutting process, I've washed away any excess
Dykem Bluefluid and scribed a distinct line for where I want to cut up to.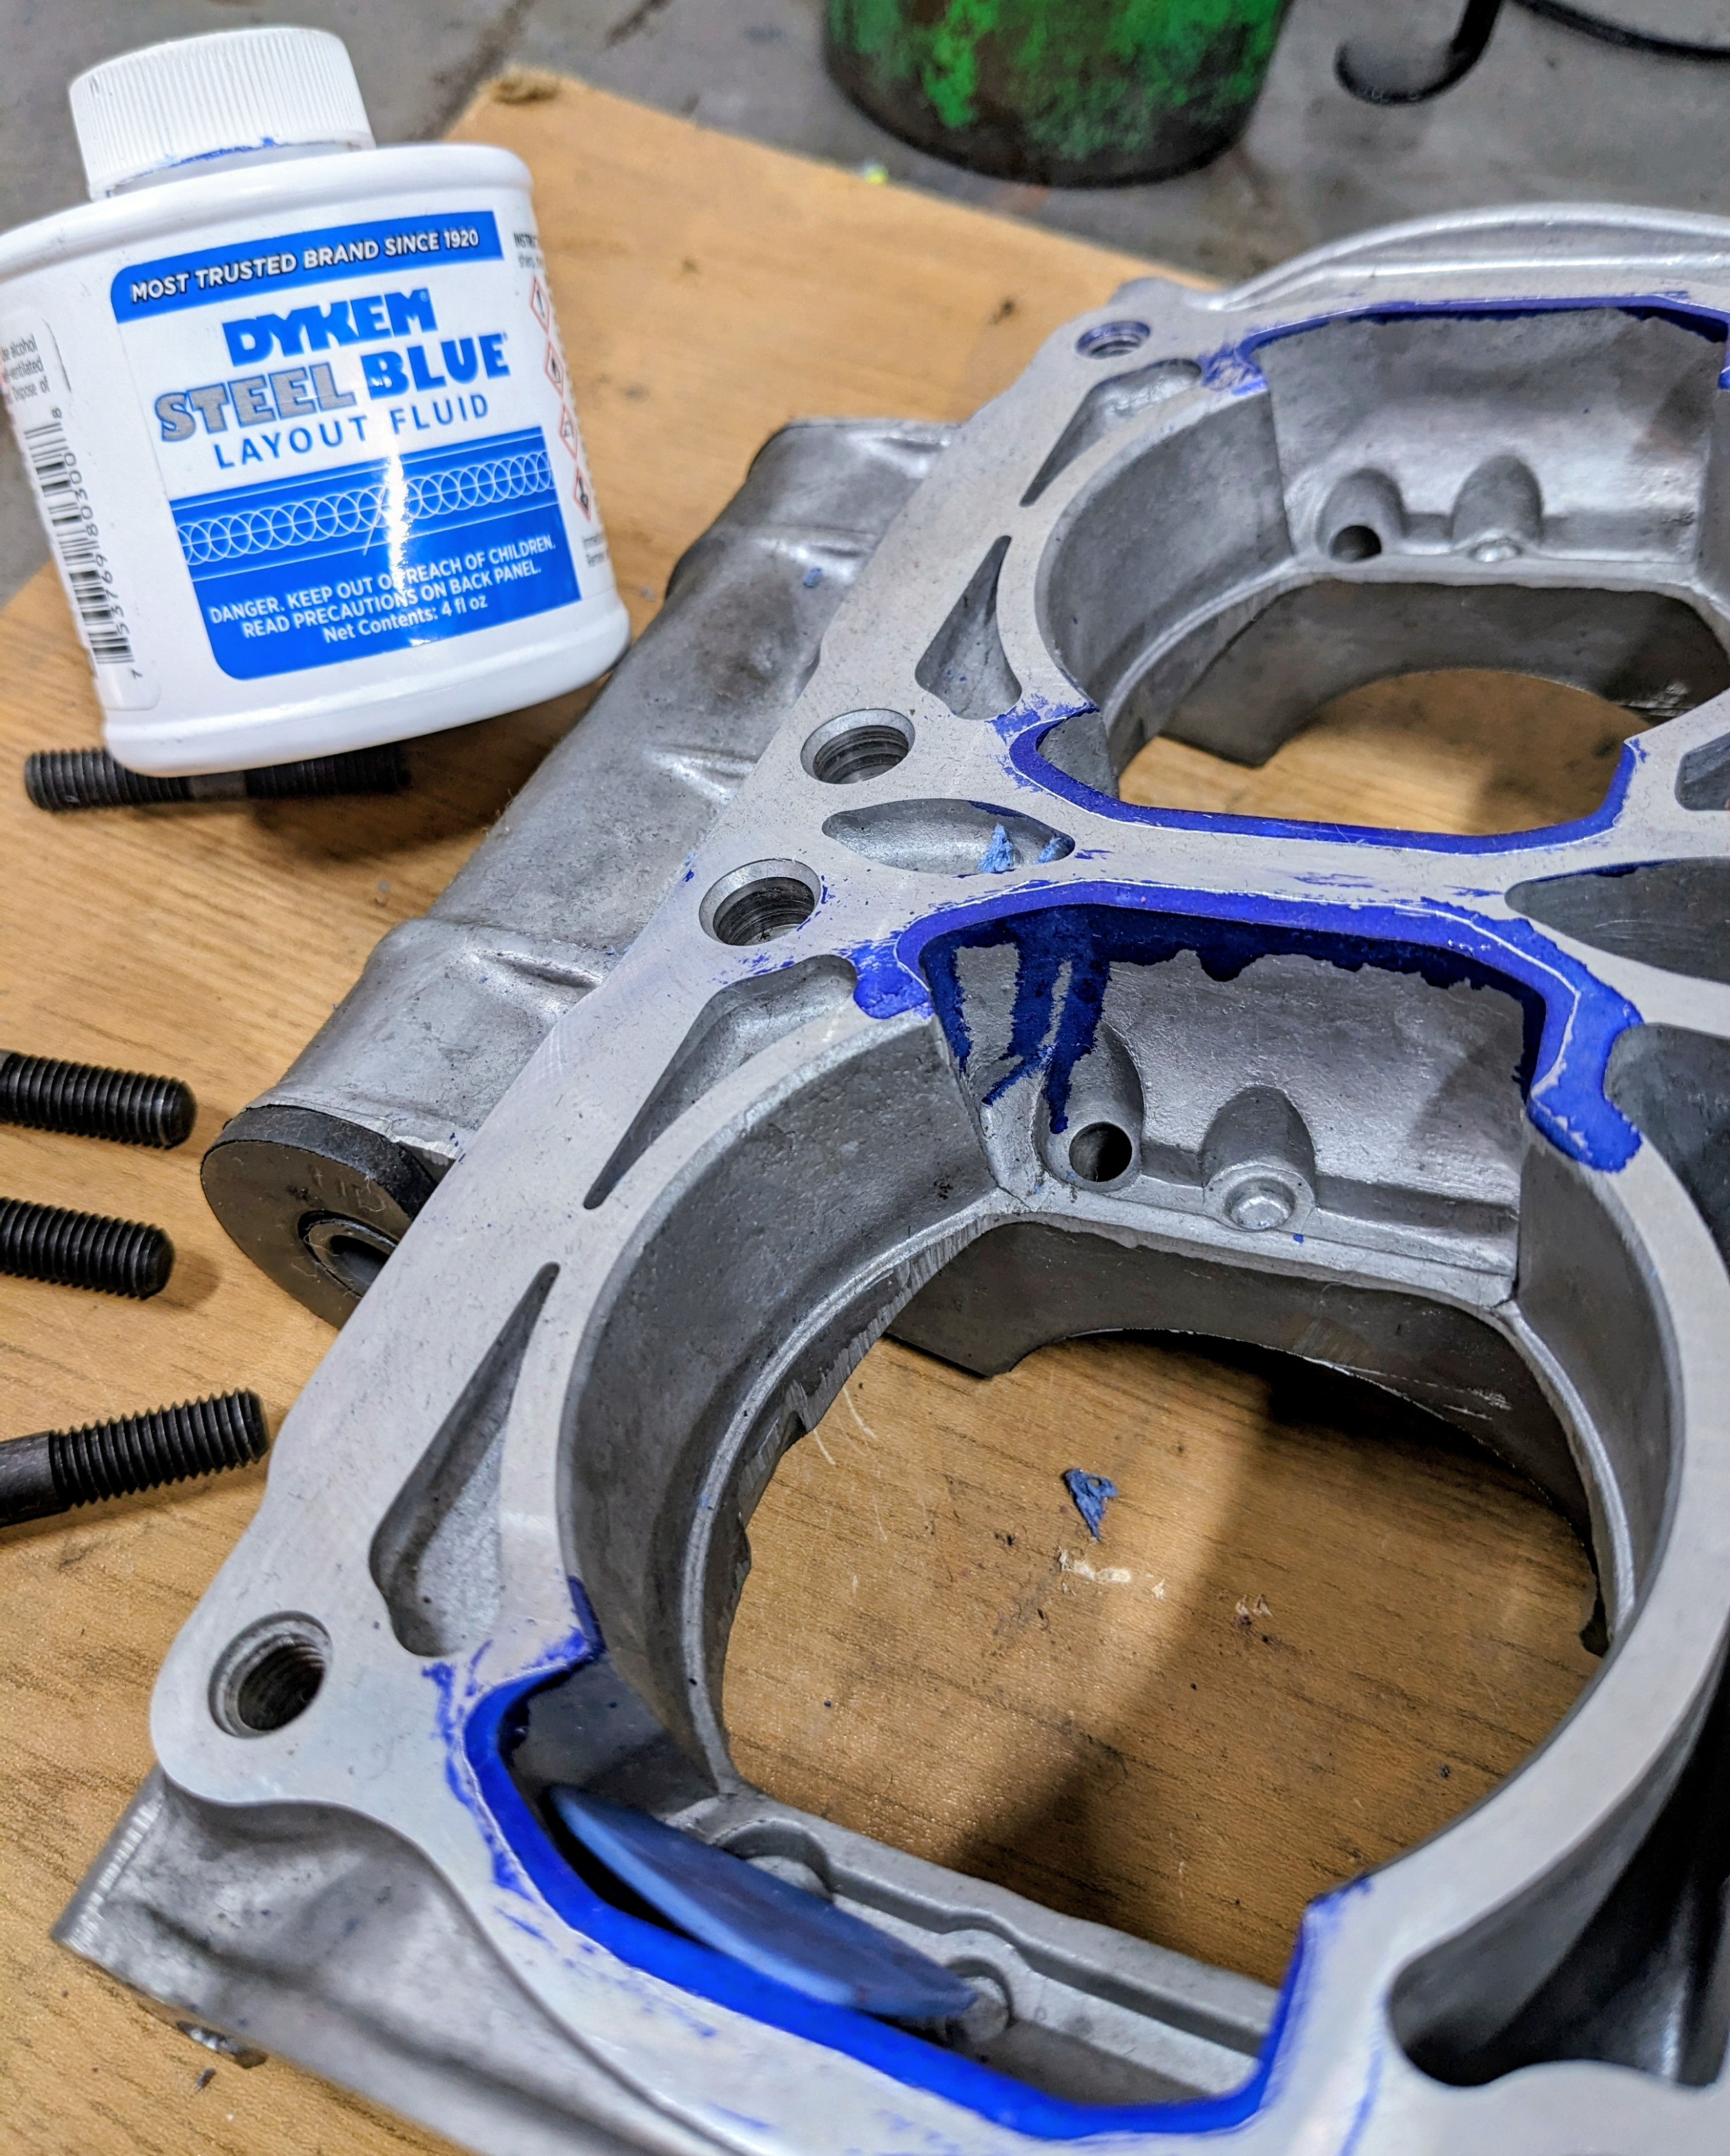
With all the appropriate markings made out, it's time to grab the die grinder and port the bottom end to match.


I'm using a
Rounded Tree Shapegold coated carbide burr. It's coarse flute geometry and titanium nitrate coating prevent the flutes from becoming clogged up and essentially cut through the alumiunium like butter.
In only a matter of seconds I've roughly cut out the intended shape.
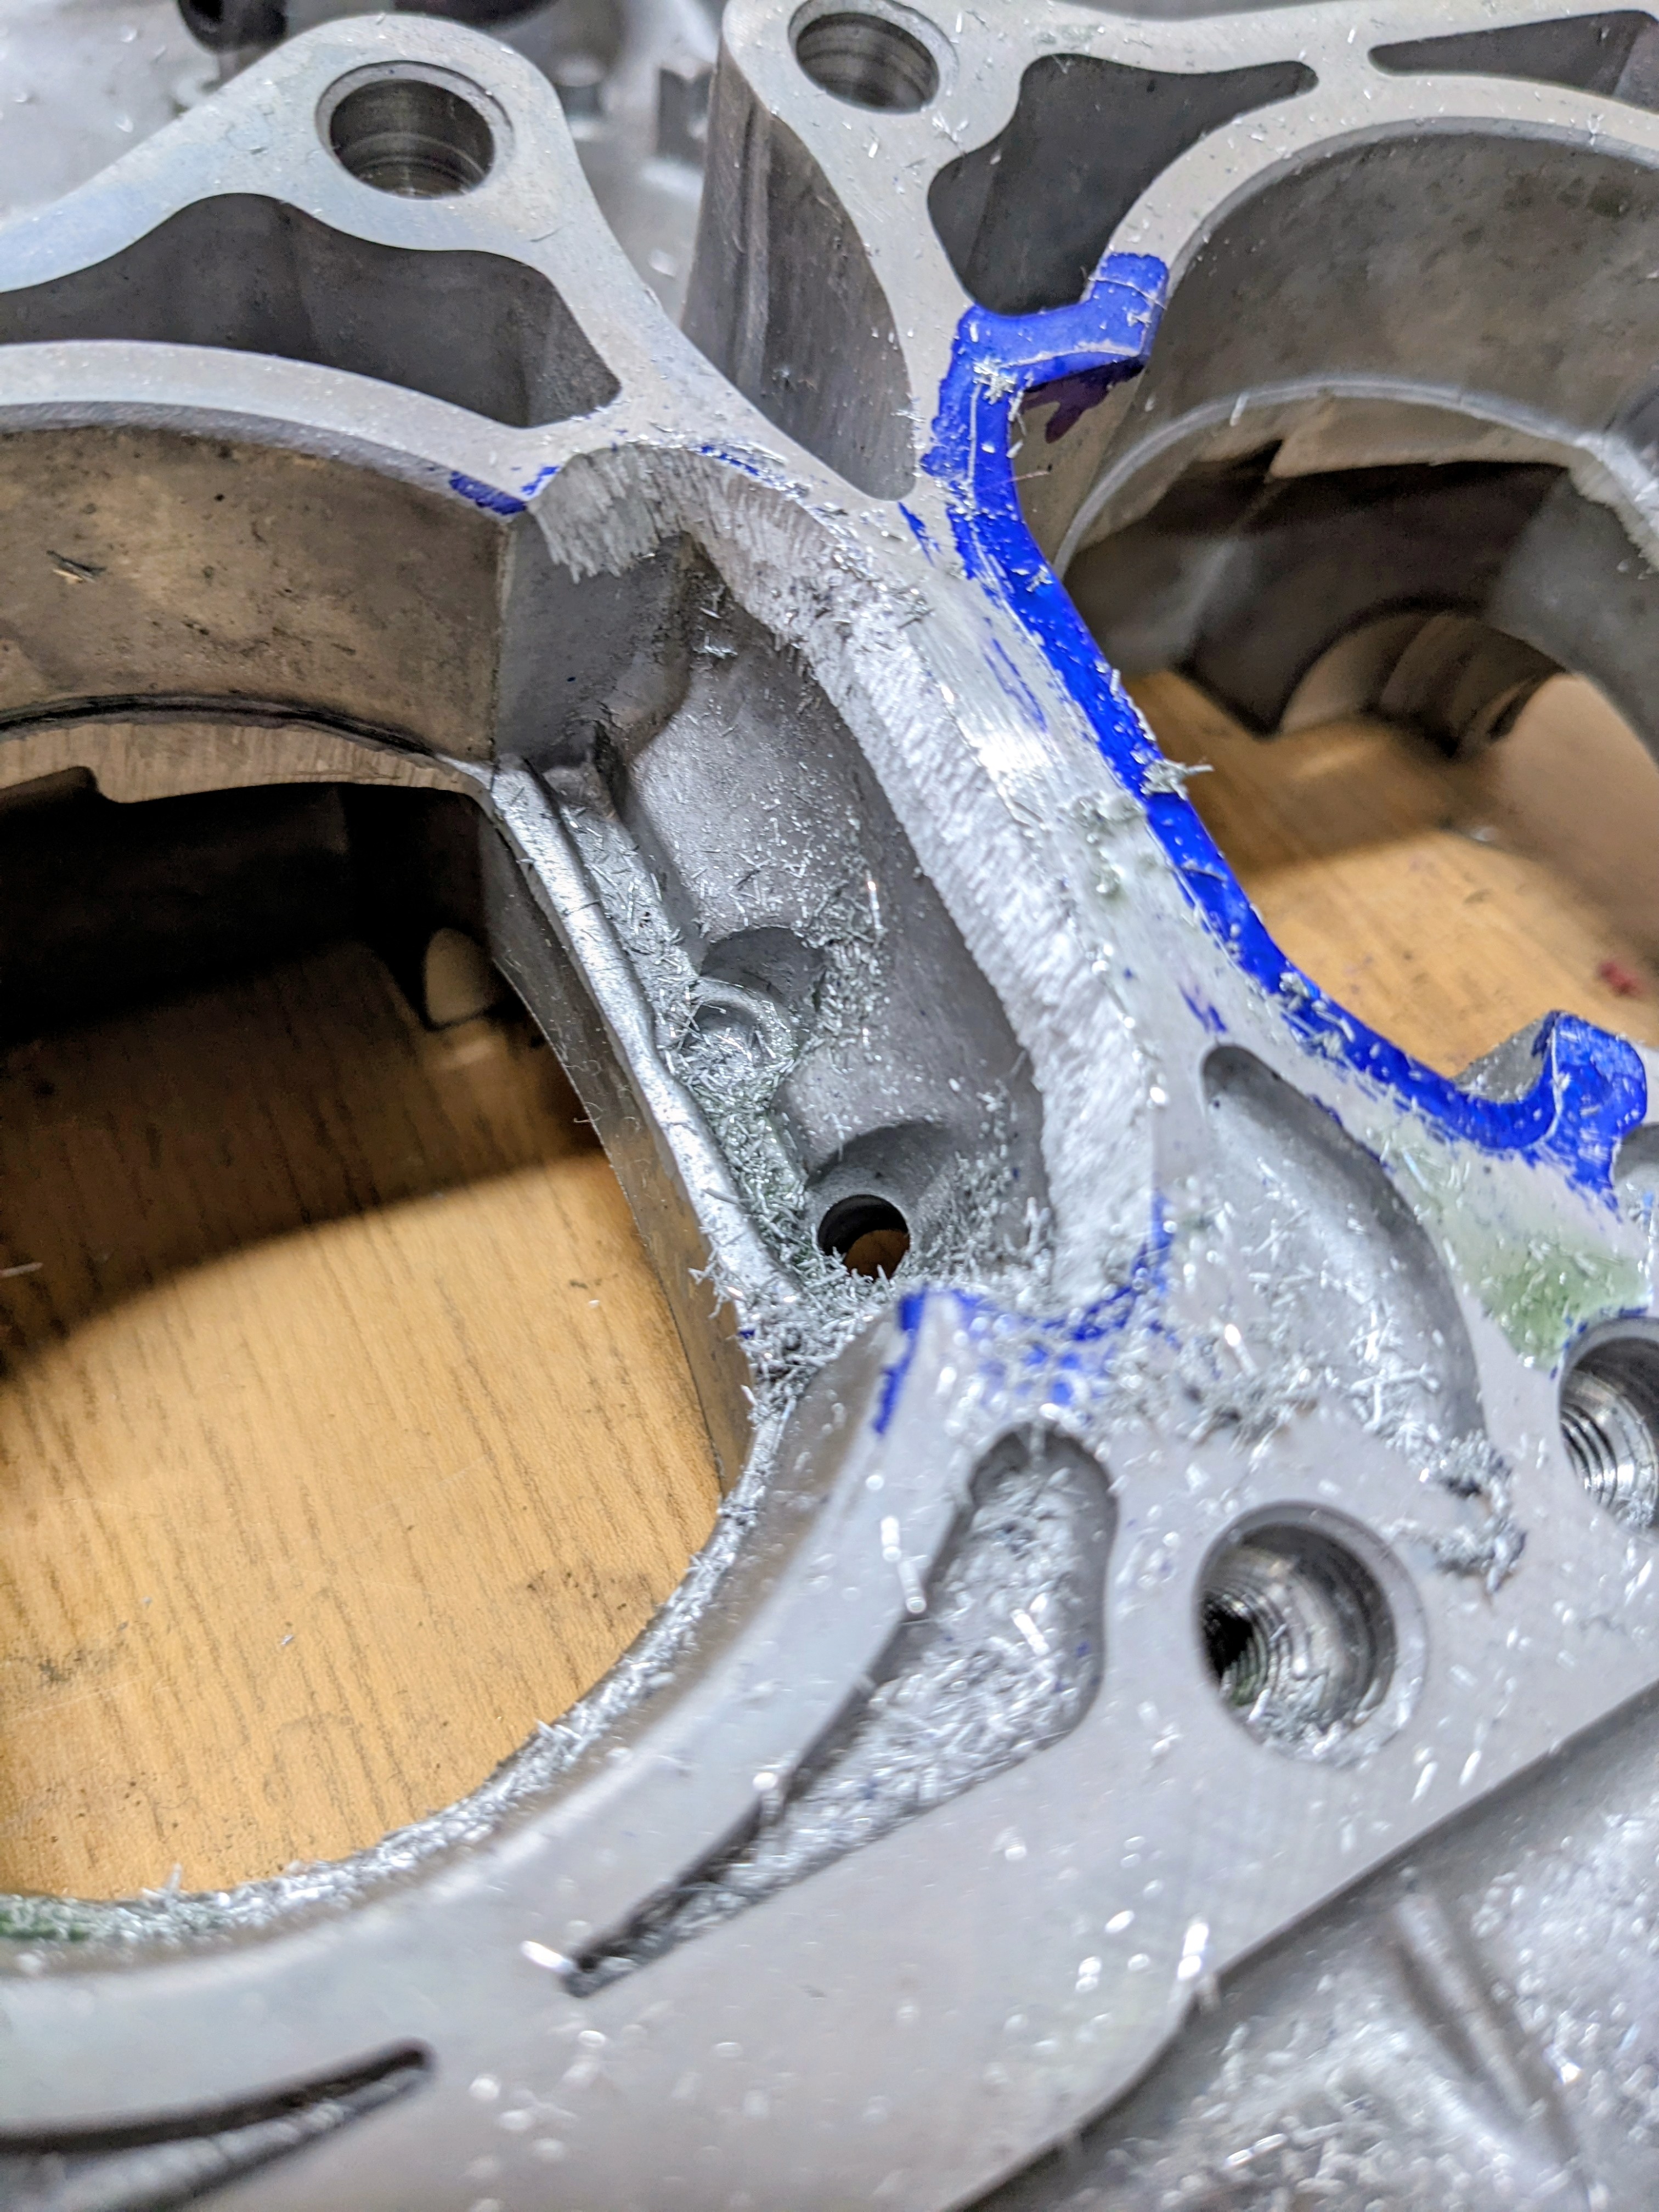
Care MUST be taken here that you don't go too deep into the trenches. The crankcase walls are pretty thin towards the bottom and therefore care must be taken to avoid porting straight through the cases.
I've taken a photo here to give you a clear indication of how deep you'll want to aim to go.

I've gone around and done a rough cut of the desired shape.

I can quickly overlay the gasket to ensure I'm along the right track.
Note: The gasket used here is only a basic indication, there are cases where the gasket protrudes into the transfer ports and as such the gaskets need trimming. Therefore the method described above is preferred to get the perfect shape. This is especially true for ported cylinders.
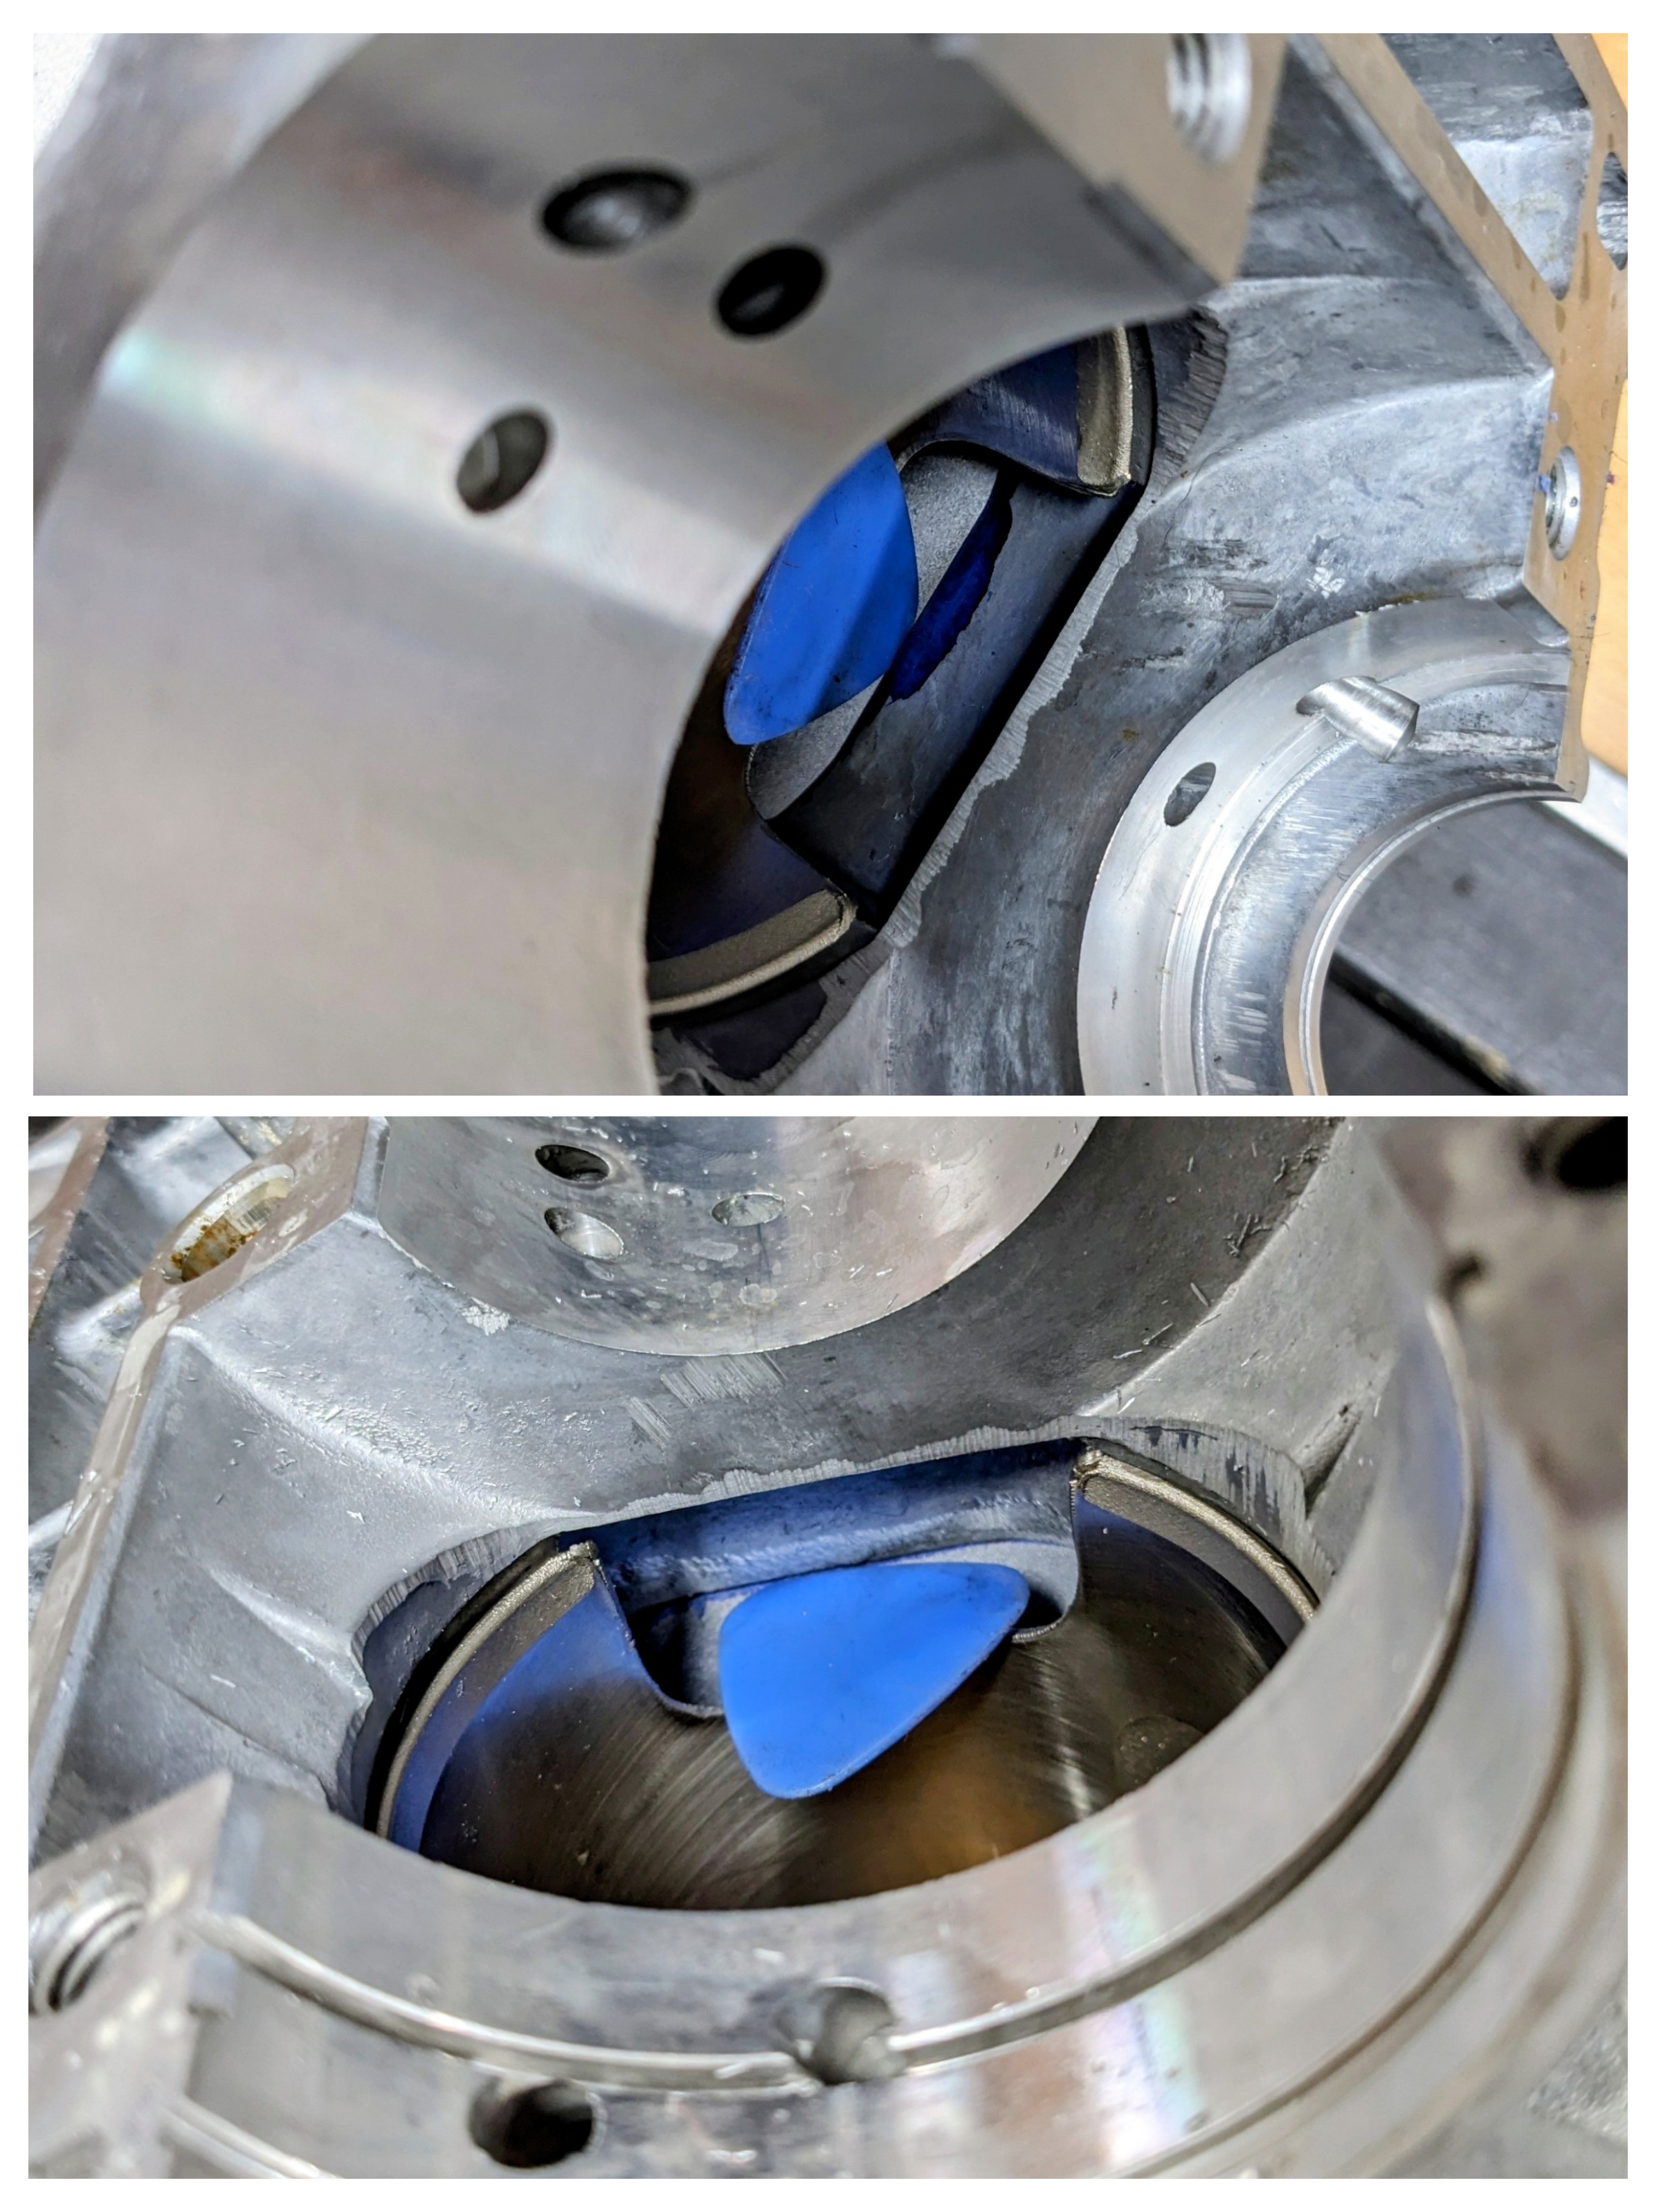
You can see here a Before/After photo and how now the pick is not being covered by the bottom end transfer ports and now correctly aligns to the cylinder transfers.
The cases need to be thoroughly cleaned throughout to ensure no swarf is left anywhere.


These cases can be ported to quite some degree, since this is only running a mild big bore kit, the extent of the transfers needn't be too significant.
With this out the way, I can now start to assemble the bottom end with all the trick bits I've bought.
Bottom End Assembly
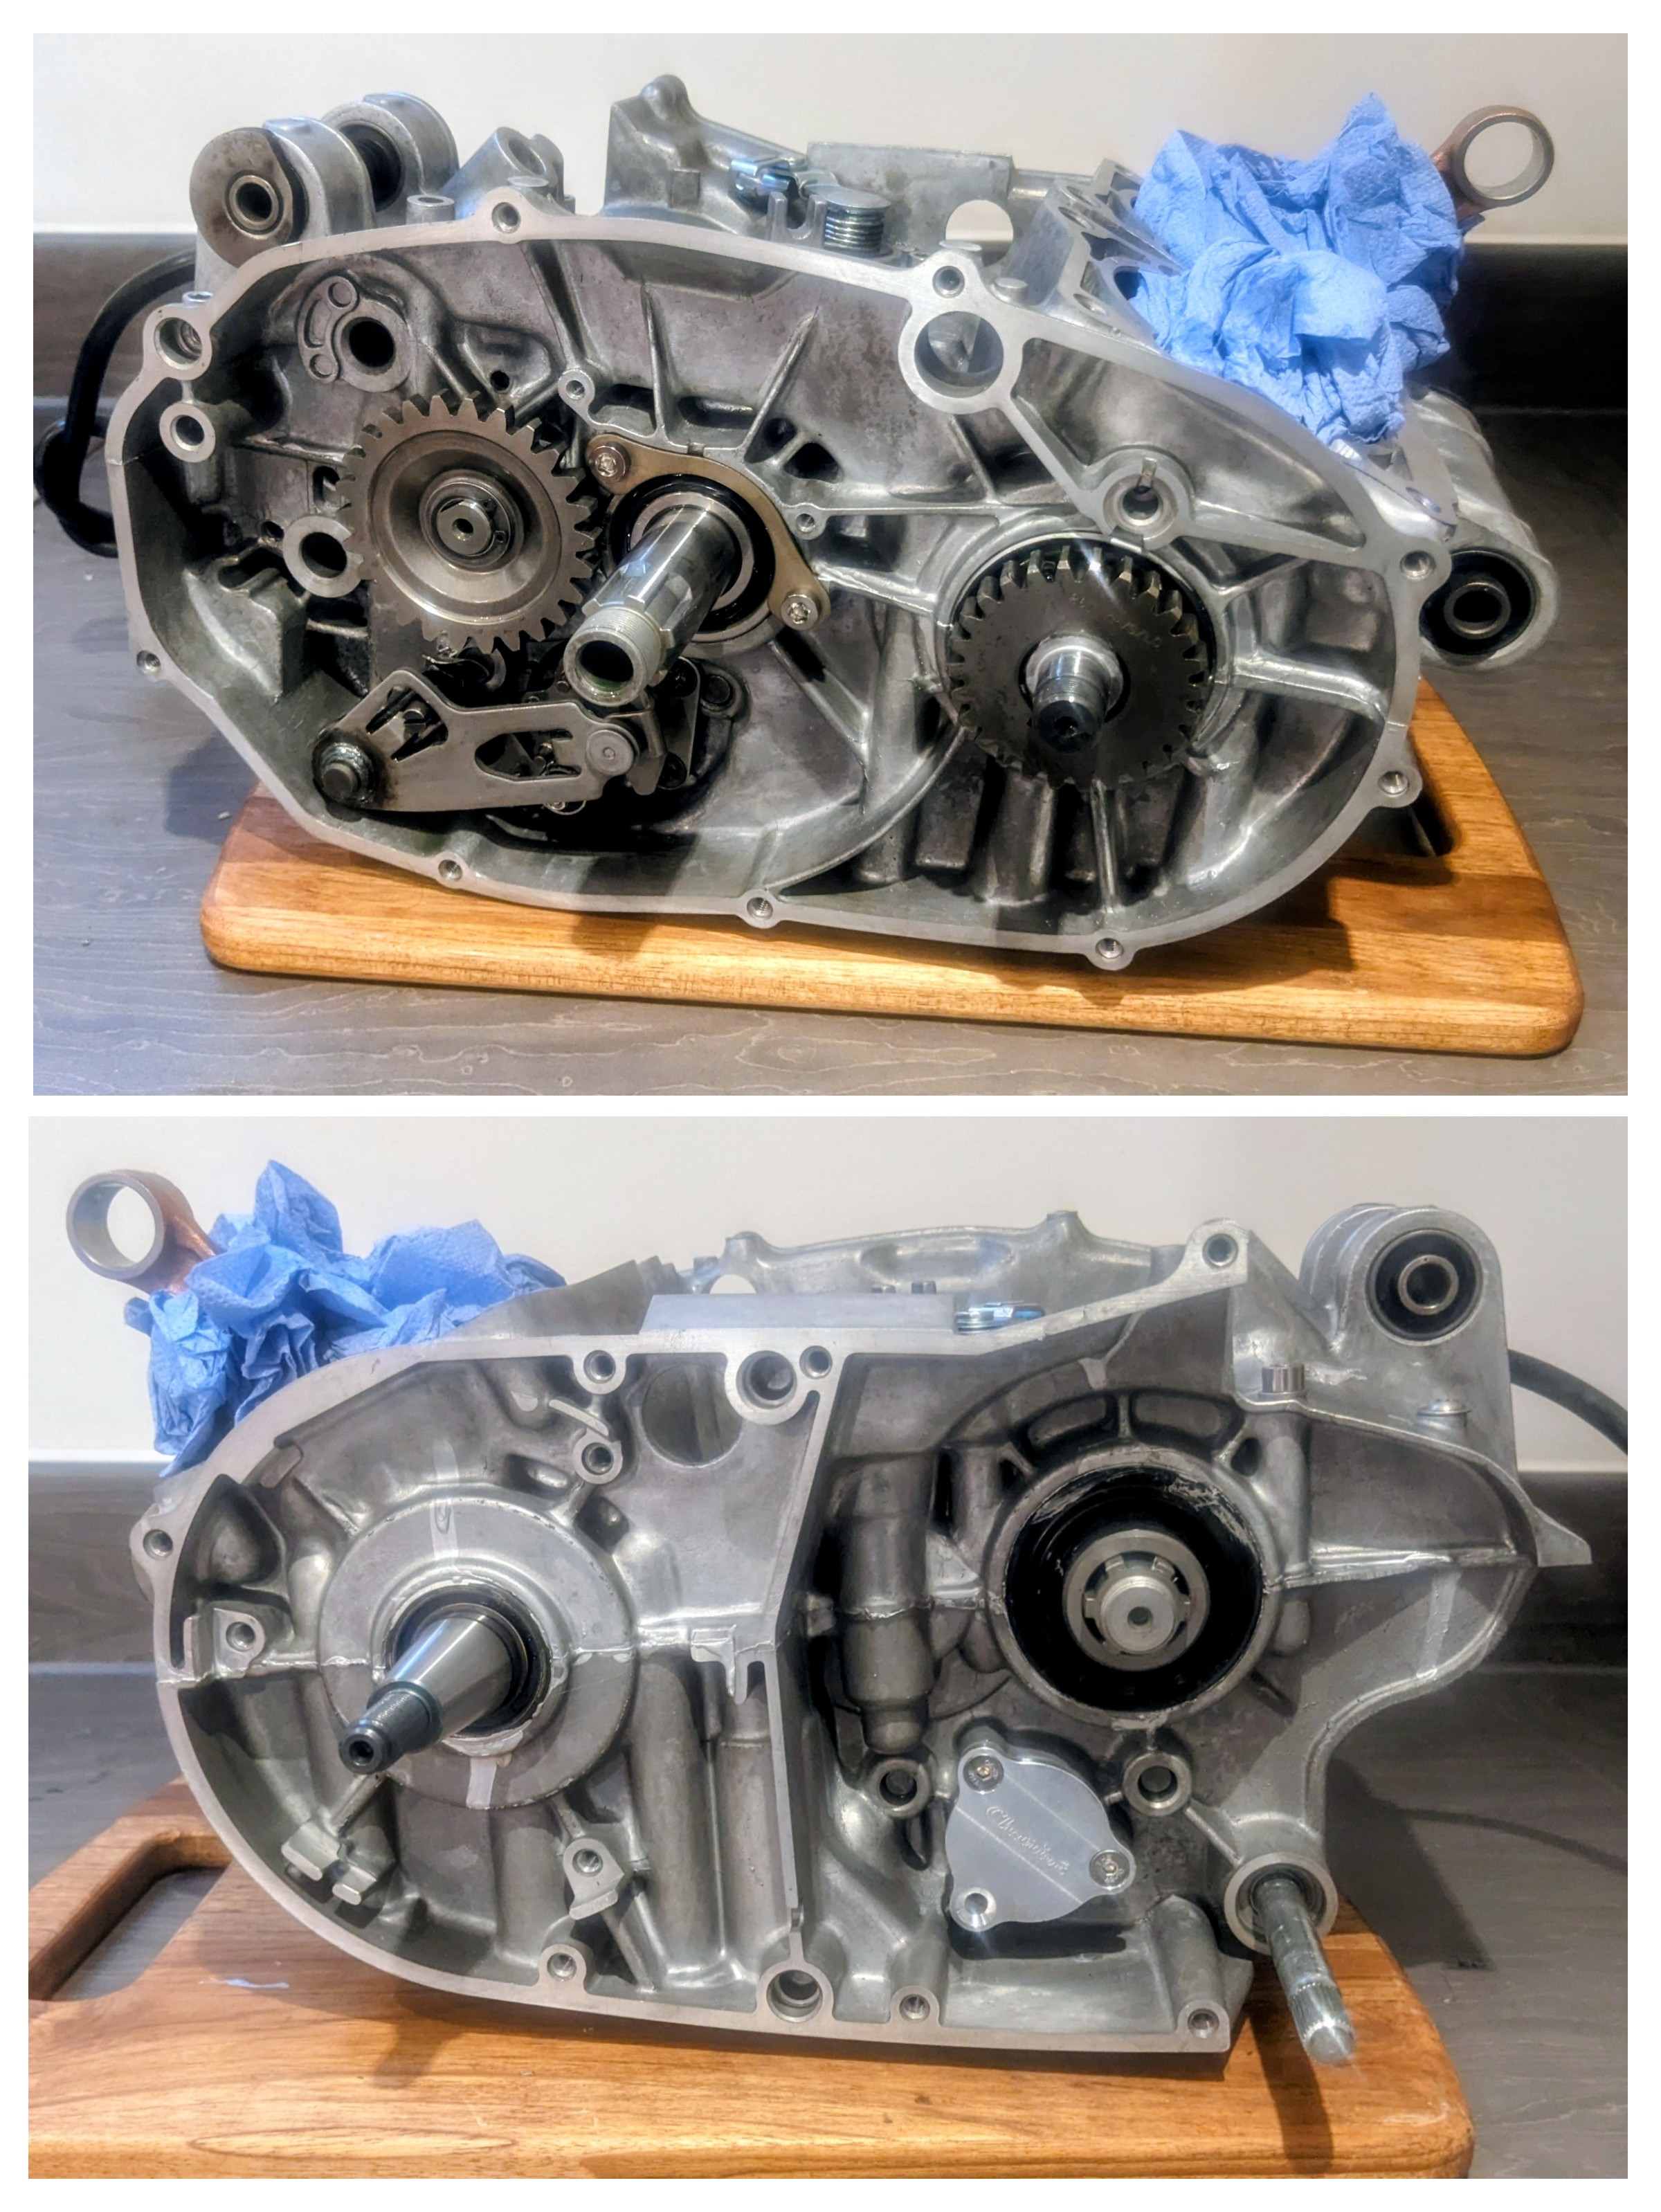
Now that the porting work has been completed and the gearbox rebuilt with a taller first gear, it's finally time to assembly the crankcase halves.
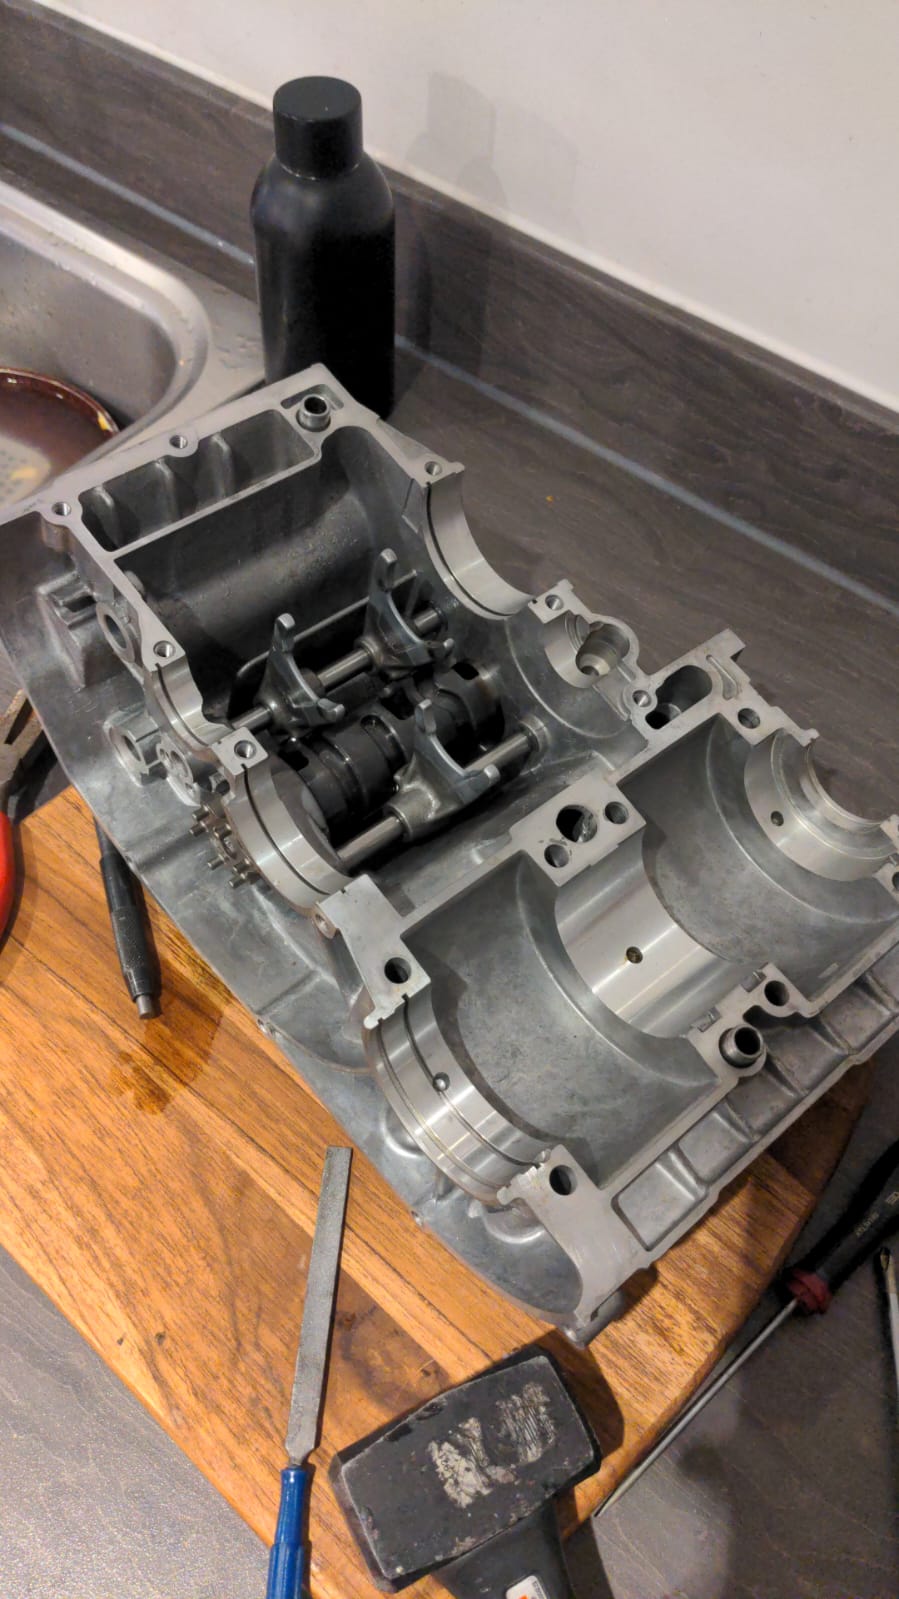
Here the selector drum can be installed along with the dog ears. The selector drum has been modified to aid easier shifting and easier neutral detection. It's a common mod for these engines and involves grinding away at the shift star to make the ramps more pronounced.

The upper crankcase halves have been installed with lightweight titanium studs.
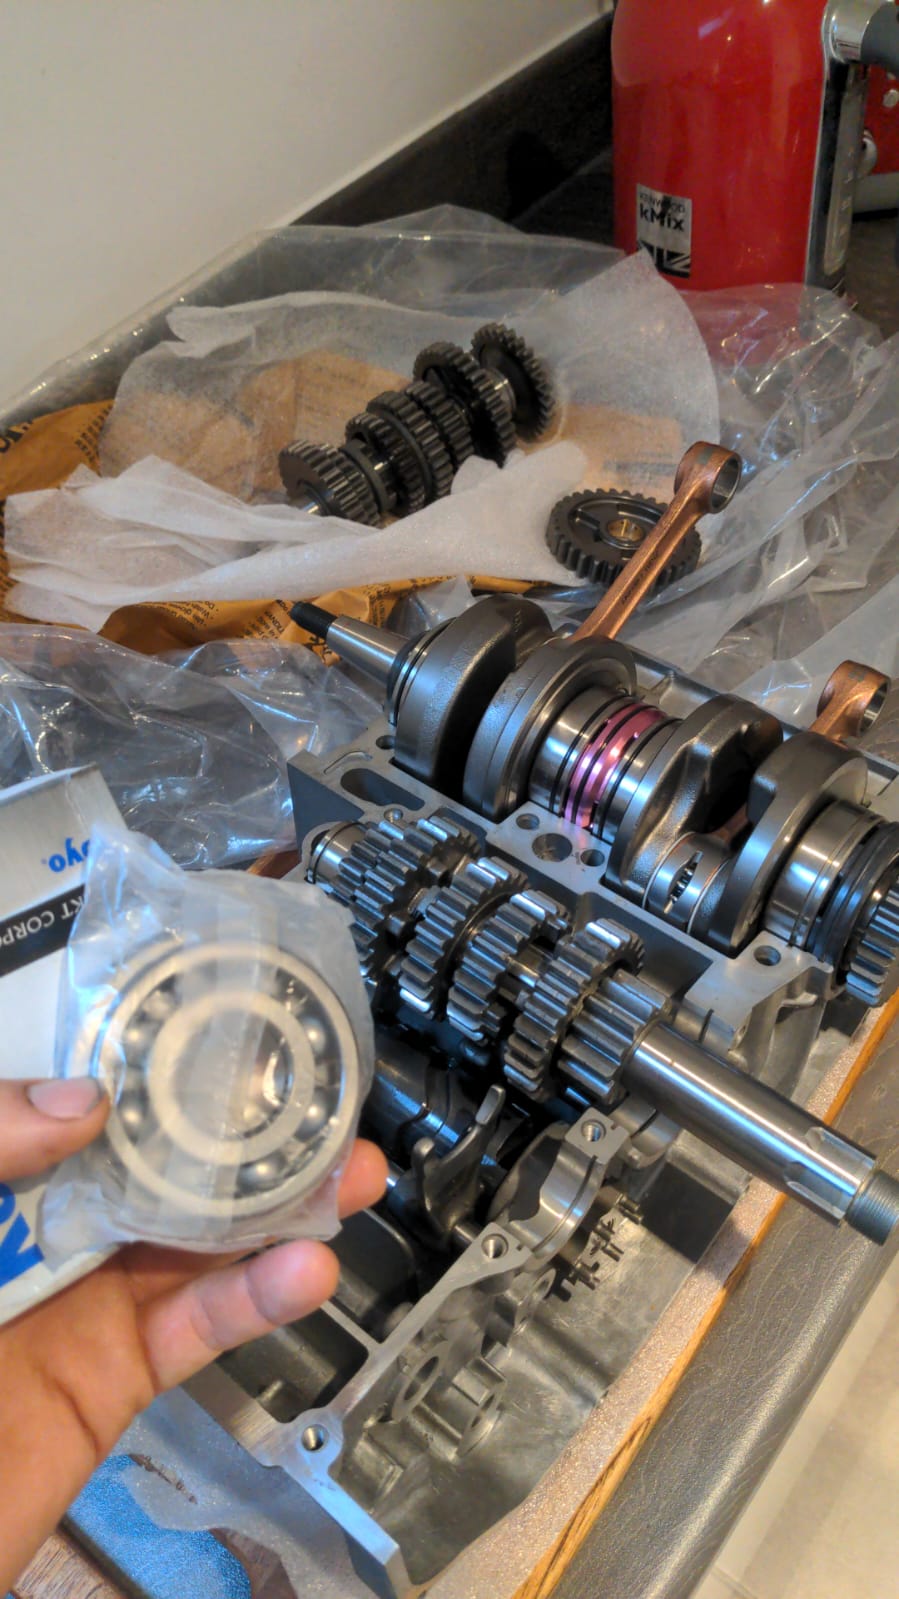
The 4mm
Hot Rodscrank can be installed, along with the straight cut primary gear. New seals throughout and I also acquired/installed new bearing clips that were allegedly tighter tolerances than the OEM ones. Although upon inspection they look much of the muchness to me.The gearbox wouldn't be complete without all new bearings throughout, although my bearing was missing the much needed circlip. Luckily I have amassed enough spares in my workshop to salvage a bearing clip from another gearbox.
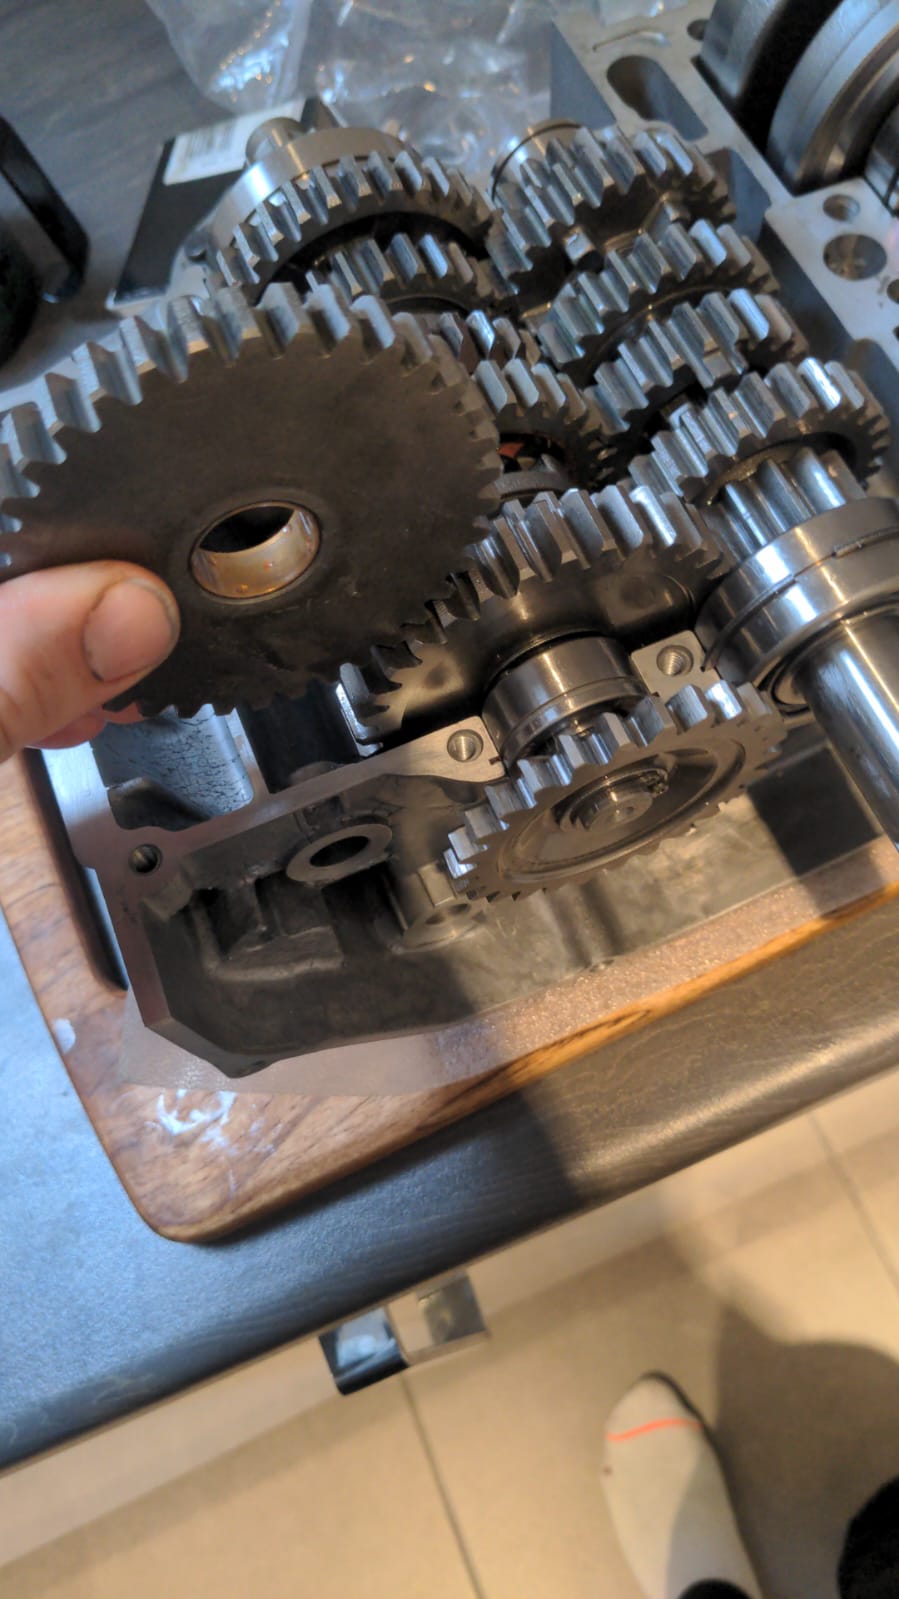
Here is the gear on the output shaft which was swapped for the 1st gear conversion.

Along with the shift star mod, I've also got a modified detent arm (with roller bearing) and shift lever with the cut outs widened to give greater movement to the shifter mechanism.

All the gears were tested/shifted to ensure correct alignment and engagement.

The shifter mechanism operates on a cam which needs to be aligned prior to sealing. A relatively simple job once you understand what you're looking for, but easy to overlook. Once the alignment has been done, the locking nut can be tightened.

Low profile grade 5 titanium bolts are used to affix the baffle plates and bearing retainer. Everything inside this engine is brand spanking new, since I have been building the engine from scratch.

I've just ordered a
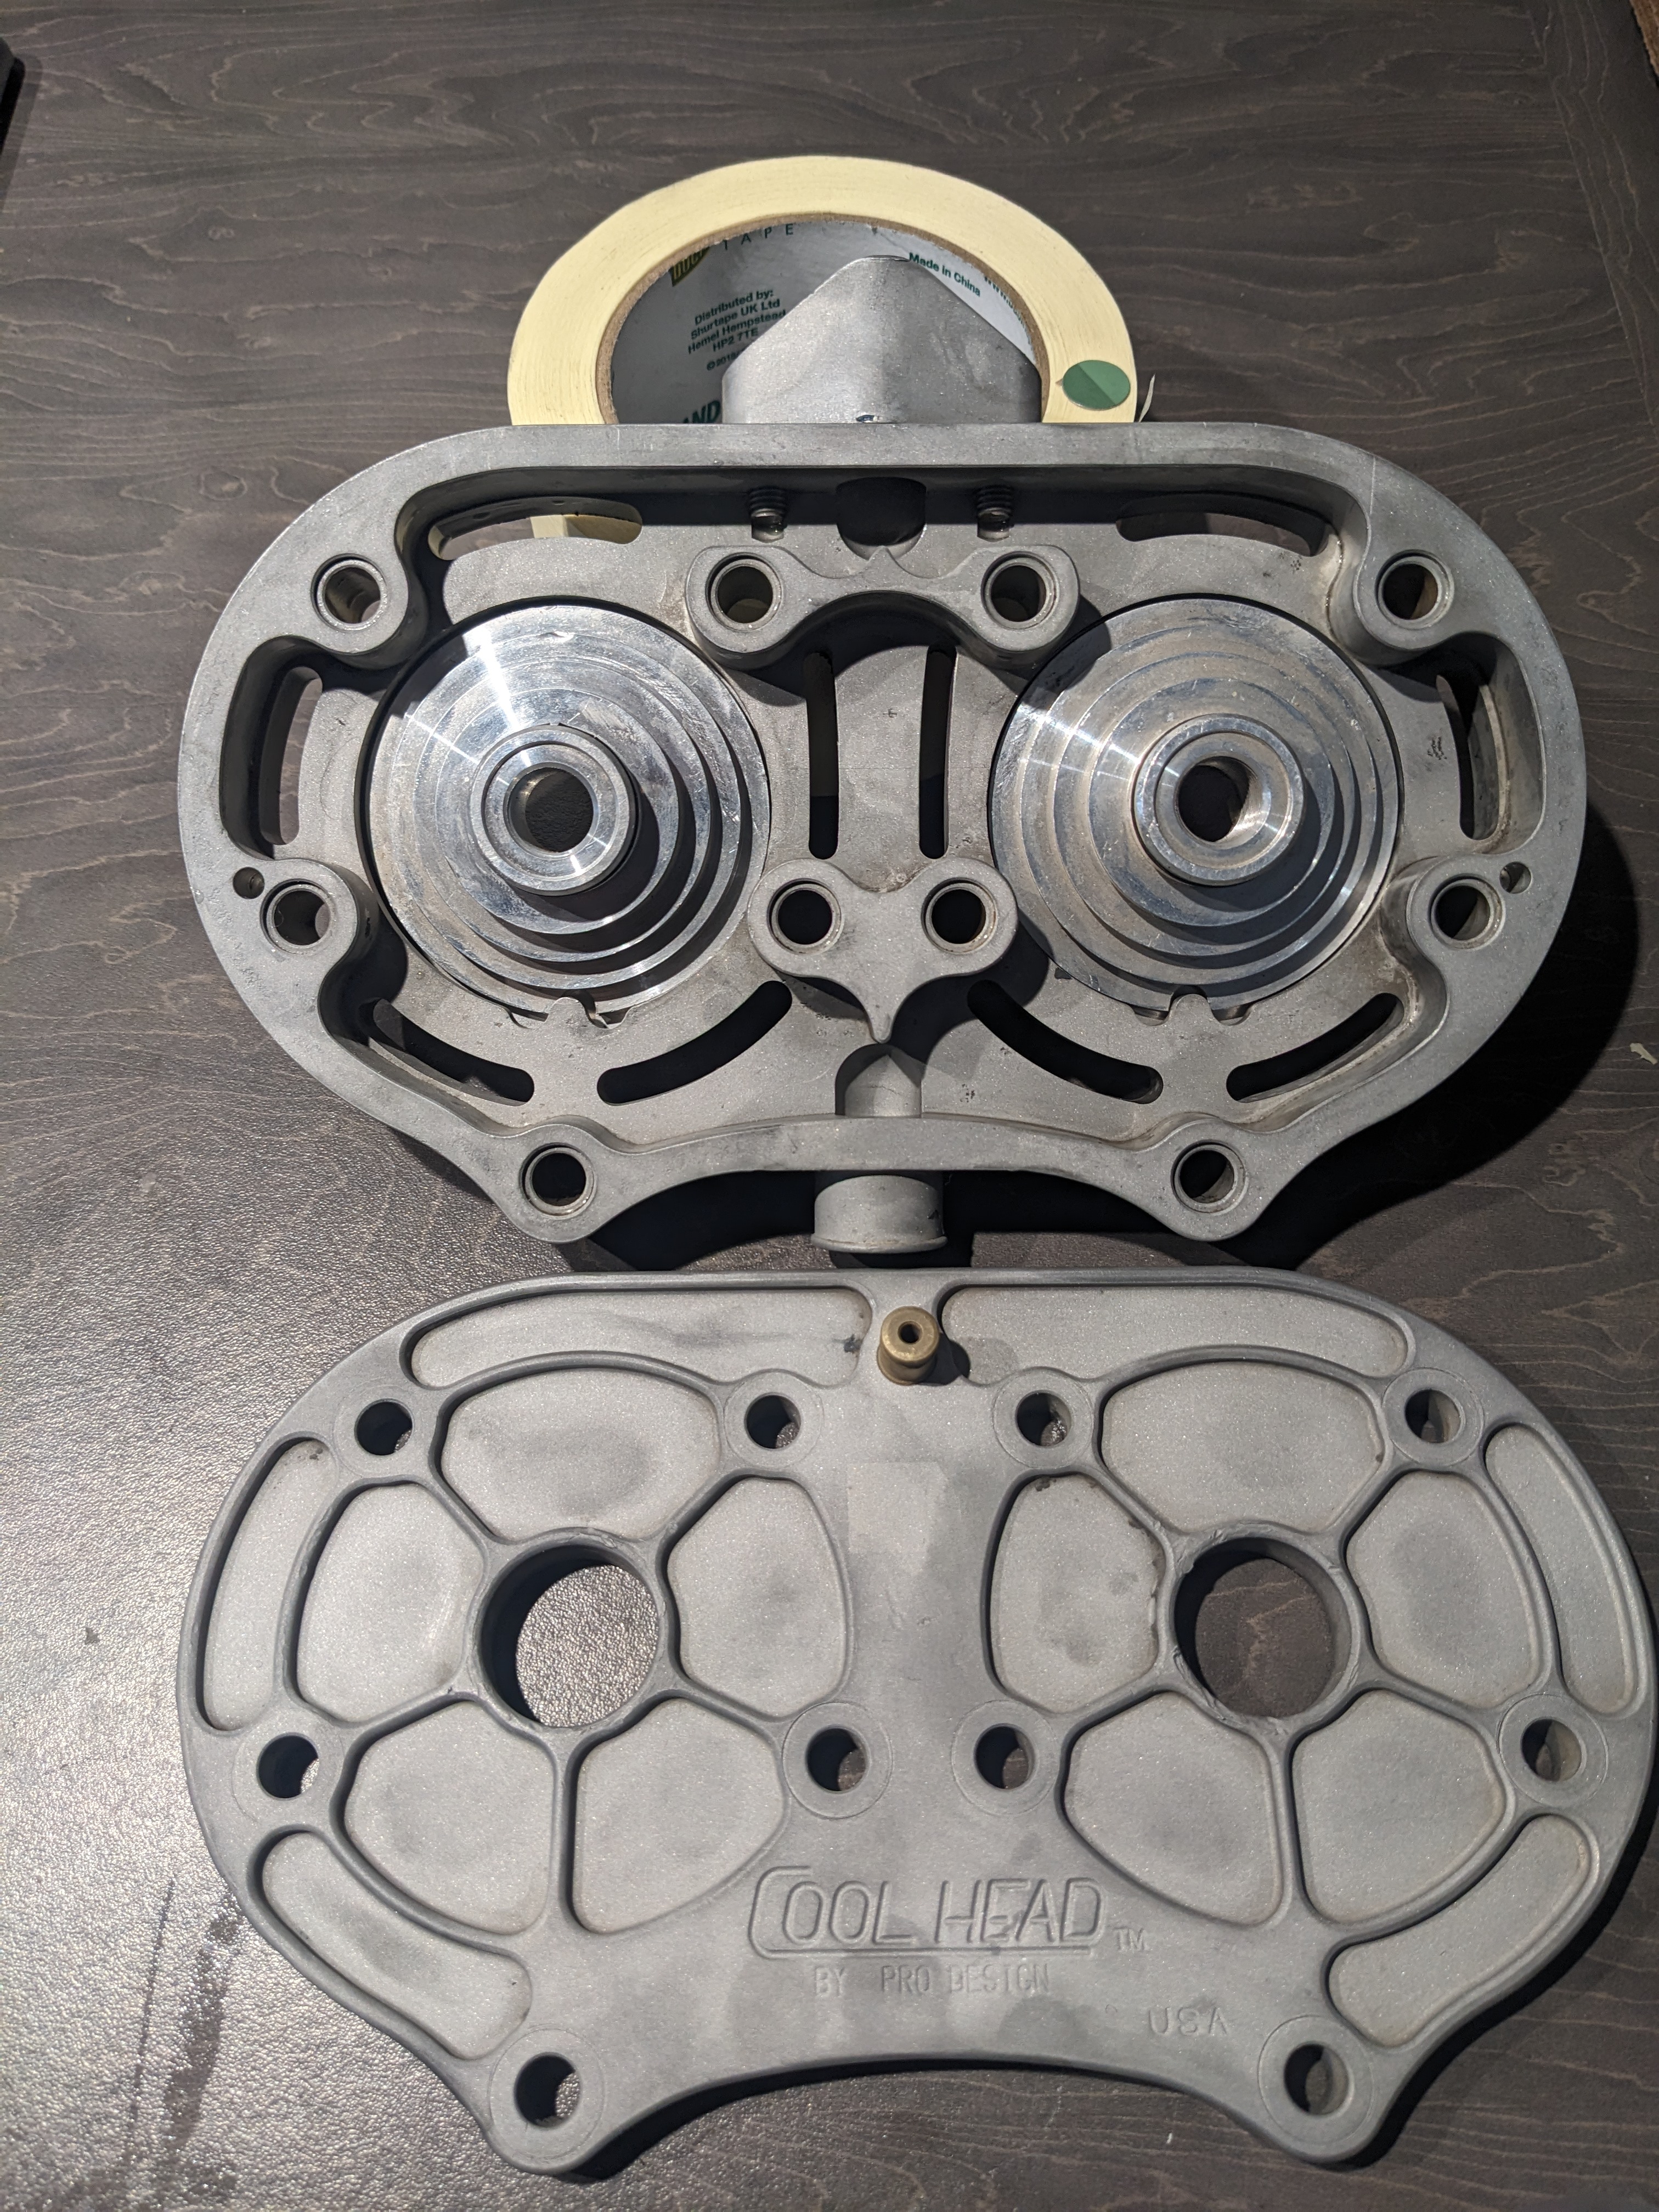
Pro Design Billet Stator Plate, not that I'll need it as I plan on running a Zeeltronic ignition system, however it should finish off the bottom end nicely. I also ordered a chinese copy which looked perfectly serviceable.I also decided to buy the
Pro Design Wicked Cool Billet Headto fit onto my Athena Big Bore kit.
I still need to get a clutch basket and clutch plates, then my straight cut gears can all be installed and the bottom end completed. This will have to wait a few months as this is quite an expensive item to acquire.

In order to get the top end assembled I need to ditch the Athena Pistons and order some appropriate ones for the stroker kit.
Carbon Fibre Moulding
On a side project, for the panelling on this machine I want a Carbon Fibre tank guard. This really isn't an necessity and I've merely been messing around with various techniques to try get a feel for how hard it would be.
Initially I started off with a moulding kit, but I ordered an inappropriate amount, failed to fully do the prep work and rushed the process. The result was the mould cracked upon separating.
Next I instead opted to just do a simple design to better understand the technique. Here I designed a part I wanted for the clutch cover in CAD then 3D printed the part to make a mould from.

This too failed as I was unable to separate the mould from the part and as a result the whole thing was scrapped. I was starting to grow impatient and finally I decided I'd directly 3D print the mould and then make a carbon fibre part directly from the mould.
To my surprise, this actually worked out really well (given the low-budgetness of it all), however I was not getting the desired effect. I wanted the lettering to be really pronounced as it is on the original part. However the lettering is feint and is mainly made of the epoxy which fell into the mould and not the carbon fibre.
I refined the approach, this time creating a mould-press to help form the lettering. I wanted to use a red carbon weave to accent the bikes final "Black" colouring.

But this again was unsatisfactory and I decided to ditch the lettering and call it a day for that idea and just focus on making a singular part.
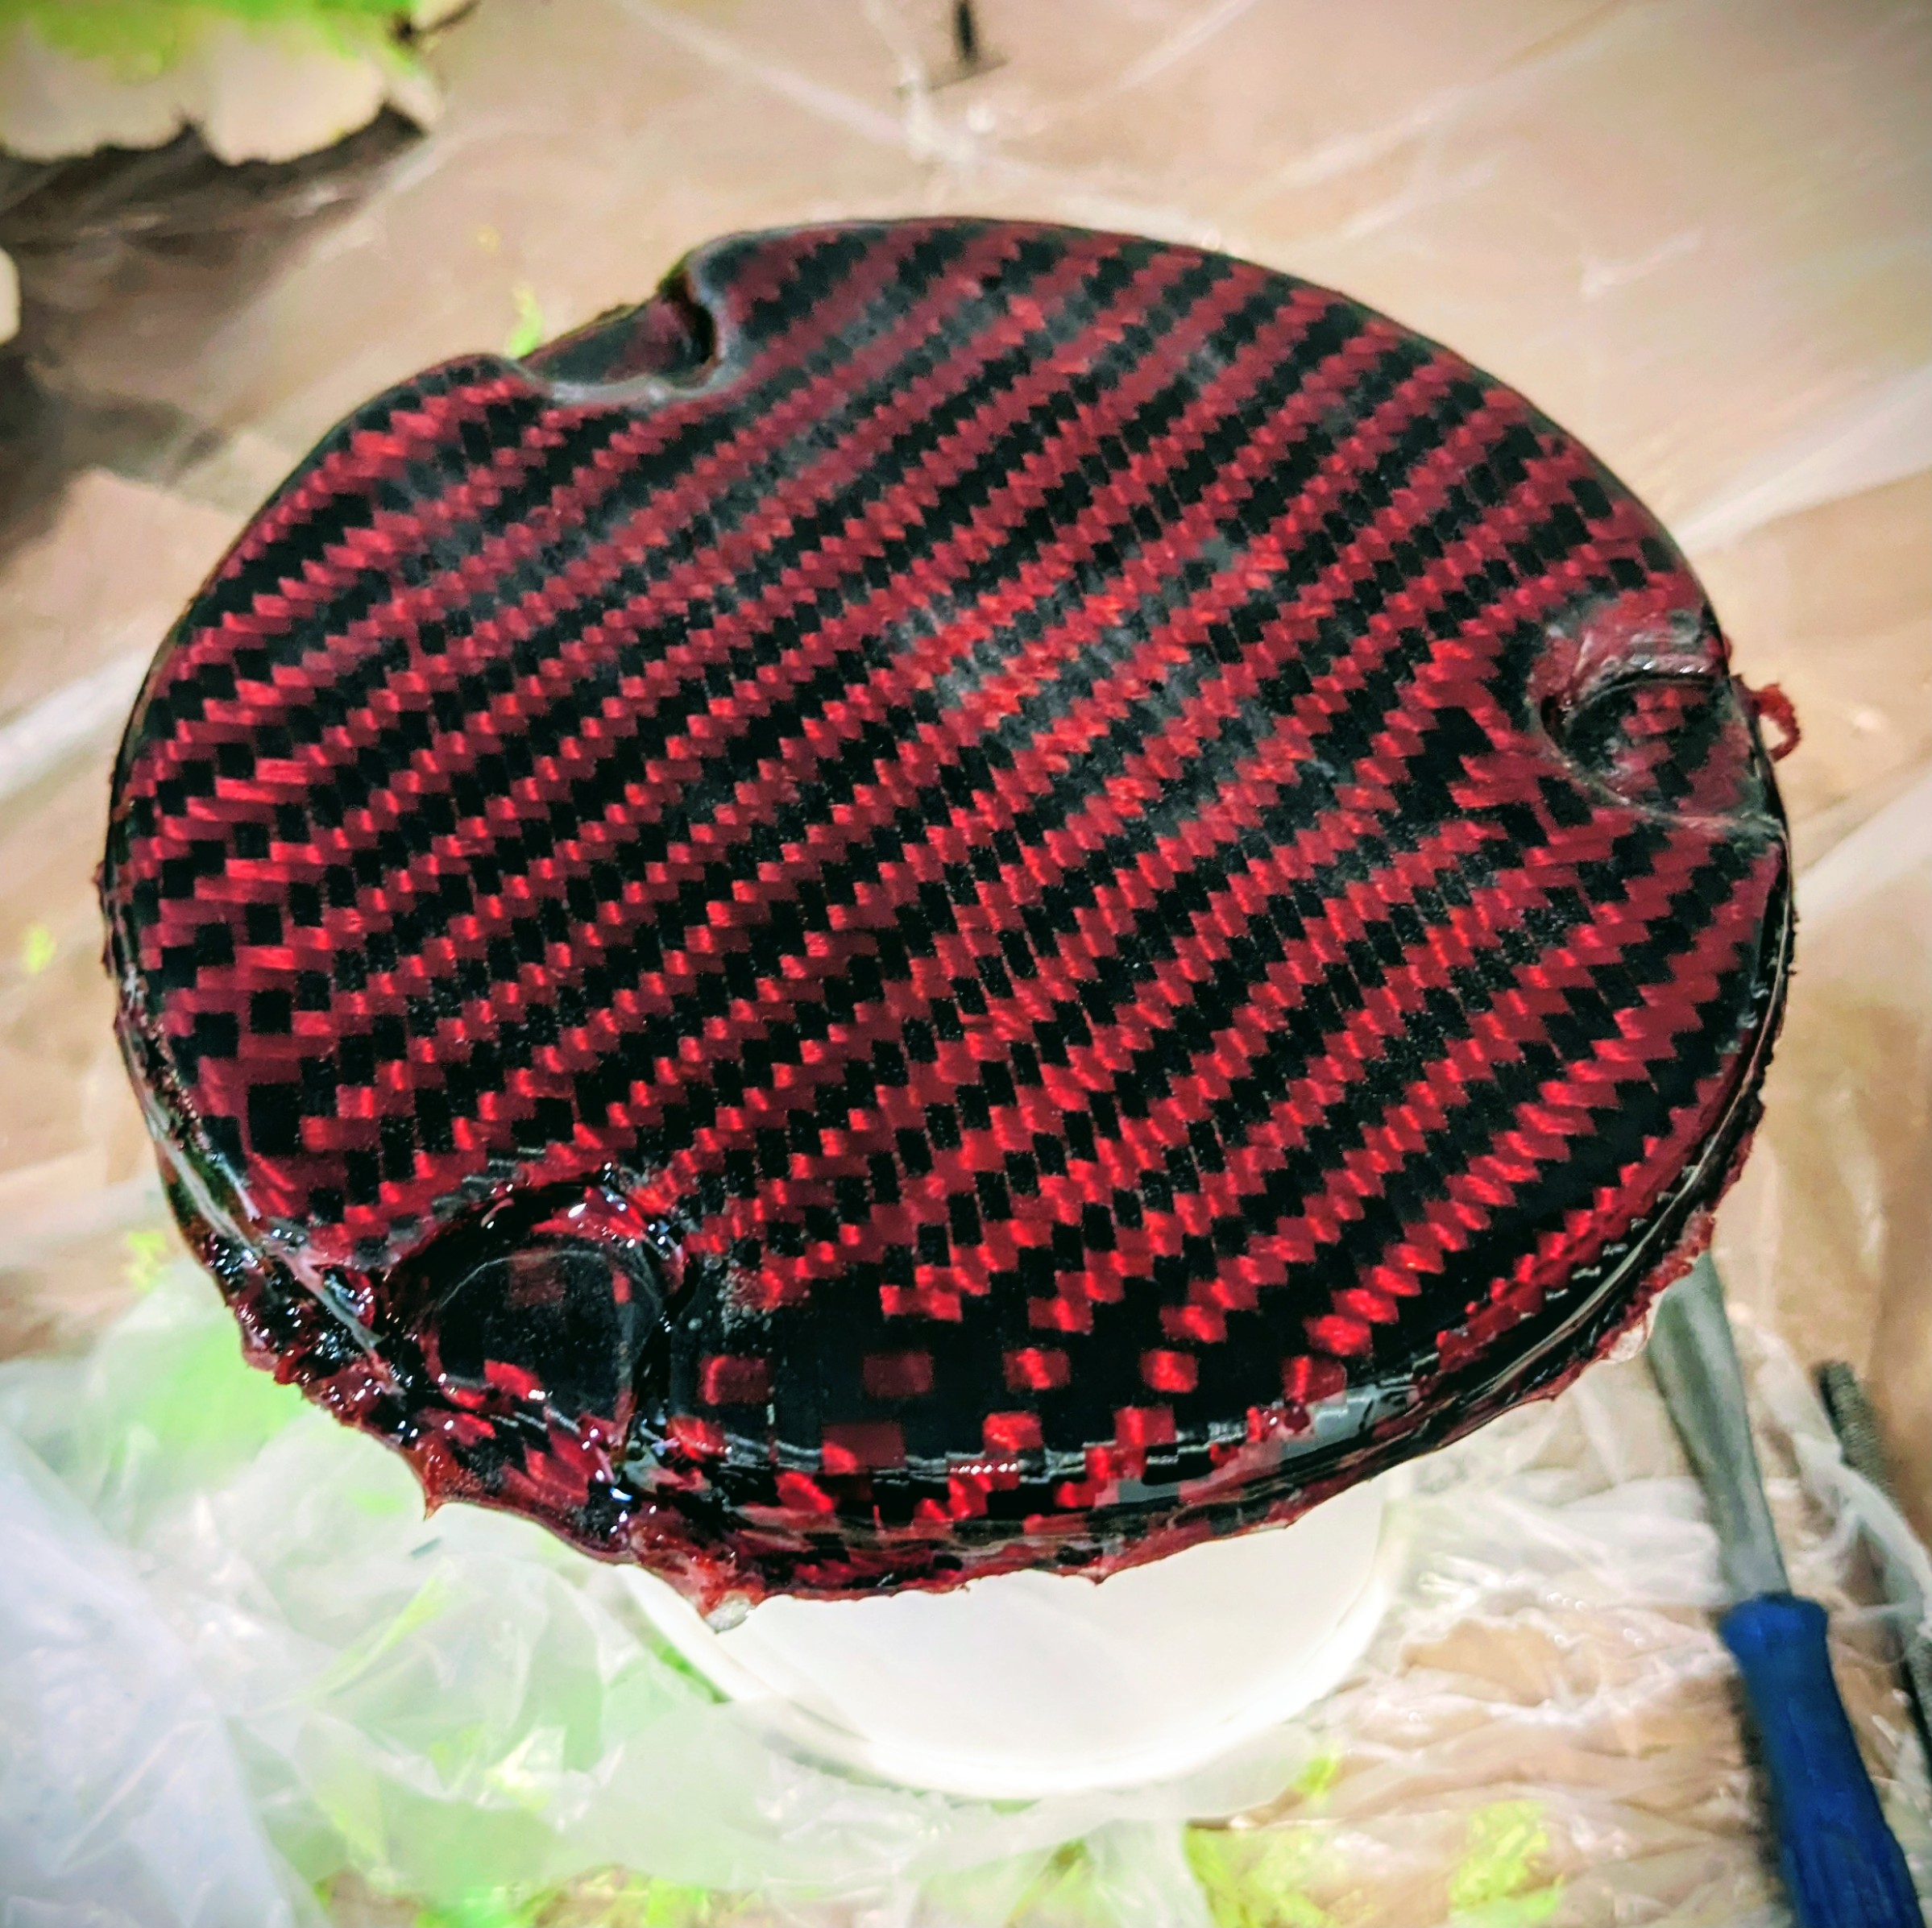
Although the weave got distorted, the part came out better than I expected.
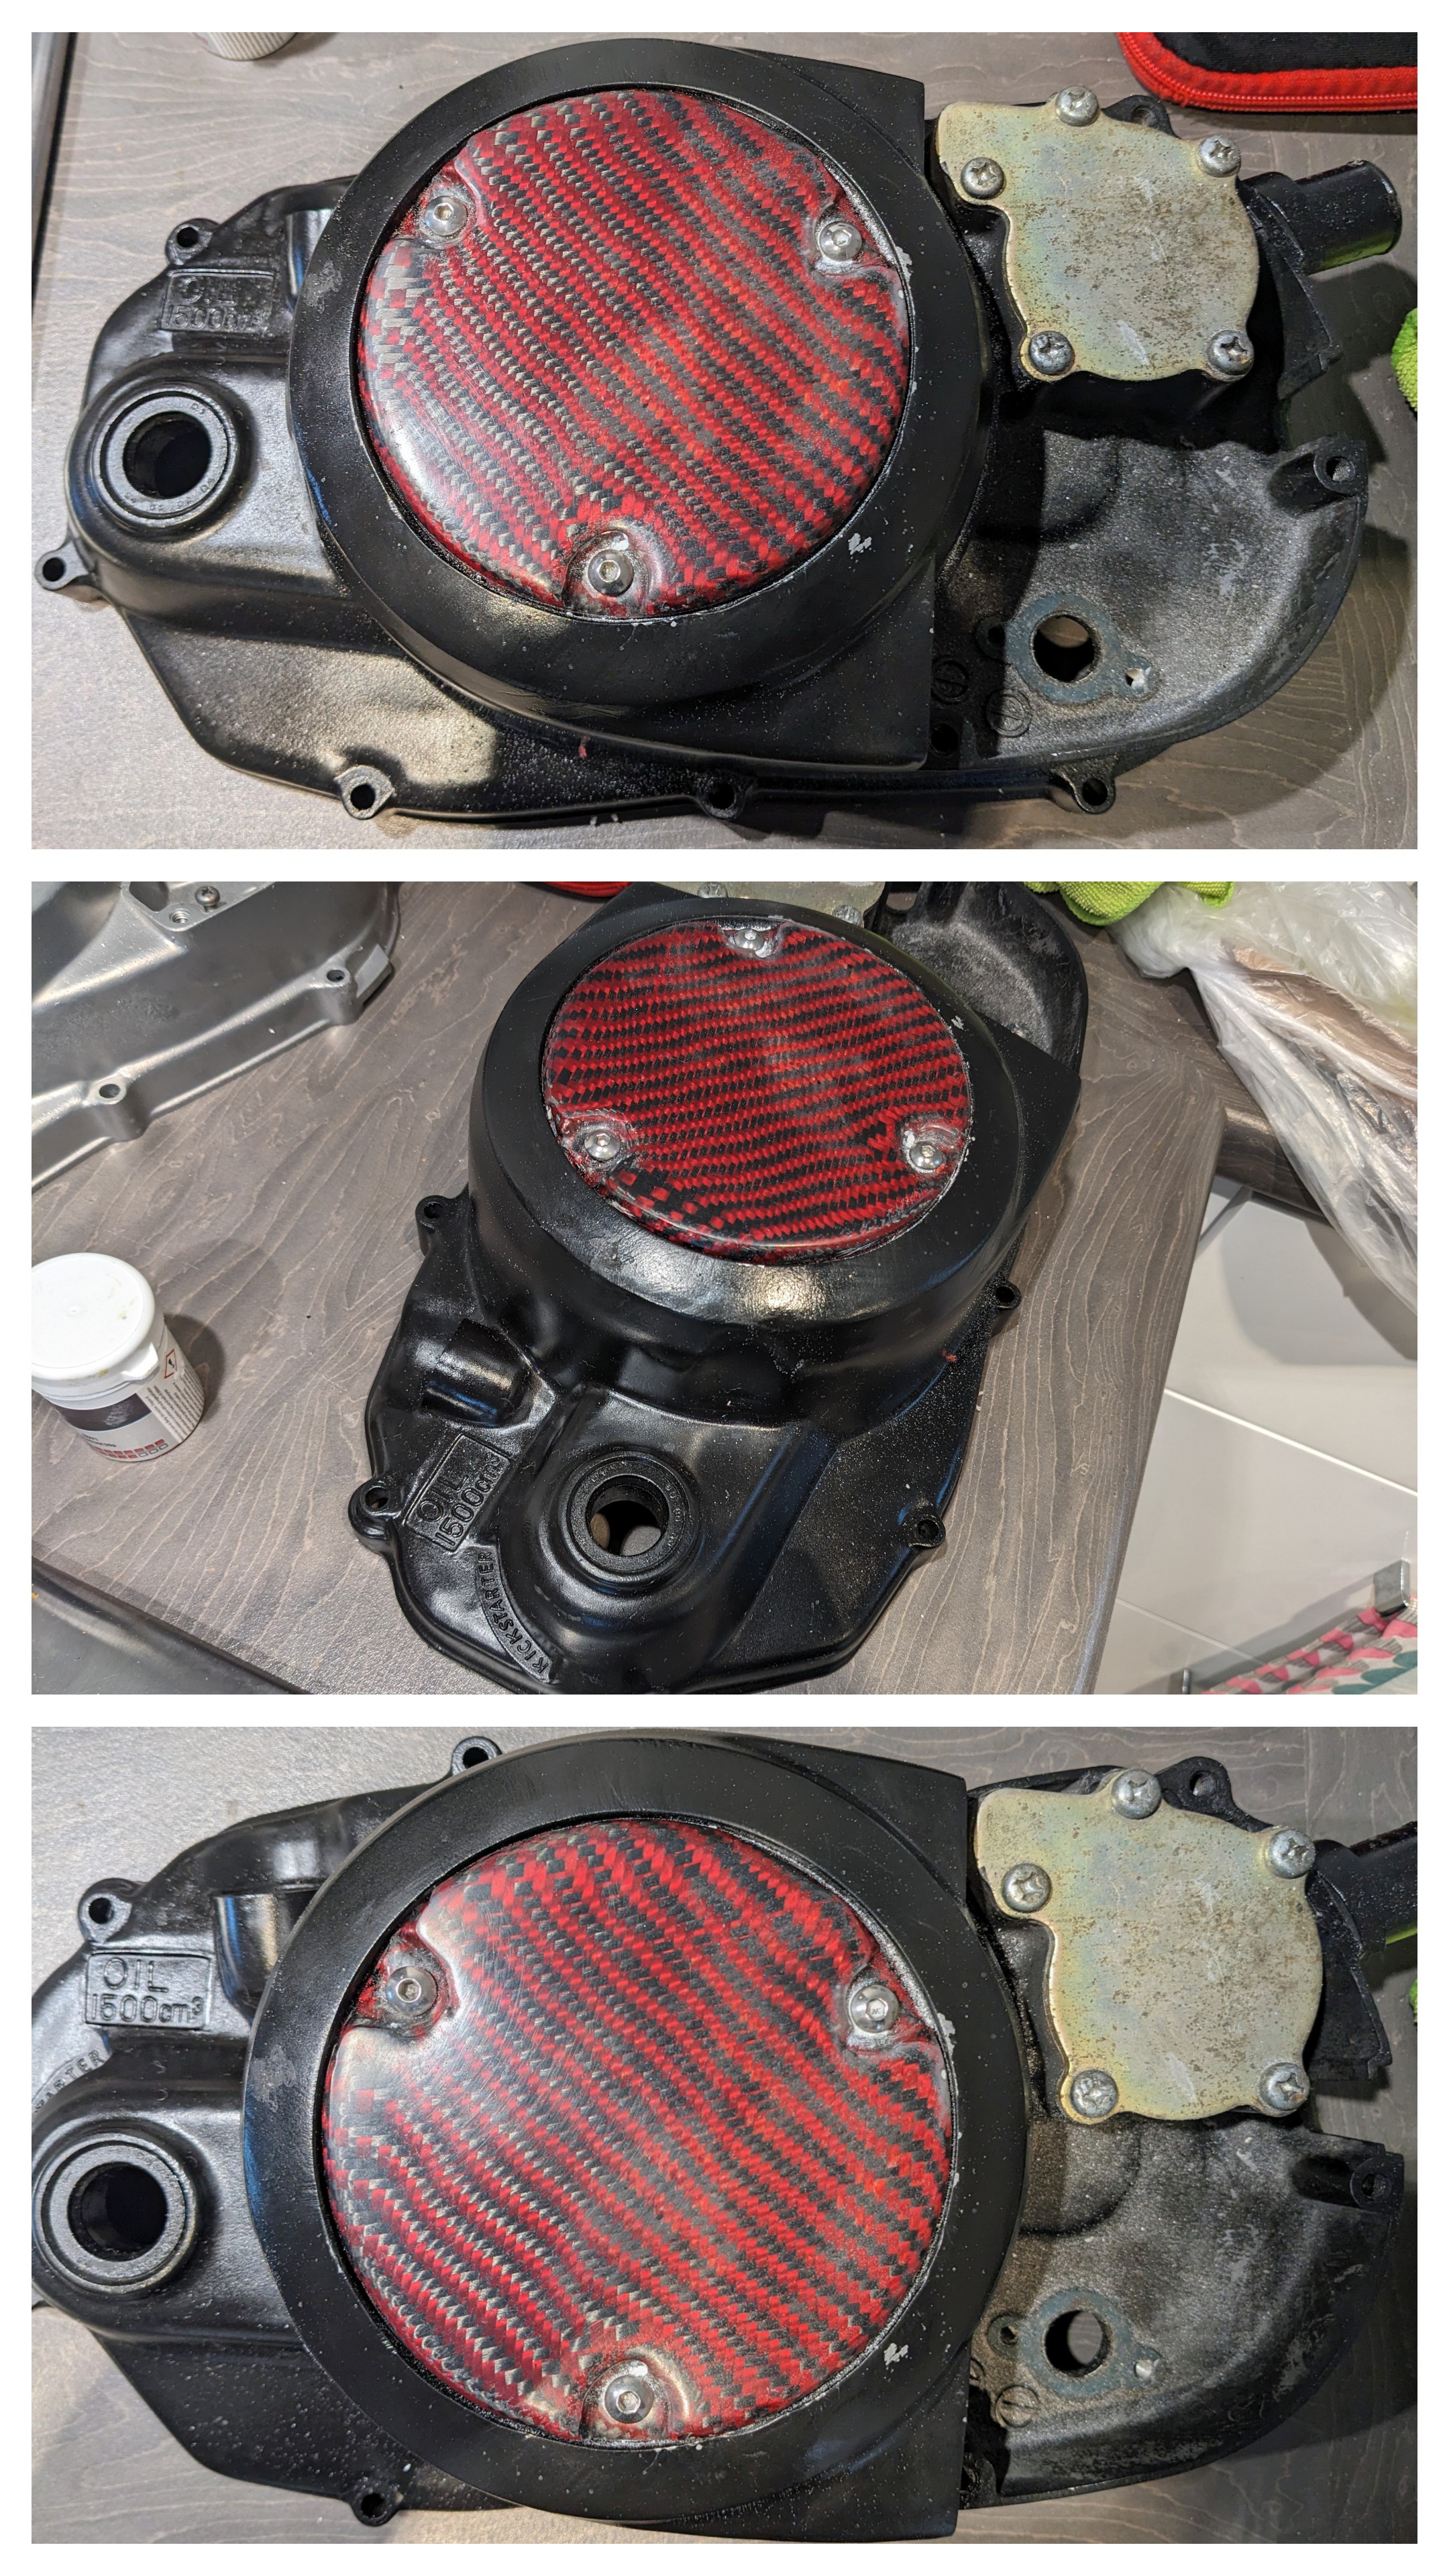
Sadly, I don't love the result, it actually looks better when the light isn't shining directly on it.
I am happy with how the part has come out, it's done as a budget part and it has worked to a degree.
Undeterred, I've given the moulding process another shot to see if I can fair up better. This time making sure I do plenty of prep work and don't rush it.
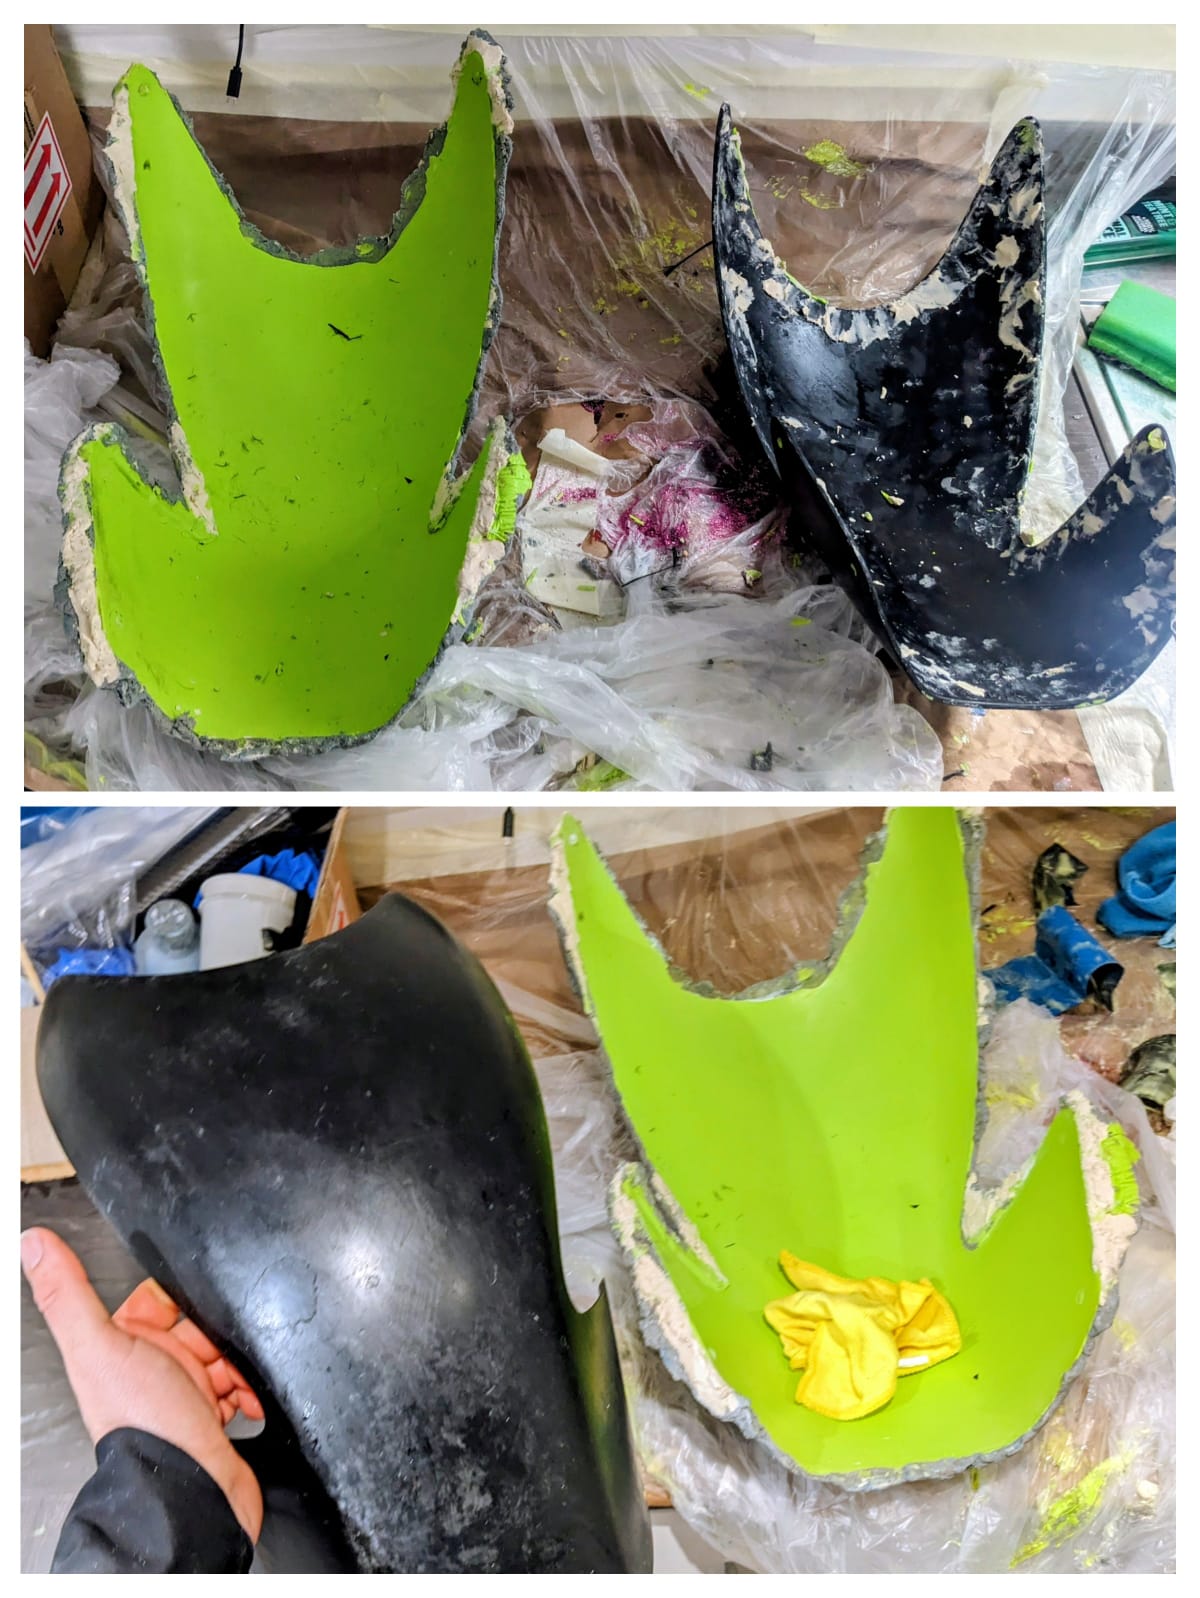
Actually pleased to say the moulding has worked! So I now have something that I could potentially make a carbon fibre part from. I know you can get reasonable jobs from this type of setup, I am not looking for perfection here, just something to give the bike a bit of bling would be nice.
Sadly, I ran out of carbon fibre weave to actually progress with this and I'm not sold I want the red carbon/polyester weave, however I've seen you can get red pigments for the epoxy resin which I may give a go with this mould.
Conclusion
Still a LONG way to go, but having the crankcase halves assembled is a huge milestone for this project. I'm hoping that next year I can get the cylinder work completed and the engine closed up. Once this has been done, I'd like a Bitubo steering damper welded to the frame and then the frame and ancillaries can go off for painting. Then it'll be case of rolling the chassis!
Always Originate, Never Pirate!
-
Wow, it's really sad how long this project takes to come to fruition...
Maybe I'm spreading myself too thin with way too many concurrent projects, maybe it's because for the first time in my life I've been doing stuff other than motorbikes/cars, but in any event December saw lots of time off for me and I was able to drag what I've been accumulating out of the wardrobe and start with some head scratching and engine work assembly.
Banshee/RD 350 Athena 421 Bottom End Assembly
With that all said, this month I took stock of my inventory and I came to realise that I had virtually all of what I needed to close the crankcases up on my Banshee 350 motor, in preparation of assembling the Athena 392 kit.
As some of you may know, there is free performance to be made if you port your crankcase's transfers to match the transfer ports on the cylinders. The
Yamaha RD 350/Yamaha Bansheeengines are notorious for leaving steps in between the transfers for the bottom end and the cylinders. Since I intend to run the Athena Big Bore Kit, this step is even more exacerbated.In a nut shell, here I'll be marking out this discrepancy using some
Dykem Blueengineering fluid, then scoring a visible outline using myFacom Scribeand then with my die grinder, porting the bottom end to match.For reference again, the engine cases I bought were brand new direct from Yamaha. As such this gives a good example of how much, unmolested cases need to be grinded away.
You can get a rough idea of what needs to be cut by overlaying the gasket over the bottom end and marking out the material that needs cutting out.
In my cases, I painted on the
Dykem Blueand assembled the cylinder to the bottom end. This squished out excess fluid and left a visible line of where the cases meet the cylinder.Here I've placed a guitar pick into the location of what we need to cut. There is a visible step here that should be machined away using a die grinder.
To ease the cutting process, I've washed away any excess
Dykem Bluefluid and scribed a distinct line for where I want to cut up to.With all the appropriate markings made out, it's time to grab the die grinder and port the bottom end to match.
I'm using a
Rounded Tree Shapegold coated carbide burr. It's coarse flute geometry and titanium nitrate coating prevent the flutes from becoming clogged up and essentially cut through the alumiunium like butter.In only a matter of seconds I've roughly cut out the intended shape.
Care MUST be taken here that you don't go too deep into the trenches. The crankcase walls are pretty thin towards the bottom and therefore care must be taken to avoid porting straight through the cases.
I've taken a photo here to give you a clear indication of how deep you'll want to aim to go.
I've gone around and done a rough cut of the desired shape.
I can quickly overlay the gasket to ensure I'm along the right track.
Note: The gasket used here is only a basic indication, there are cases where the gasket protrudes into the transfer ports and as such the gaskets need trimming. Therefore the method described above is preferred to get the perfect shape. This is especially true for ported cylinders.
You can see here a Before/After photo and how now the pick is not being covered by the bottom end transfer ports and now correctly aligns to the cylinder transfers.
The cases need to be thoroughly cleaned throughout to ensure no swarf is left anywhere.
These cases can be ported to quite some degree, since this is only running a mild big bore kit, the extent of the transfers needn't be too significant.
With this out the way, I can now start to assemble the bottom end with all the trick bits I've bought.
Bottom End Assembly
Now that the porting work has been completed and the gearbox rebuilt with a taller first gear, it's finally time to assembly the crankcase halves.
Here the selector drum can be installed along with the dog ears. The selector drum has been modified to aid easier shifting and easier neutral detection. It's a common mod for these engines and involves grinding away at the shift star to make the ramps more pronounced.
The upper crankcase halves have been installed with lightweight titanium studs.
The 4mm
Hot Rodscrank can be installed, along with the straight cut primary gear. New seals throughout and I also acquired/installed new bearing clips that were allegedly tighter tolerances than the OEM ones. Although upon inspection they look much of the muchness to me.The gearbox wouldn't be complete without all new bearings throughout, although my bearing was missing the much needed circlip. Luckily I have amassed enough spares in my workshop to salvage a bearing clip from another gearbox.
Here is the gear on the output shaft which was swapped for the 1st gear conversion.
Along with the shift star mod, I've also got a modified detent arm (with roller bearing) and shift lever with the cut outs widened to give greater movement to the shifter mechanism.
All the gears were tested/shifted to ensure correct alignment and engagement.
The shifter mechanism operates on a cam which needs to be aligned prior to sealing. A relatively simple job once you understand what you're looking for, but easy to overlook. Once the alignment has been done, the locking nut can be tightened.
Low profile grade 5 titanium bolts are used to affix the baffle plates and bearing retainer. Everything inside this engine is brand spanking new, since I have been building the engine from scratch.
I've just ordered a
Pro Design Billet Stator Plate, not that I'll need it as I plan on running a Zeeltronic ignition system, however it should finish off the bottom end nicely. I also ordered a chinese copy which looked perfectly serviceable.I also decided to buy the
Pro Design Wicked Cool Billet Headto fit onto my Athena Big Bore kit.
I still need to get a clutch basket and clutch plates, then my straight cut gears can all be installed and the bottom end completed. This will have to wait a few months as this is quite an expensive item to acquire.
In order to get the top end assembled I need to ditch the Athena Pistons and order some appropriate ones for the stroker kit.
Carbon Fibre Moulding
On a side project, for the panelling on this machine I want a Carbon Fibre tank guard. This really isn't an necessity and I've merely been messing around with various techniques to try get a feel for how hard it would be.
Initially I started off with a moulding kit, but I ordered an inappropriate amount, failed to fully do the prep work and rushed the process. The result was the mould cracked upon separating.
Next I instead opted to just do a simple design to better understand the technique. Here I designed a part I wanted for the clutch cover in CAD then 3D printed the part to make a mould from.
This too failed as I was unable to separate the mould from the part and as a result the whole thing was scrapped. I was starting to grow impatient and finally I decided I'd directly 3D print the mould and then make a carbon fibre part directly from the mould.
To my surprise, this actually worked out really well (given the low-budgetness of it all), however I was not getting the desired effect. I wanted the lettering to be really pronounced as it is on the original part. However the lettering is feint and is mainly made of the epoxy which fell into the mould and not the carbon fibre.
I refined the approach, this time creating a mould-press to help form the lettering. I wanted to use a red carbon weave to accent the bikes final "Black" colouring.
But this again was unsatisfactory and I decided to ditch the lettering and call it a day for that idea and just focus on making a singular part.
Although the weave got distorted, the part came out better than I expected.
Sadly, I don't love the result, it actually looks better when the light isn't shining directly on it.
I am happy with how the part has come out, it's done as a budget part and it has worked to a degree.
Undeterred, I've given the moulding process another shot to see if I can fair up better. This time making sure I do plenty of prep work and don't rush it.
Actually pleased to say the moulding has worked! So I now have something that I could potentially make a carbon fibre part from. I know you can get reasonable jobs from this type of setup, I am not looking for perfection here, just something to give the bike a bit of bling would be nice.
Sadly, I ran out of carbon fibre weave to actually progress with this and I'm not sold I want the red carbon/polyester weave, however I've seen you can get red pigments for the epoxy resin which I may give a go with this mould.
Conclusion
Still a LONG way to go, but having the crankcase halves assembled is a huge milestone for this project. I'm hoping that next year I can get the cylinder work completed and the engine closed up. Once this has been done, I'd like a Bitubo steering damper welded to the frame and then the frame and ancillaries can go off for painting. Then it'll be case of rolling the chassis!
@Calum This is an amazing project, looking forward to the next instalment!
It's crazy how Yamaha making the 350 Banshee has breathed new life into the 350LC/YPVS community. This might be of interest, over on 999Lazer YouTube channel they're covering an auction of someone's entire collection which includes a brand new Banshee still in the crate: https://www.youtube.com/watch?v=E_mb4AUi4kg
-
@Calum This is an amazing project, looking forward to the next instalment!
It's crazy how Yamaha making the 350 Banshee has breathed new life into the 350LC/YPVS community. This might be of interest, over on 999Lazer YouTube channel they're covering an auction of someone's entire collection which includes a brand new Banshee still in the crate: https://www.youtube.com/watch?v=E_mb4AUi4kg
@HOTSHOT-III Yeah and the tuning possibilities for the RD is all thanks to the Americans and the love for the Banshee.
I just think it's amazing that an engine basically designed in the 60s was used competitively all the way up till today.
Wow a Banshee new in crate, that's silly! They command good money now for a Banshee.
-
@hotshot-iii That's a very cool video and local to me too!
A crated Banshee, wow what a museum piece.
I had no affiliation with the Banshee prior to this build, but what a machine and what an era for motorcycling. All lost to time now and kids these days won't know the joys of machines like that.
-
Well this last month a disgusting amount of money was dropped on parts for this engine.
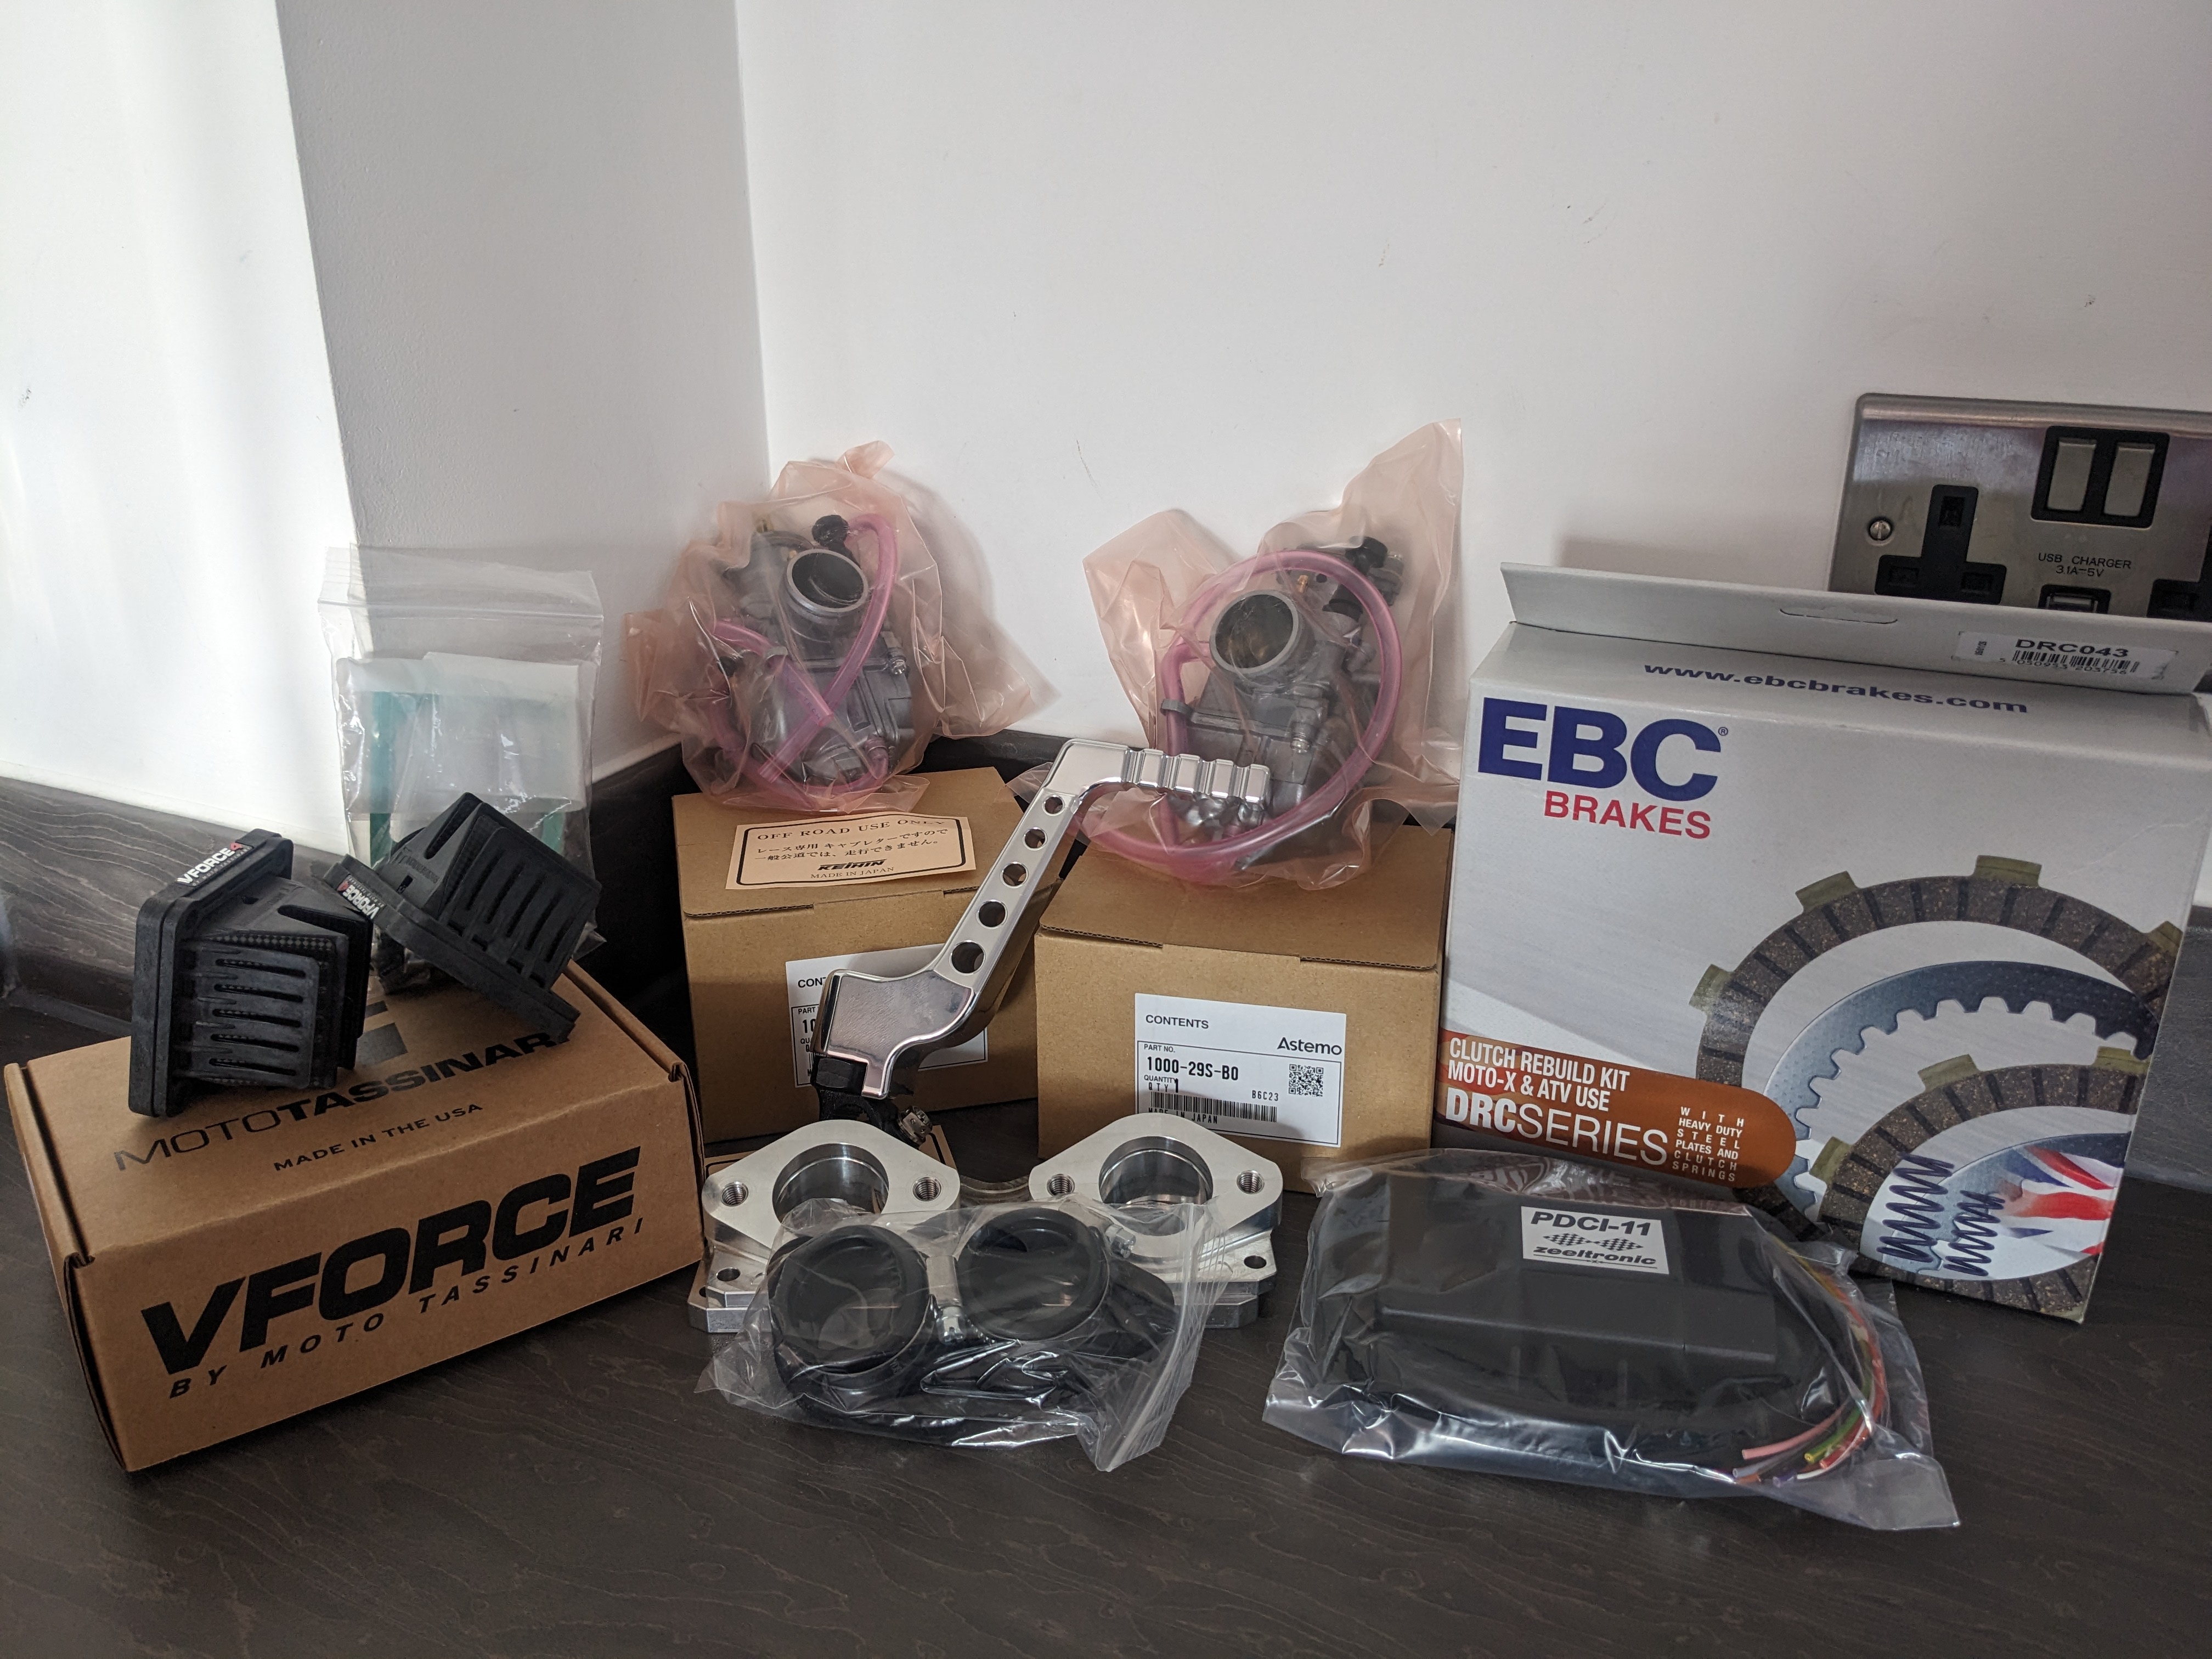
- Two Keihin PWK 28mm Carbs
- Two Vforce Reed Blocks
- Billet Inlet manifold
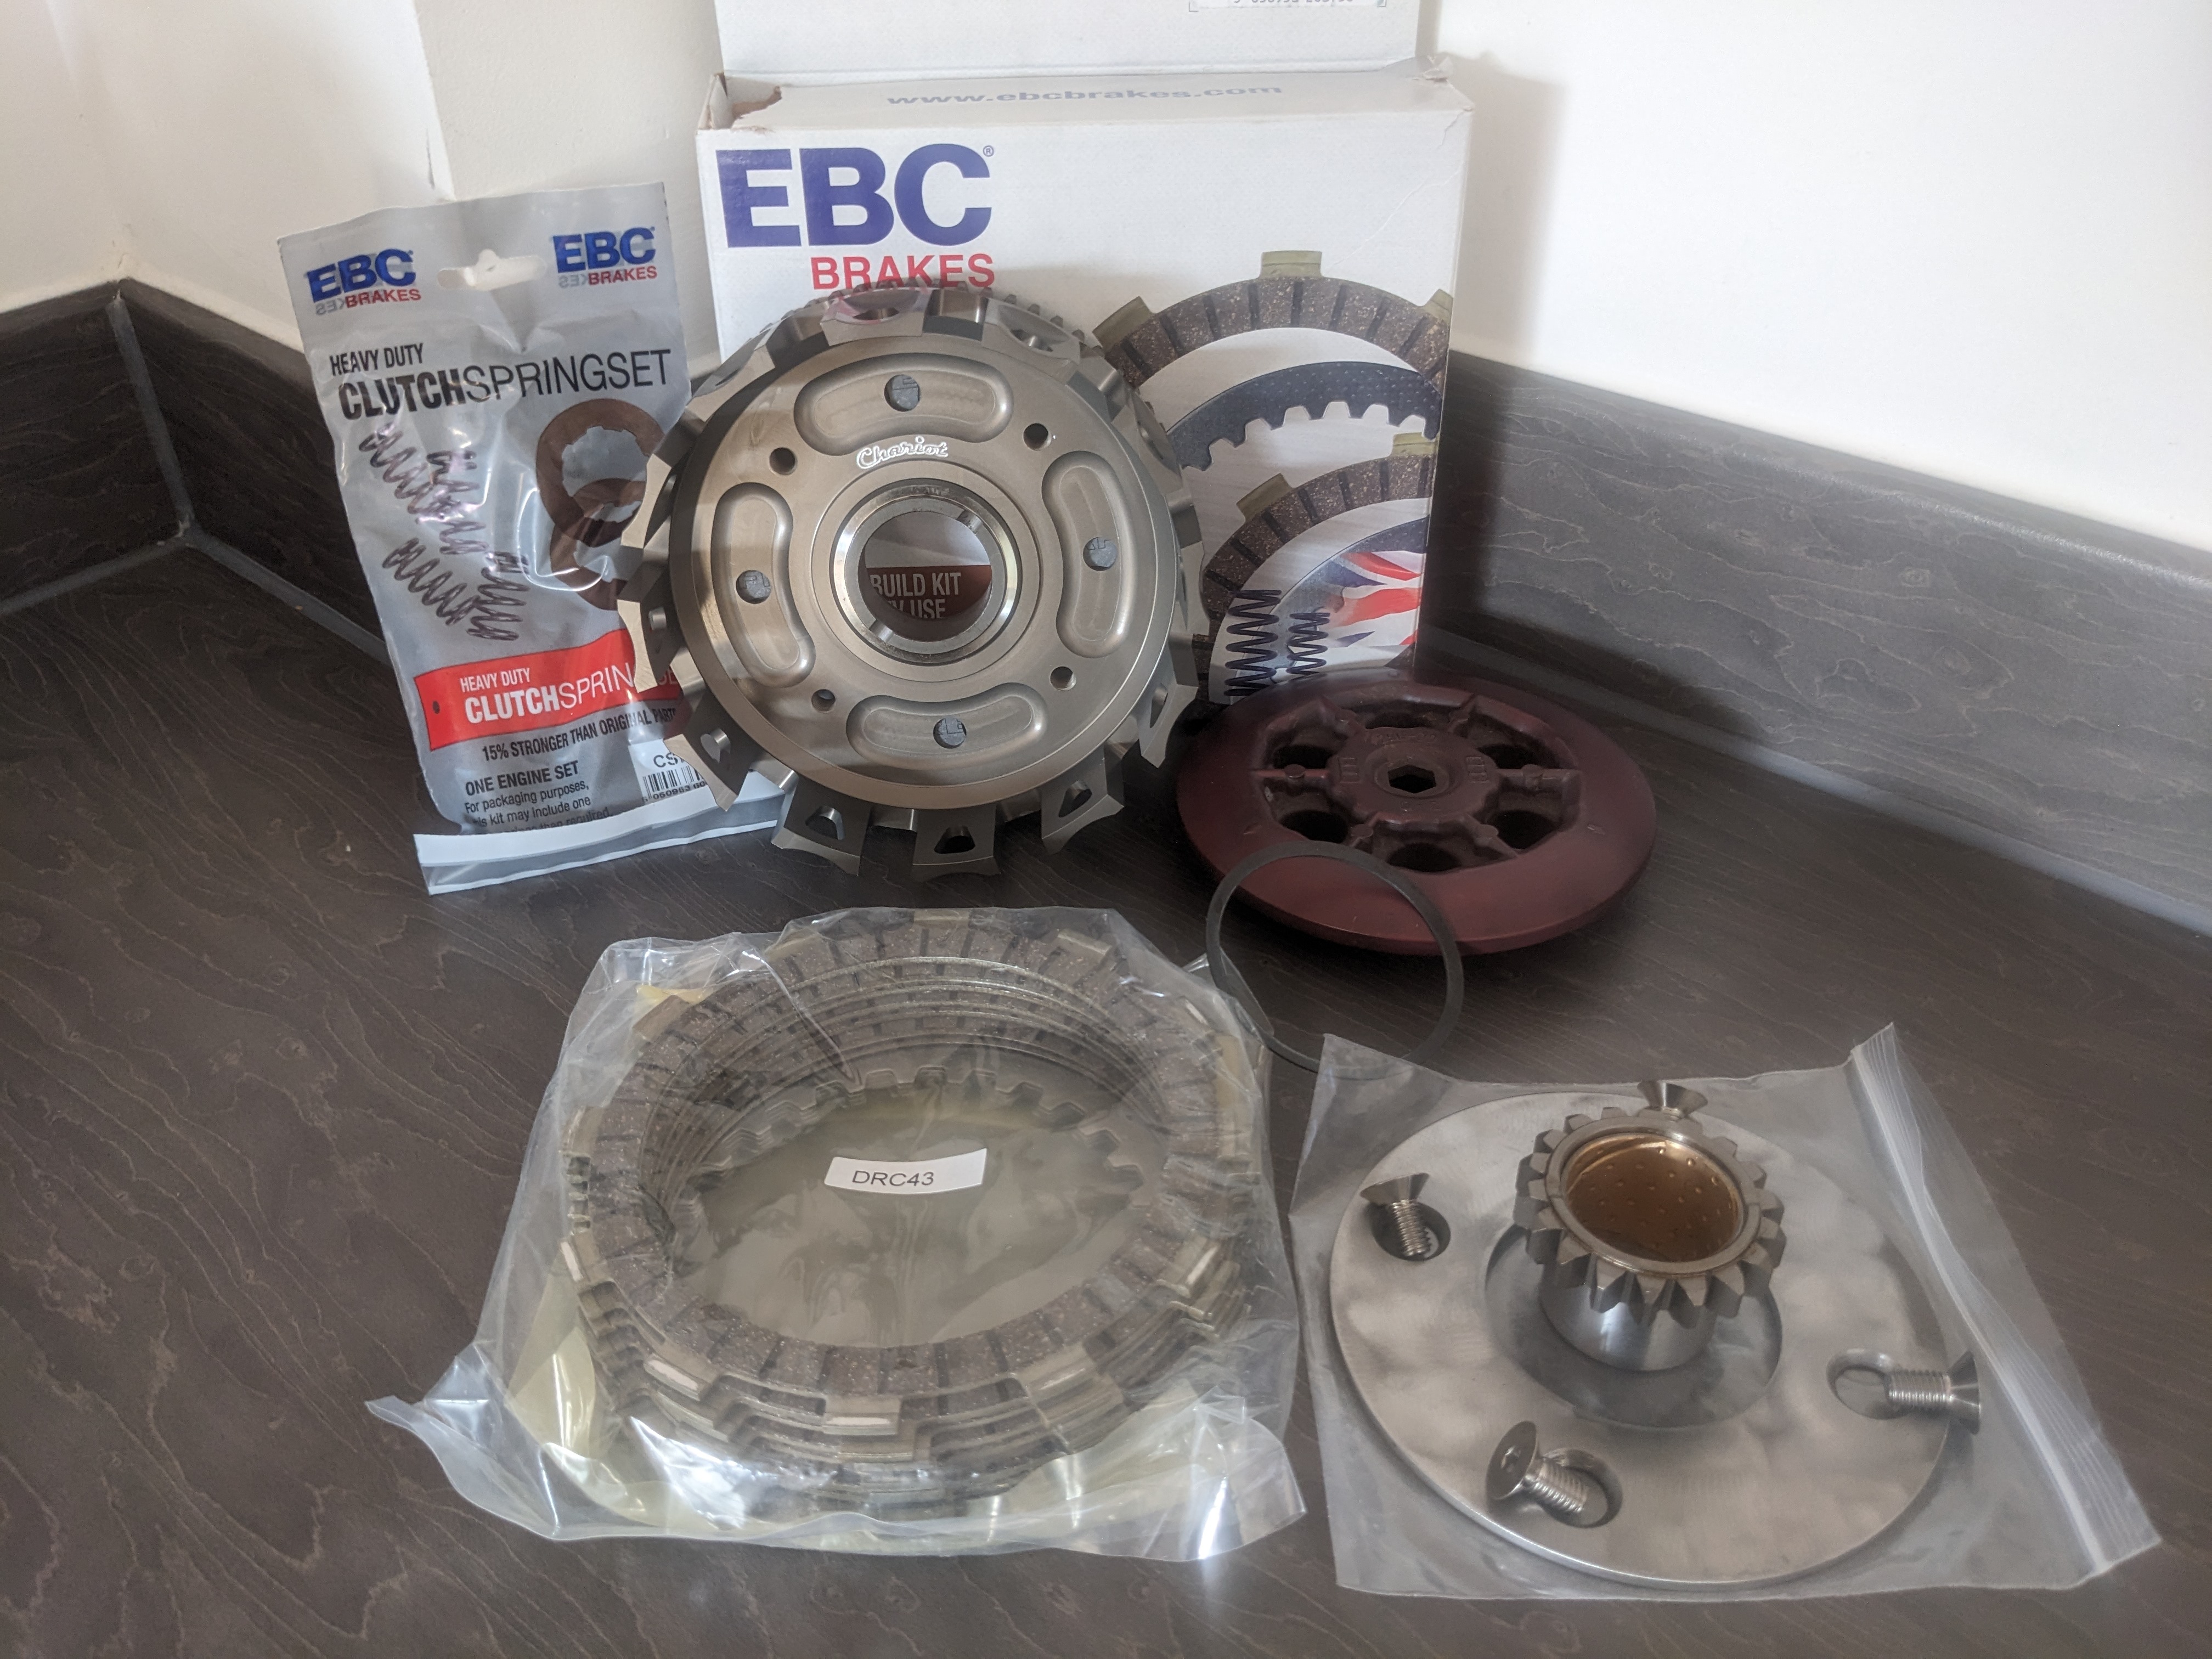
- EBC Clutch Kit + Heavy Duty Springs
- 6 TZ750 Genuine Clutch Springs
- Zeeltronic Ignition System
- Billet Kick Starter Lever
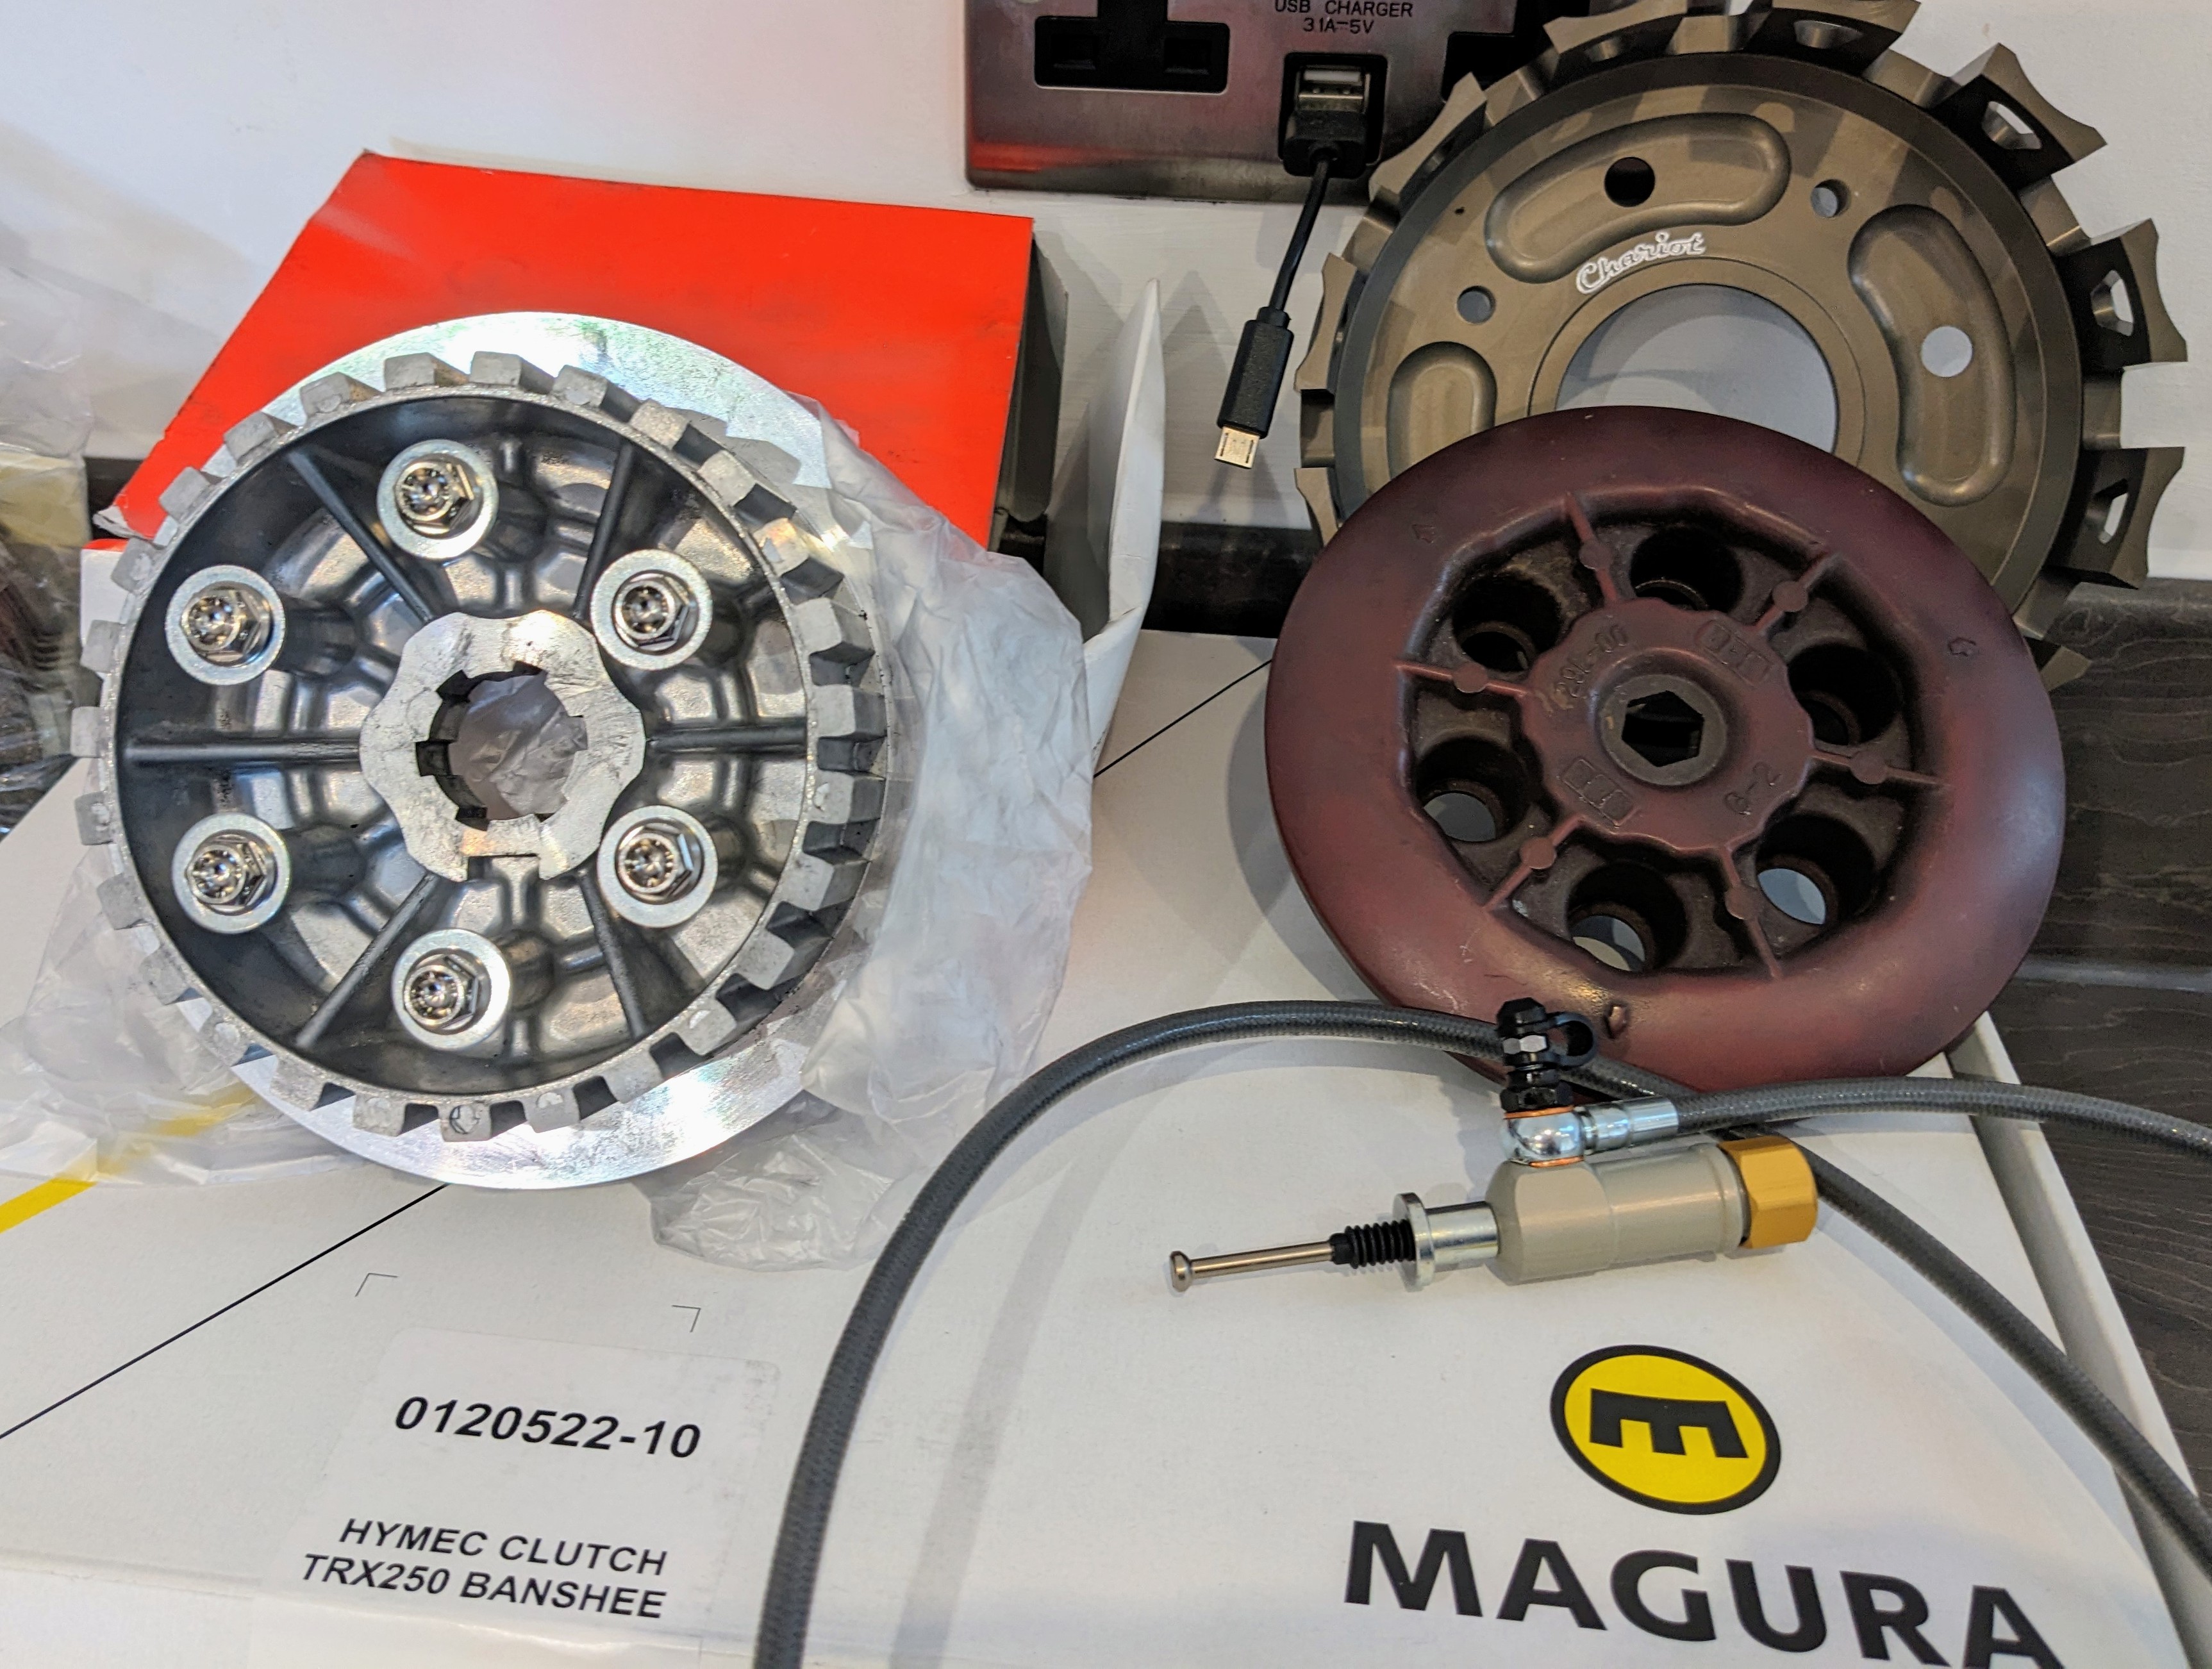
- Magura Hydraulic Clutch Lever
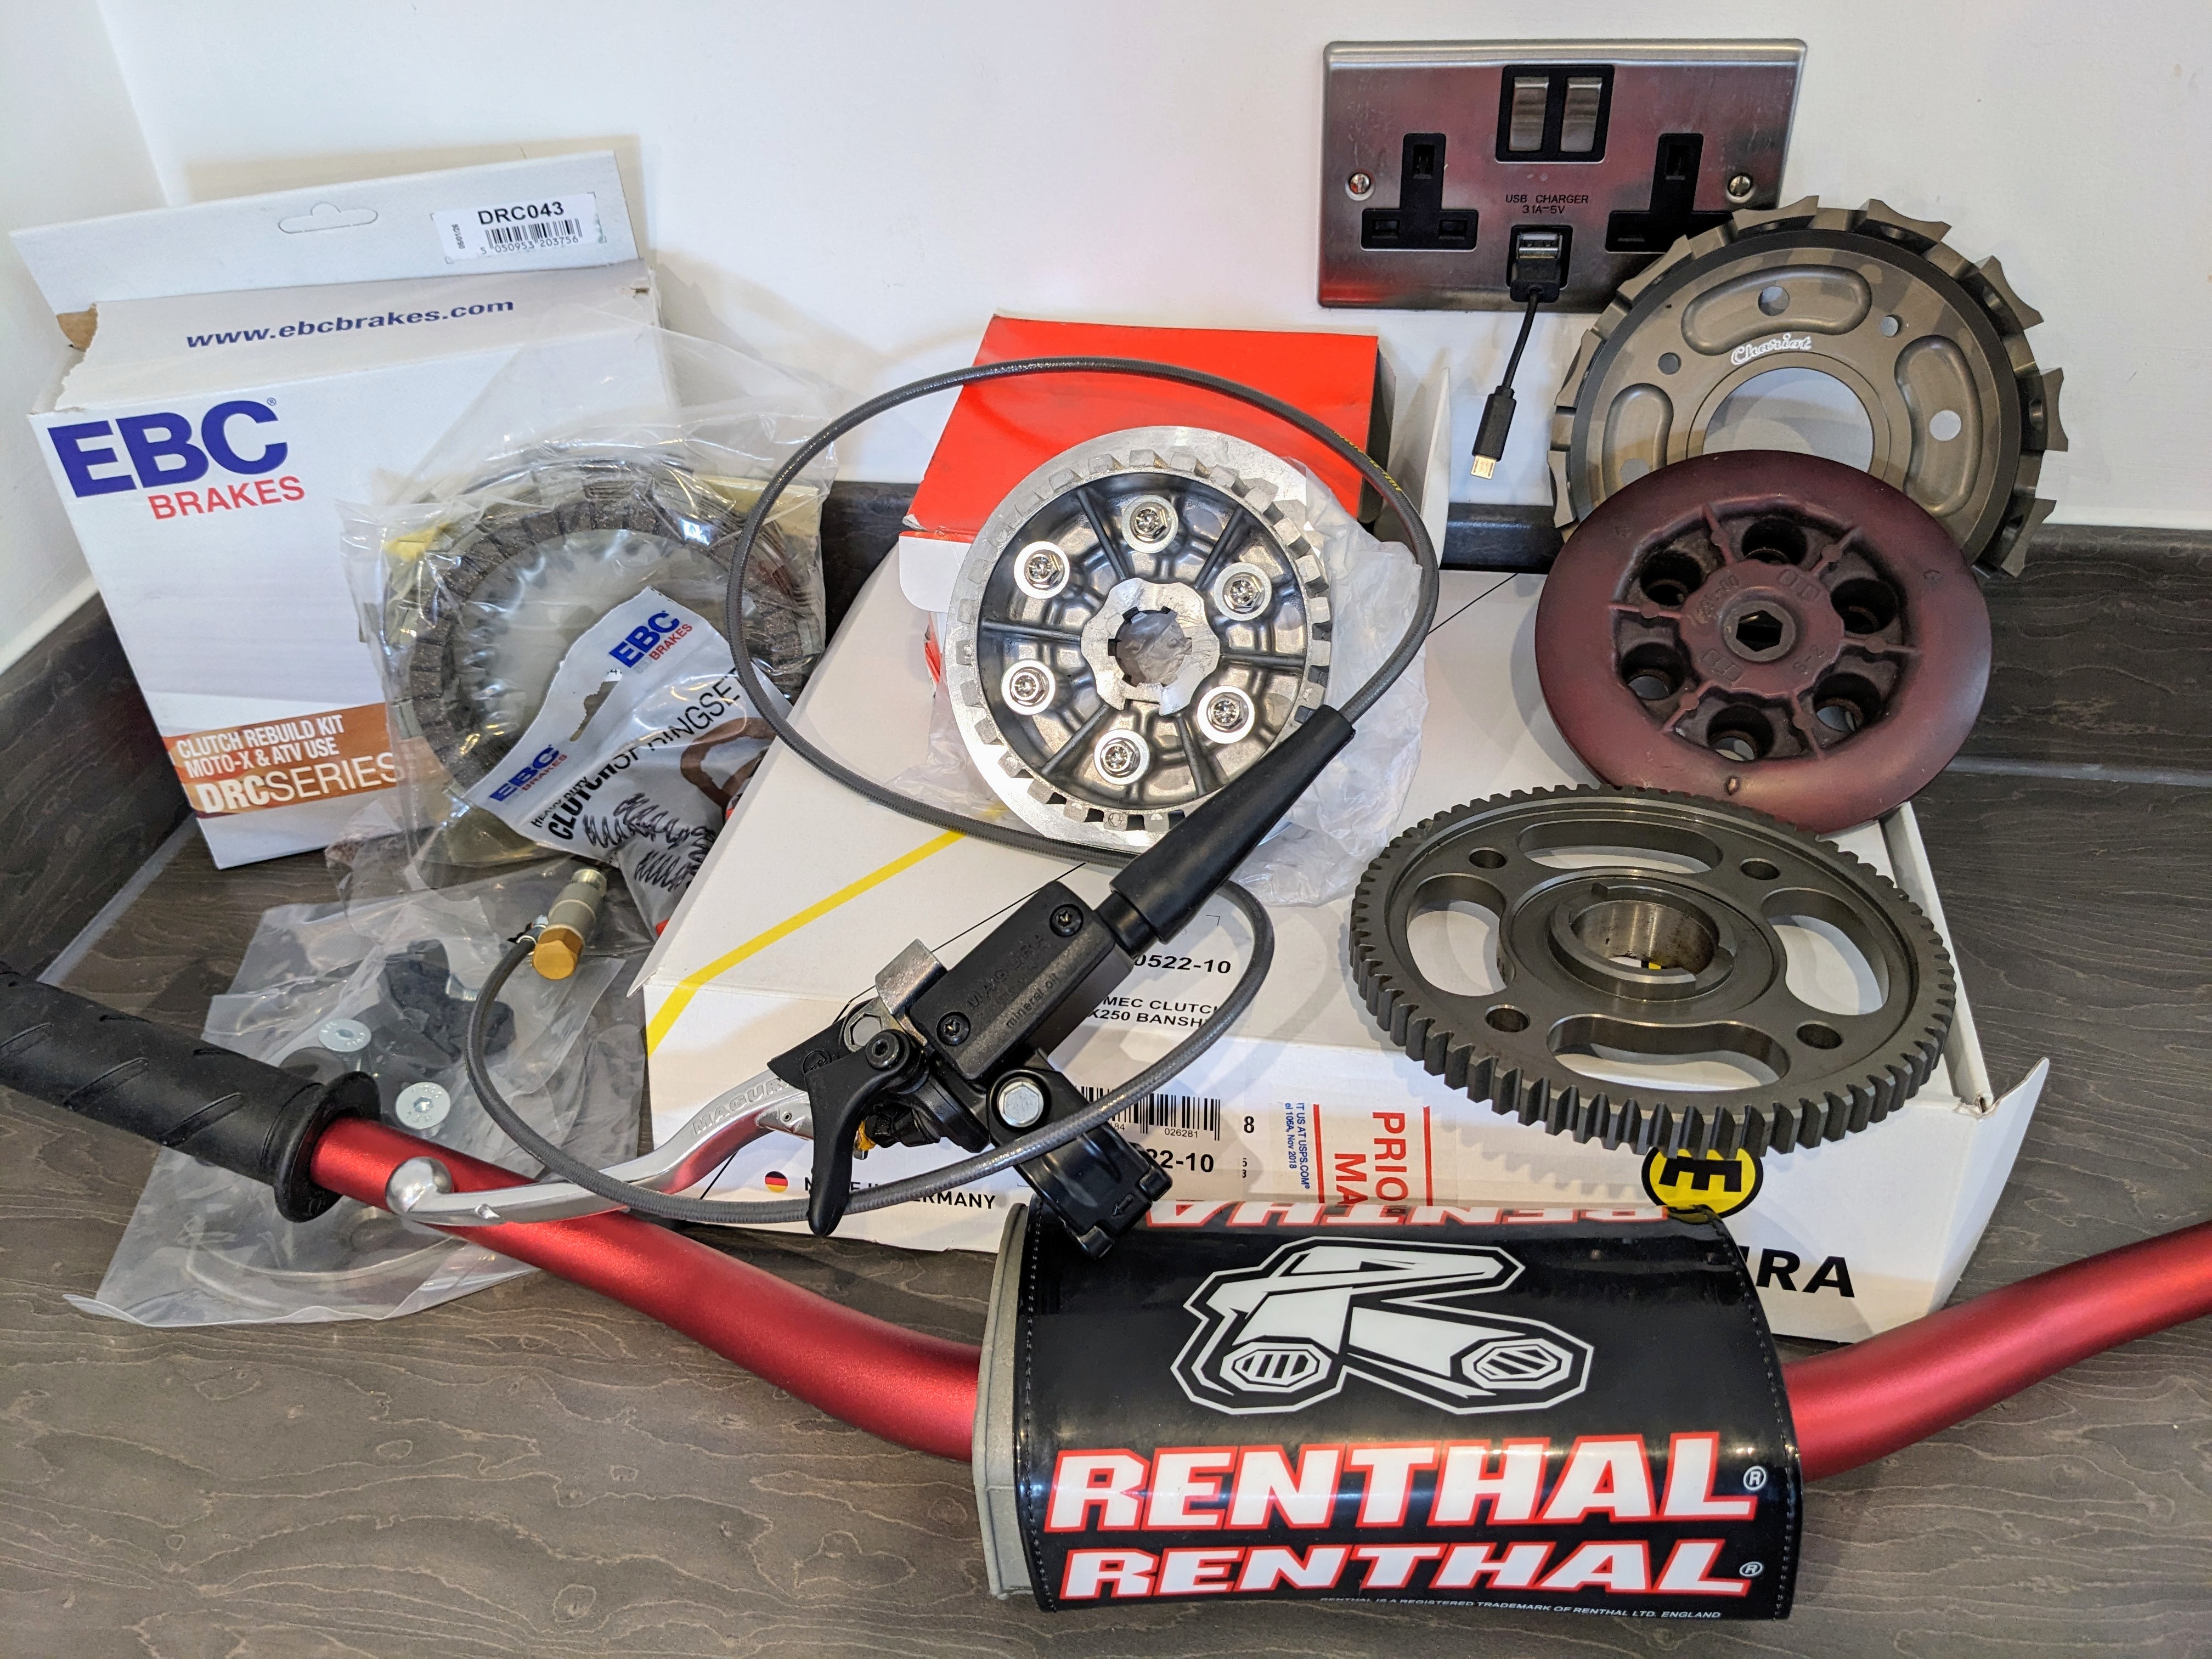
- Chariot Performance Billet Clutch Basket
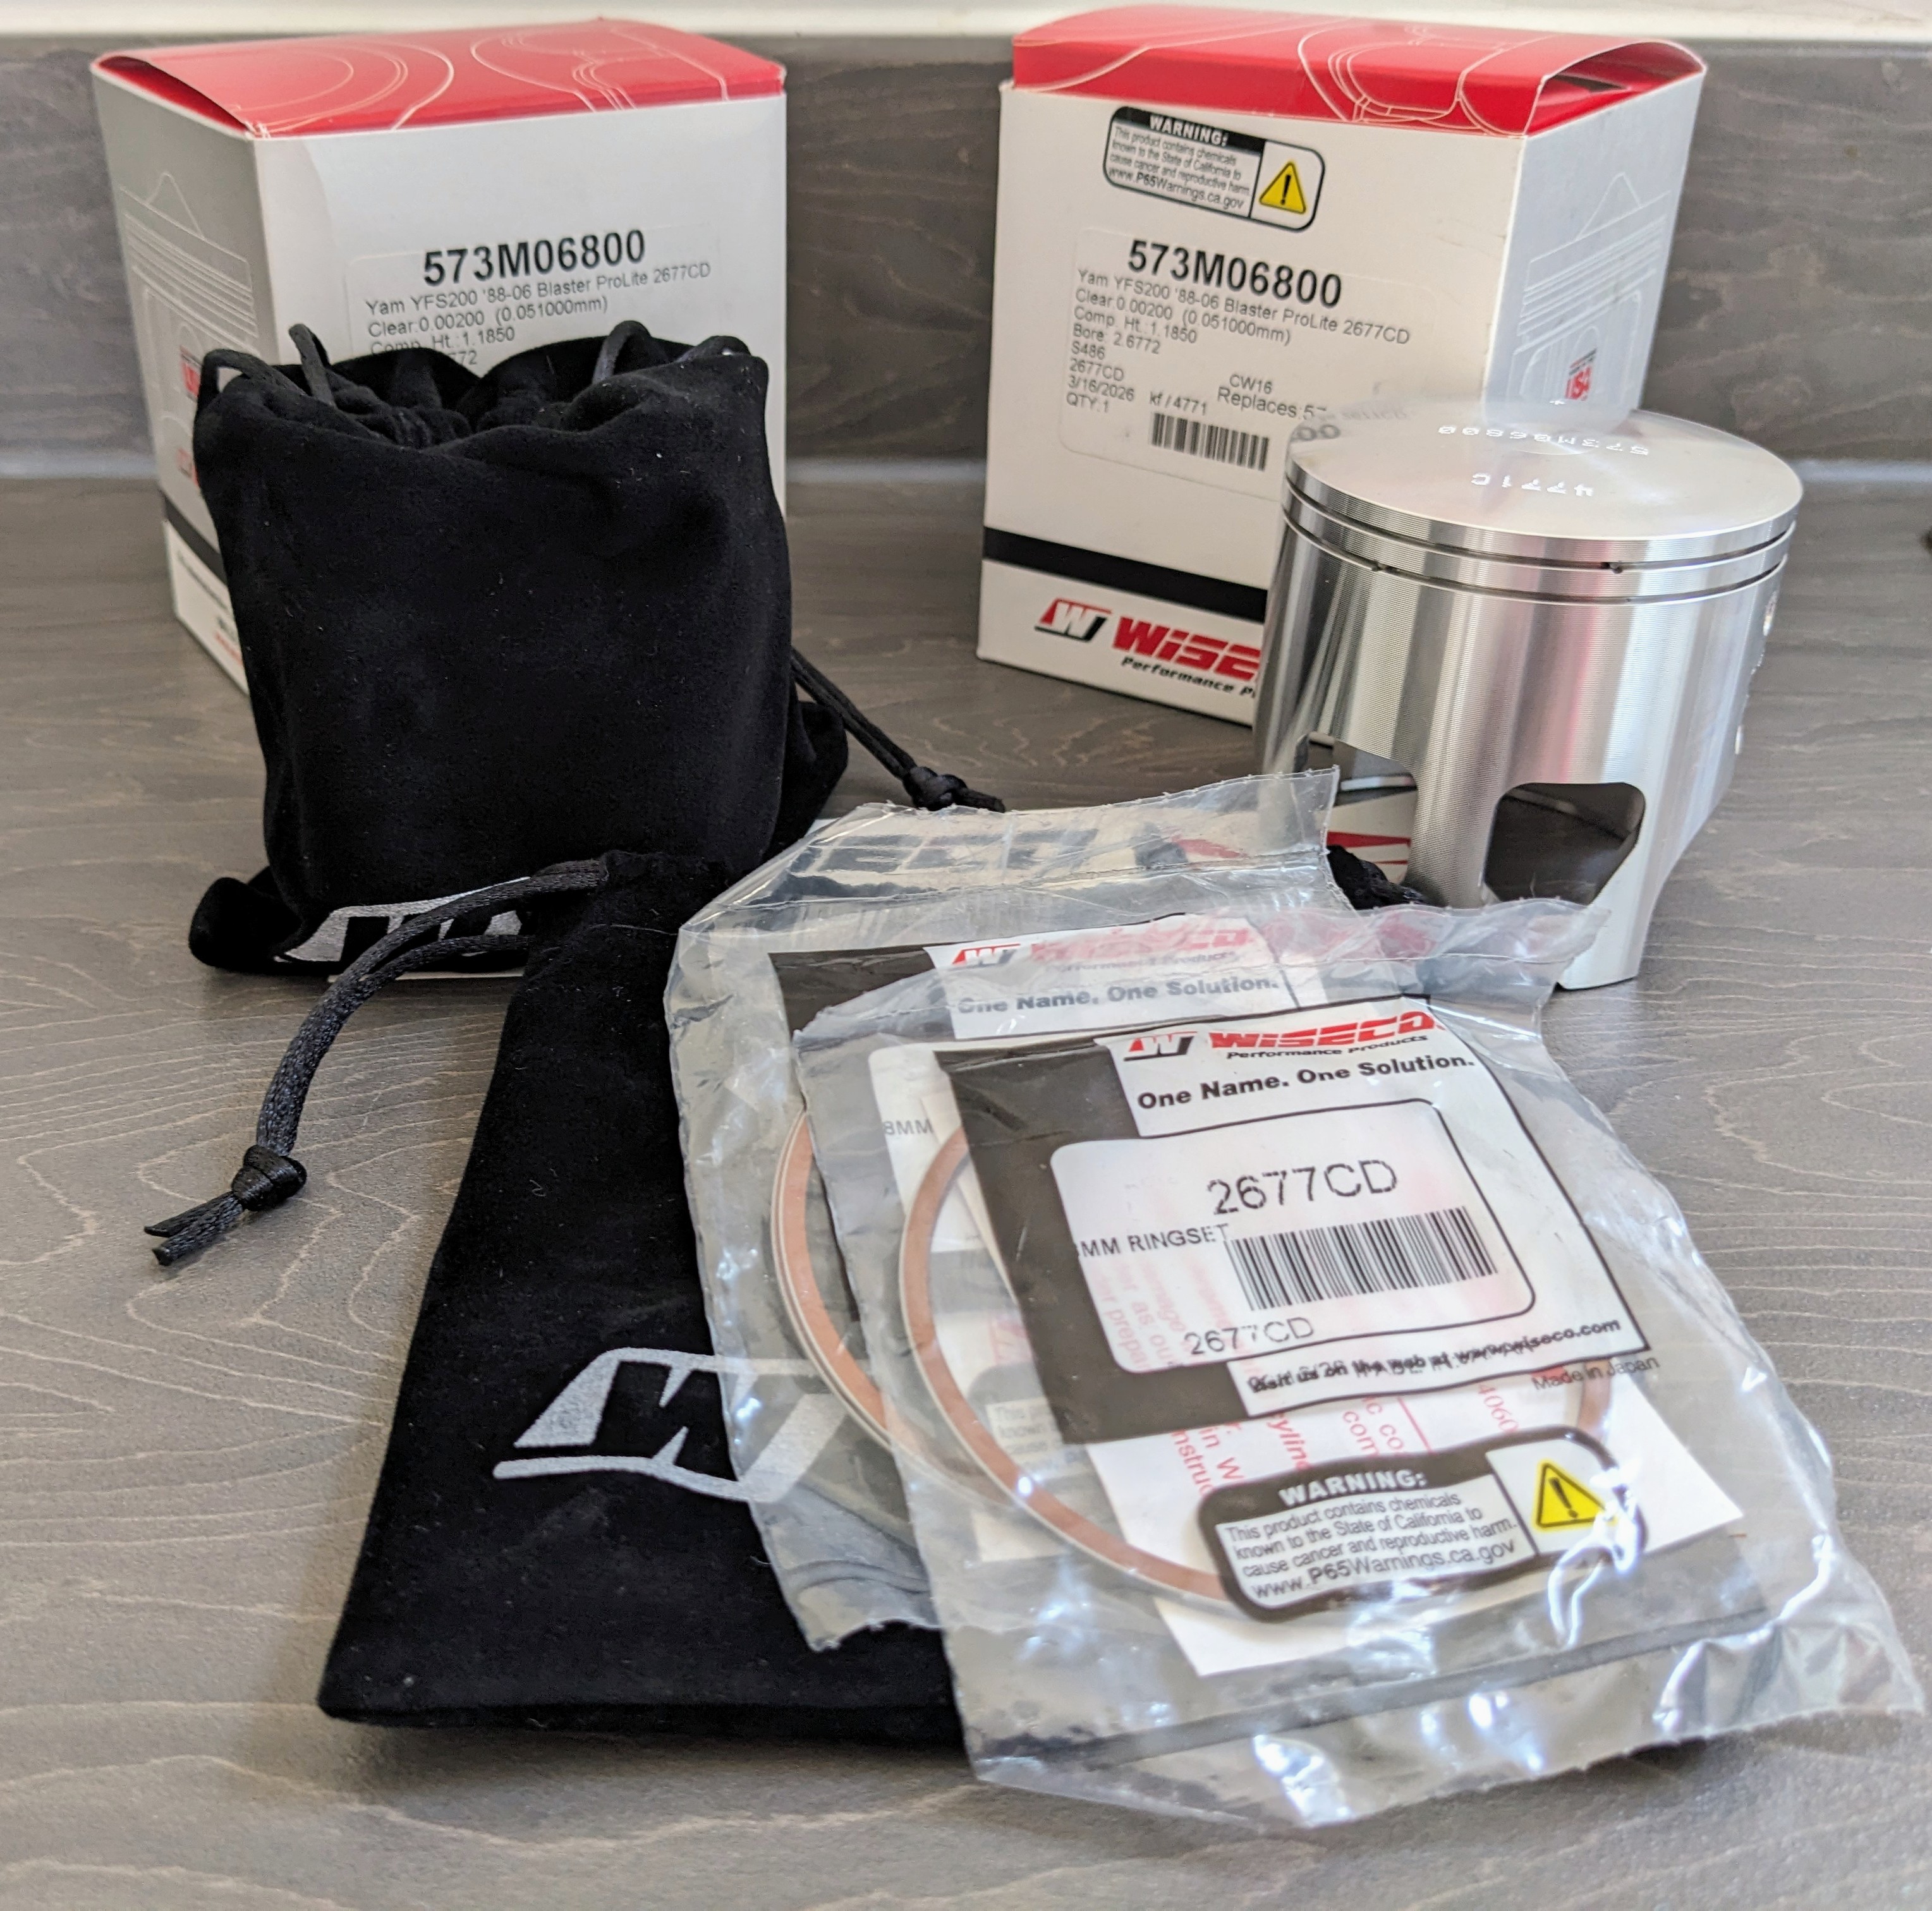
- Wiseco Blaster 200 Piston (
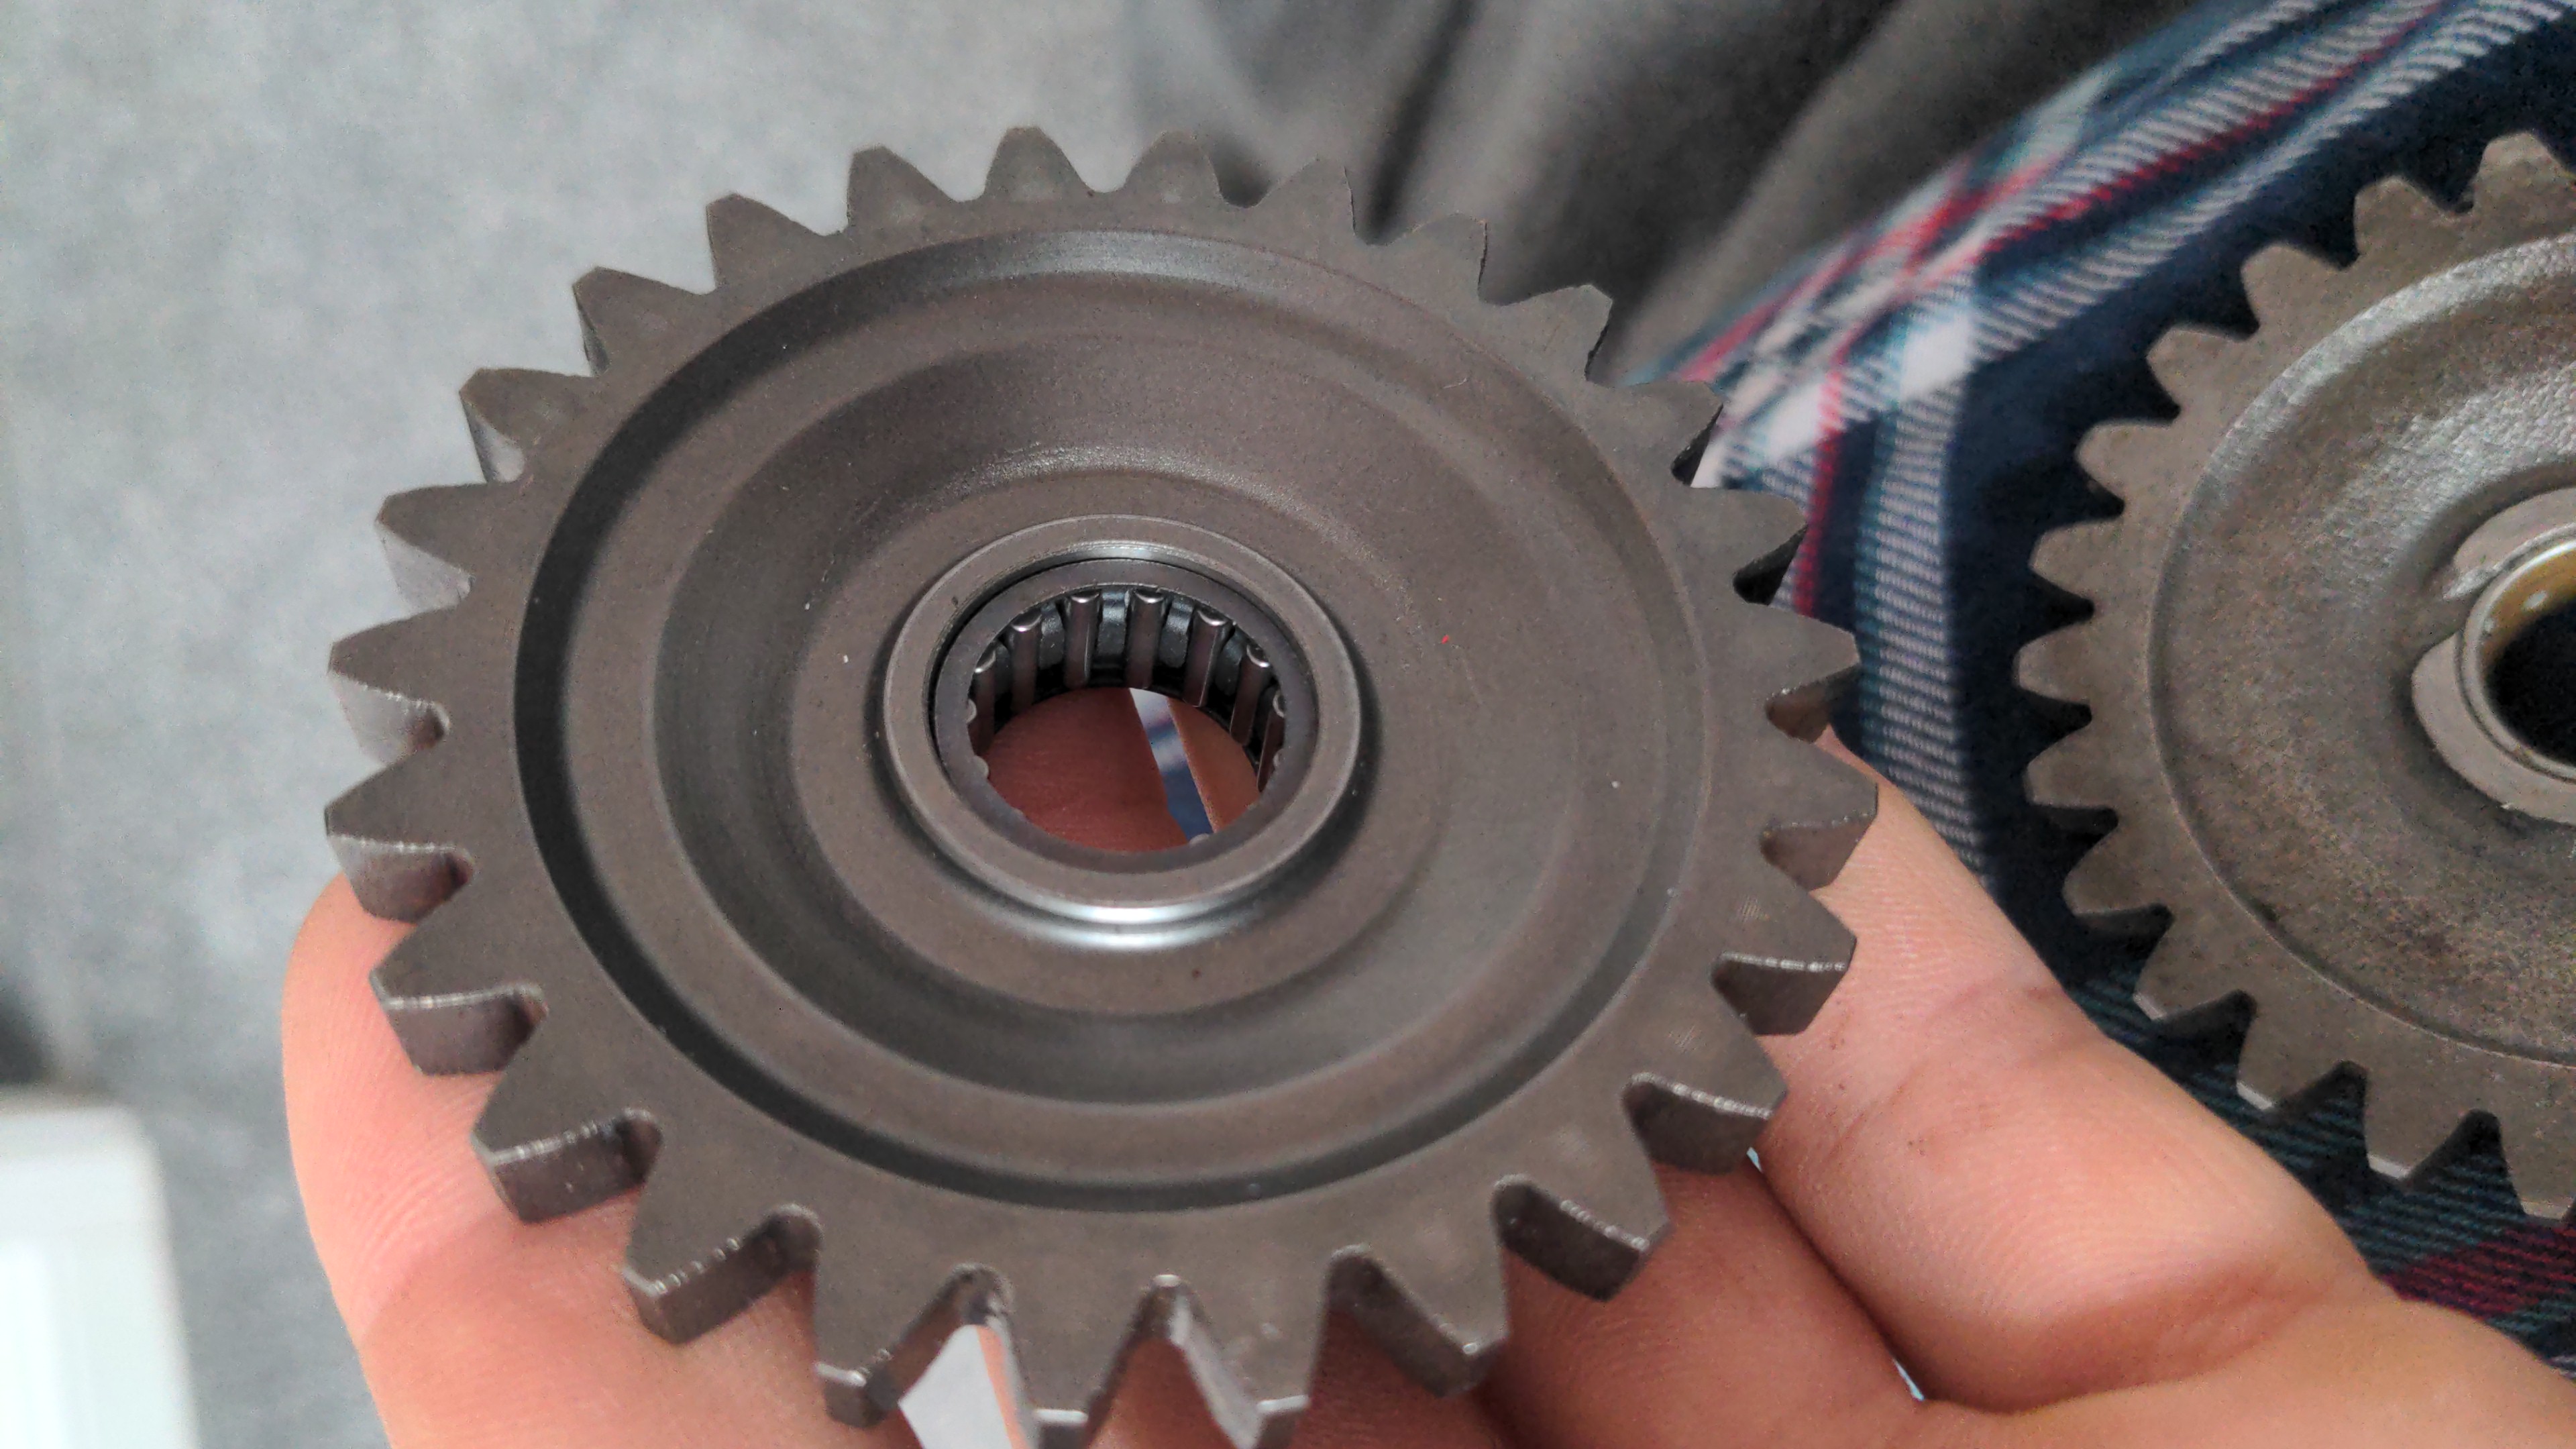
573M06800) - Modified Idle Gear with bearing
These
Wisecopistons replace the stock Athena pistons due to the115mmlong rods I'm running and the+4mmstroked crank shaft. The head still needs to be machined to accommodate the longer stroke and the wrist pin on these pistons is different to accommodate the longer rod.
This idle gear is lovely, totally unnecessary but was only £60 but seemingly not available to purchase anywhere I looked.
The Magura wasn't cheap, but it's going to be necessary when running all 6
TZ750clutch springs just to keep the power from slipping the clutch.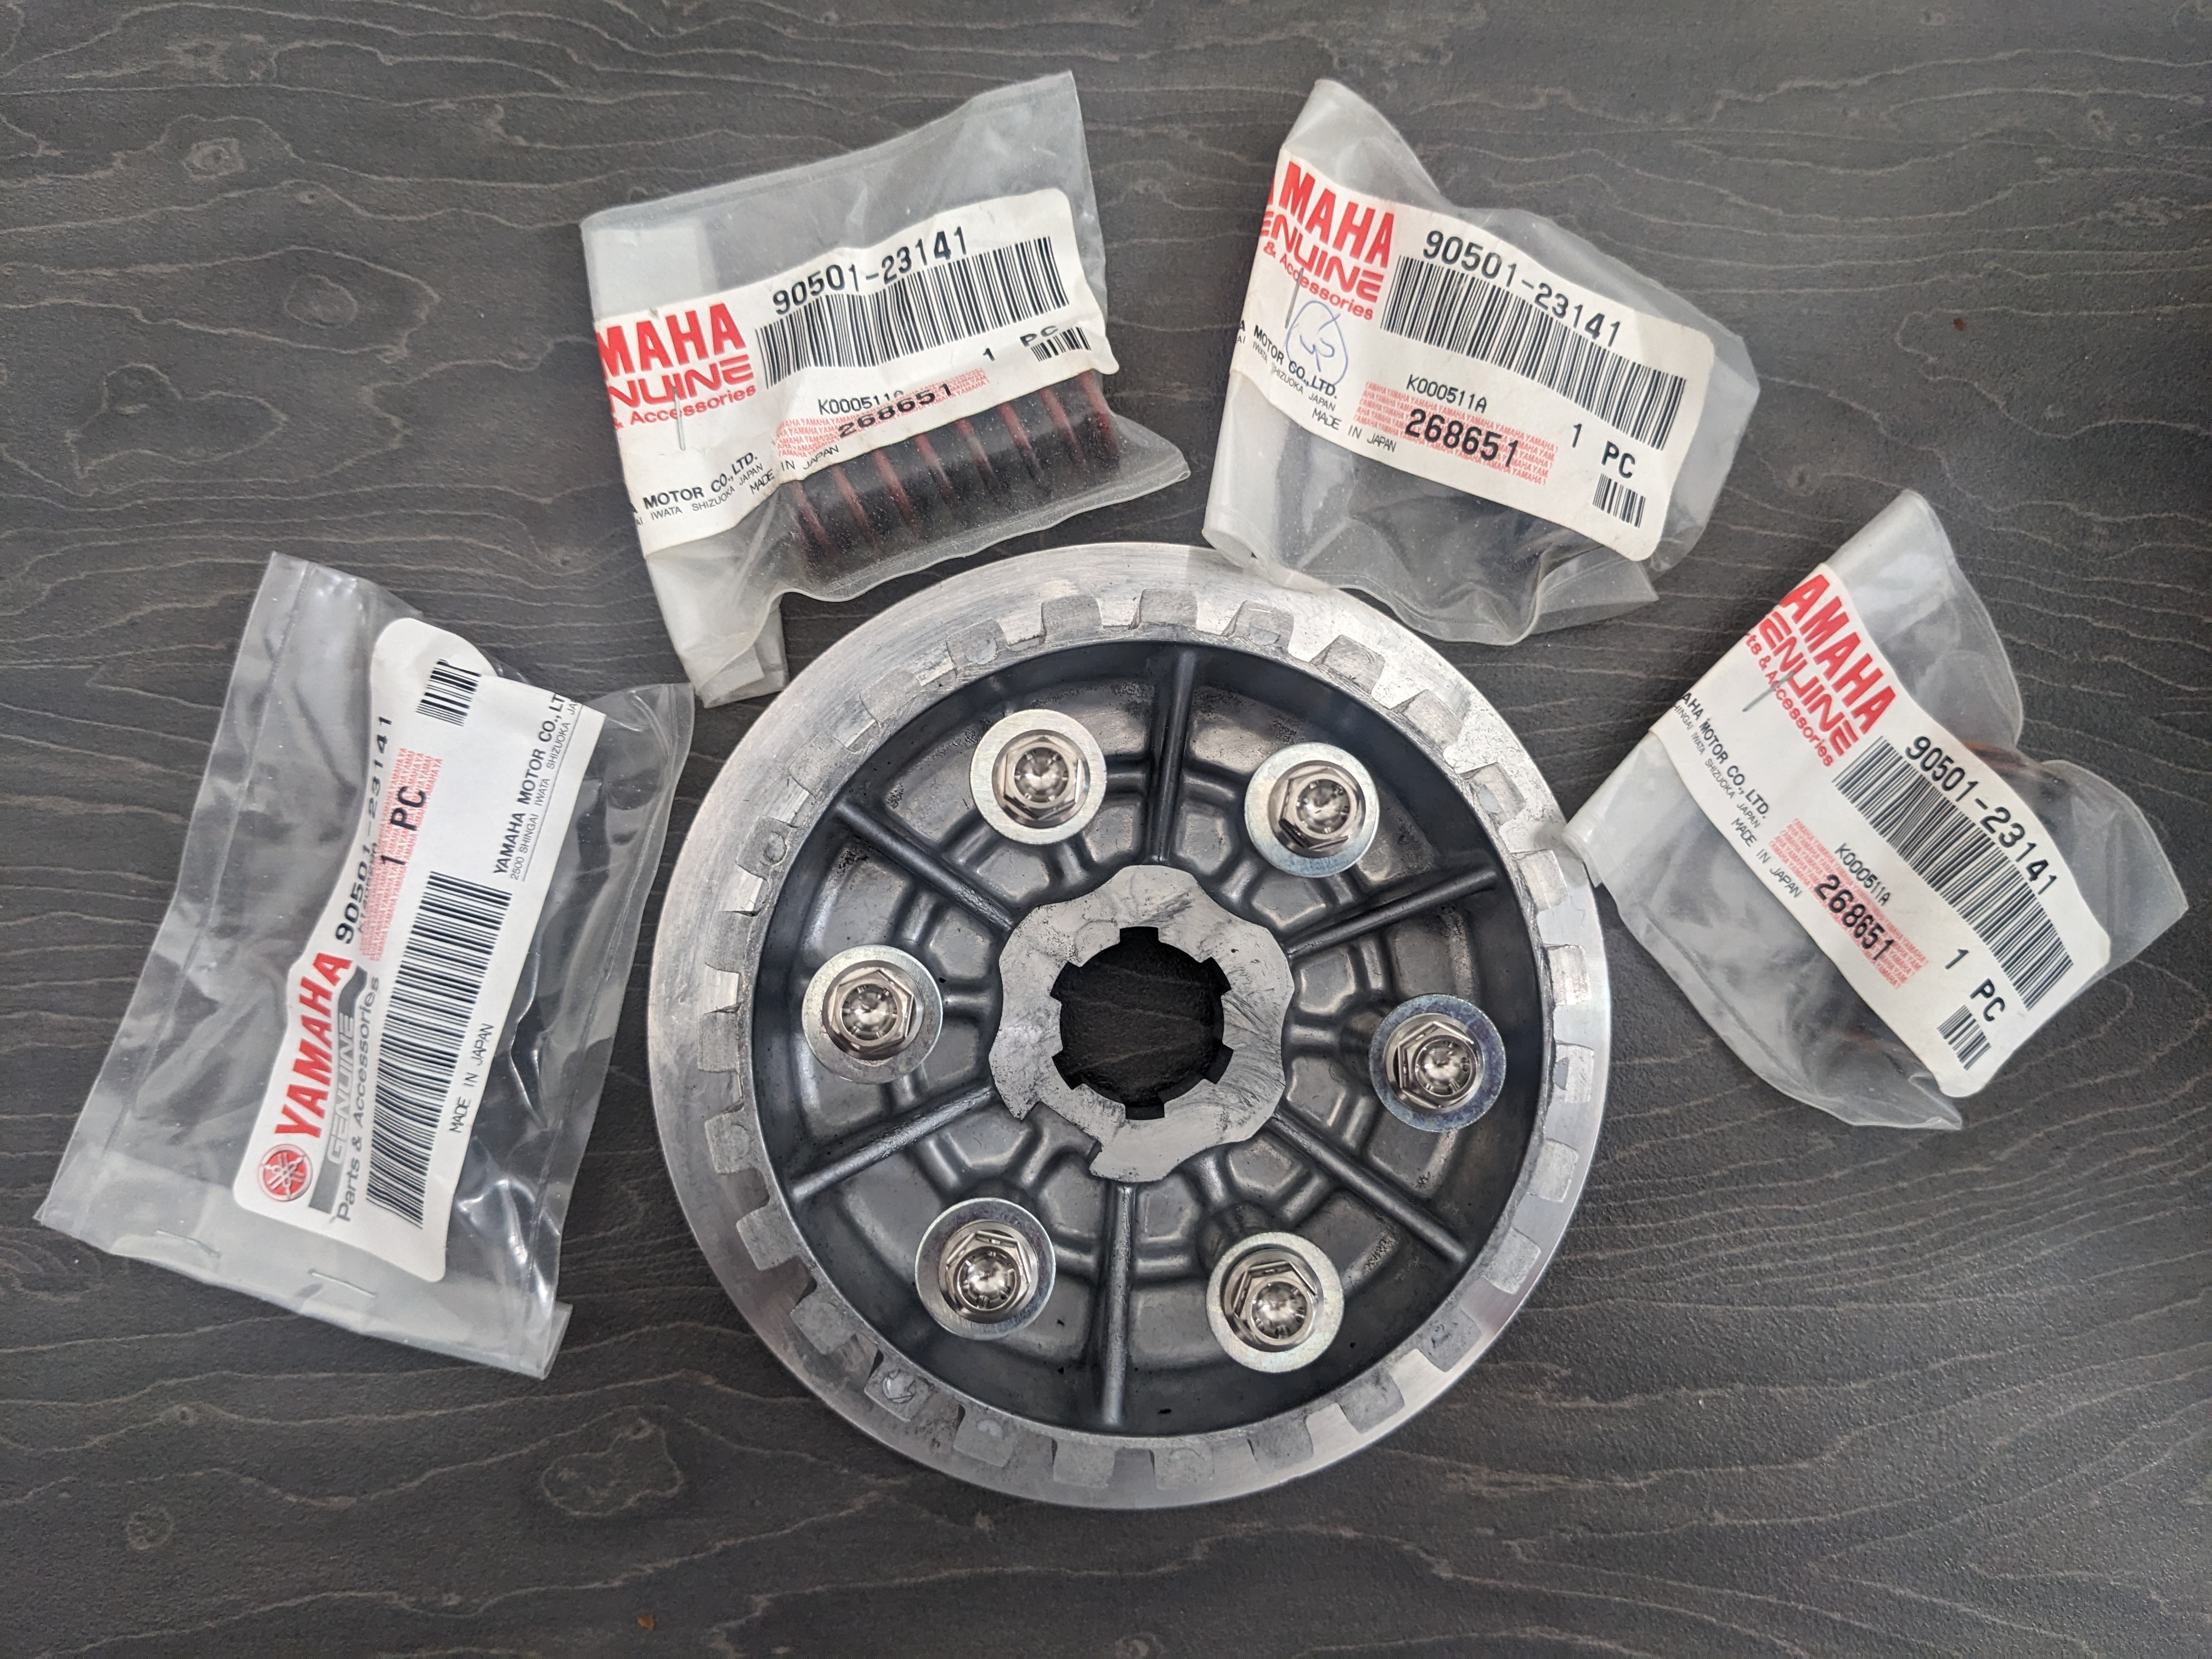
(the other two springs are in the post I had to source elsewhere).Now that I have the basket, I can finally assemble the clutch basket with my straight cut primary gears.
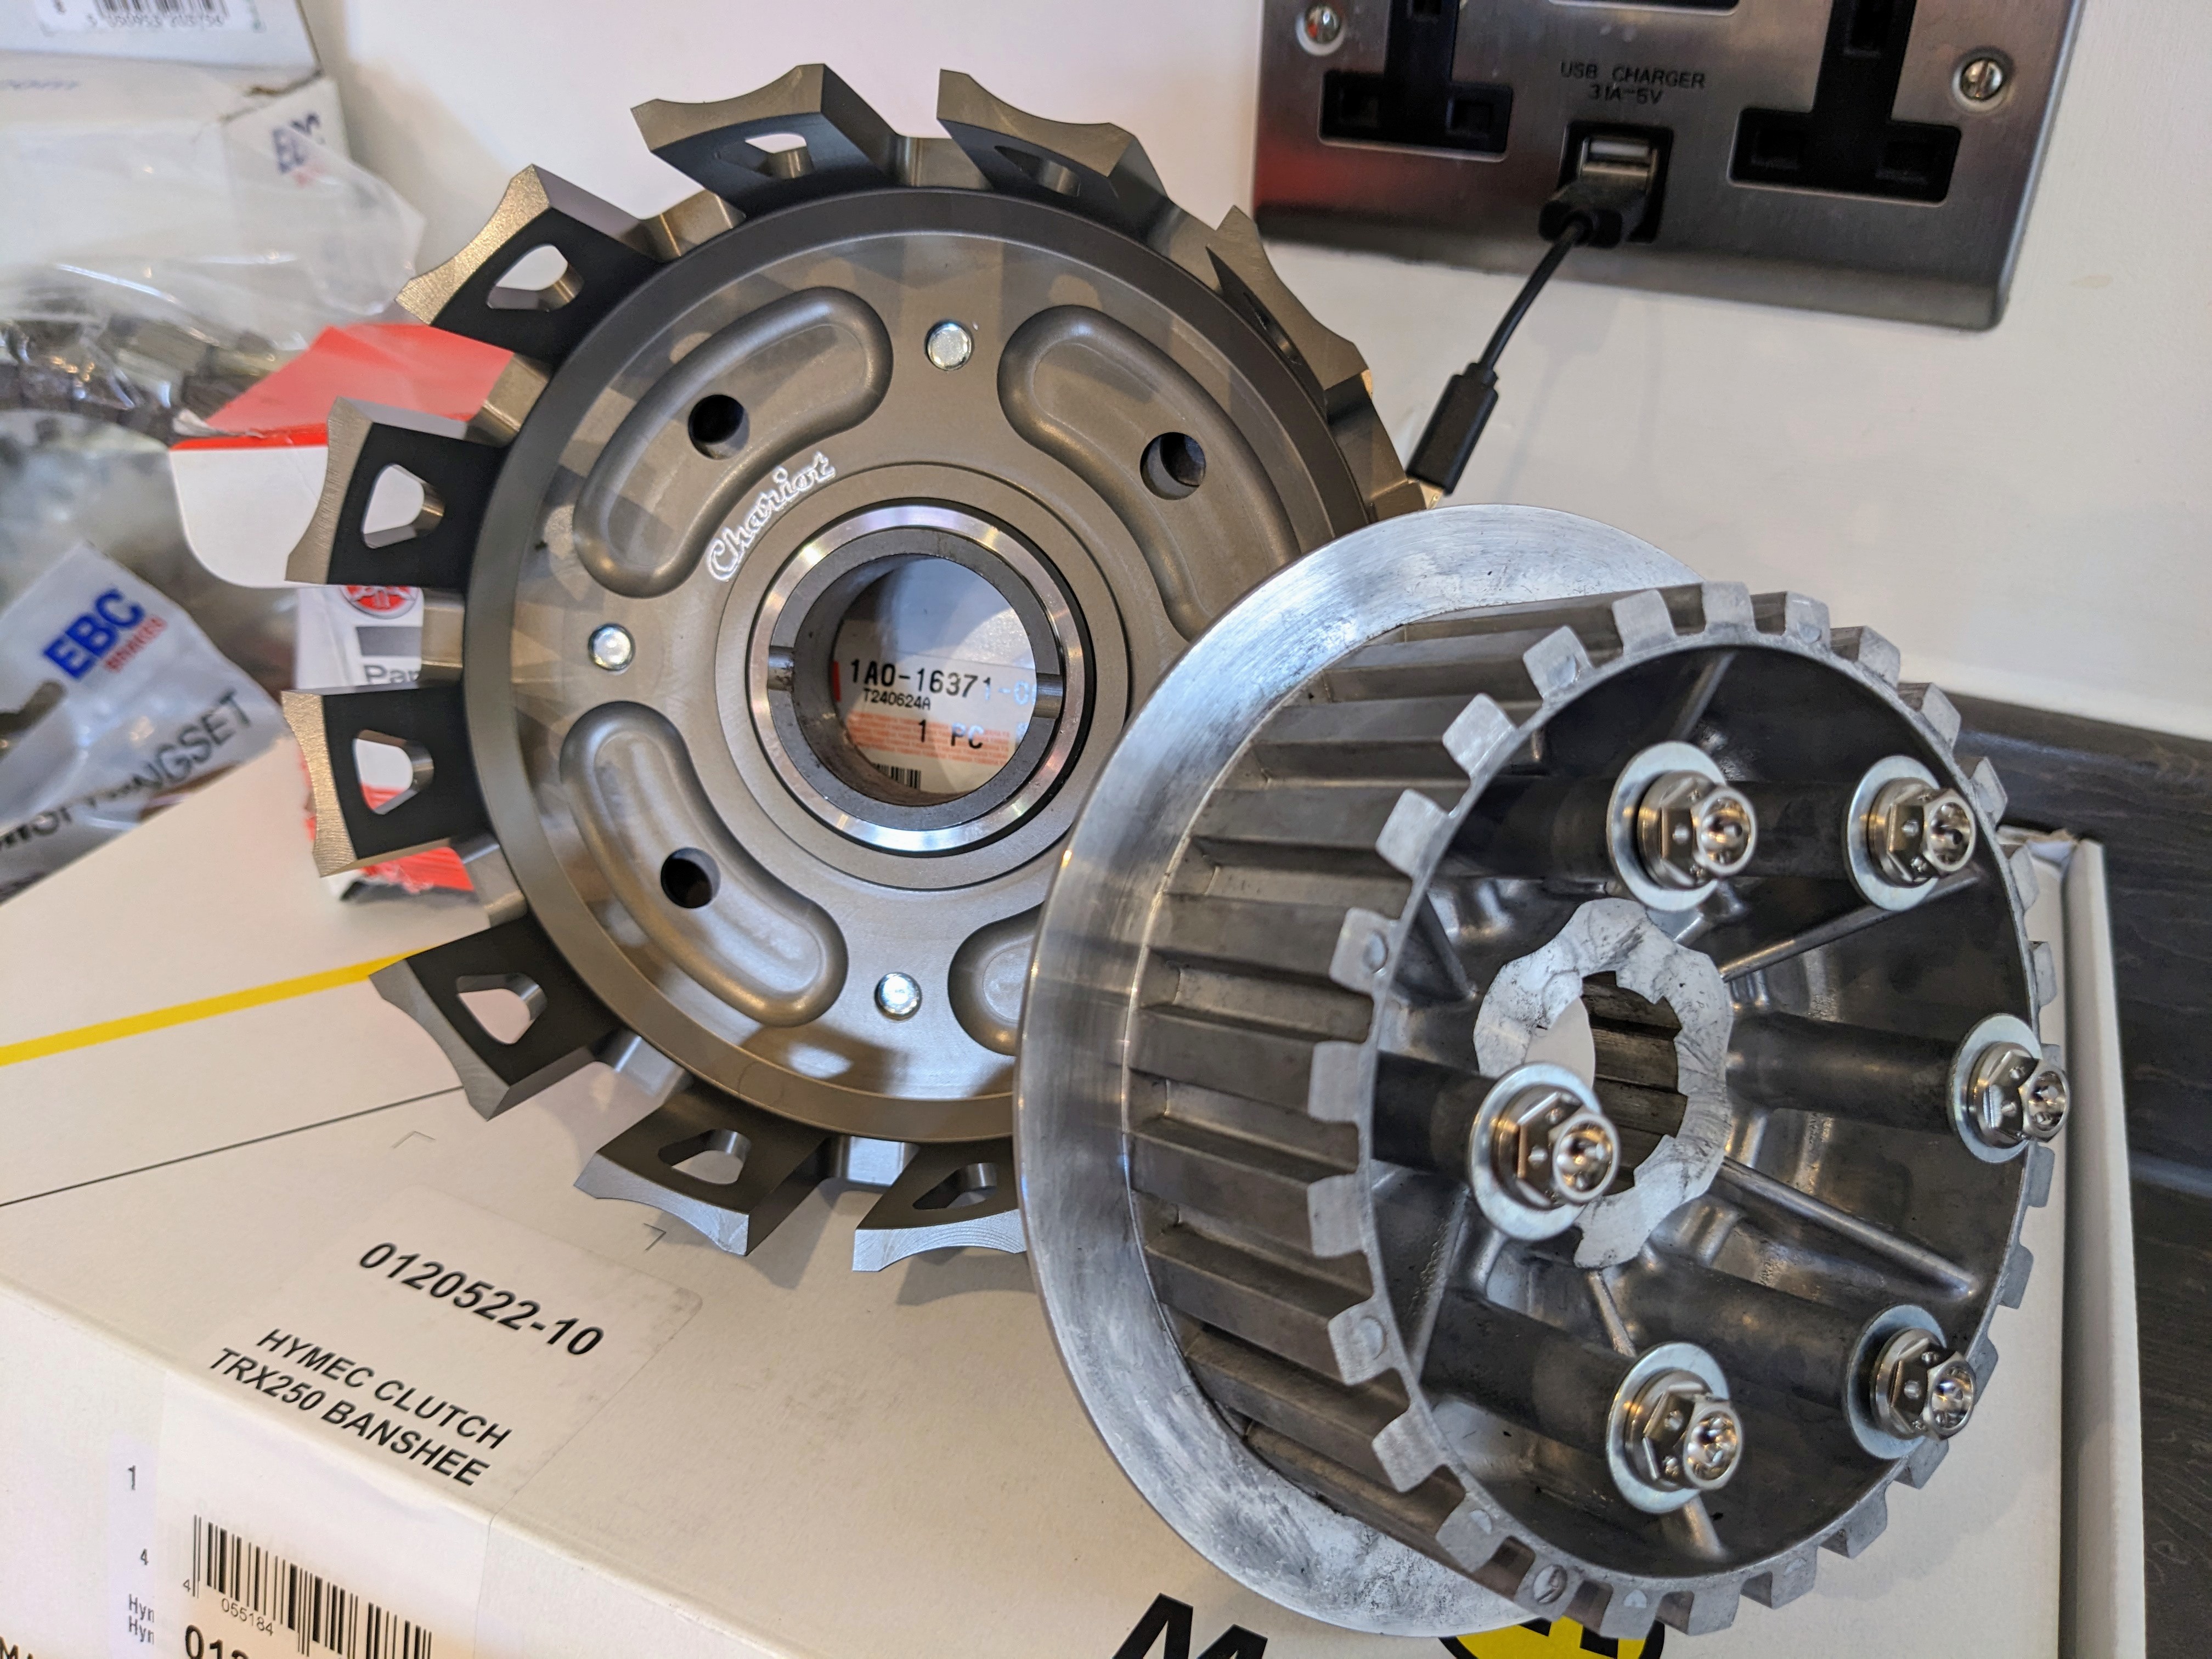
Basket is beautifully made, claimed to be the best on the market and I can see why. It was missing the Belleville washer that sits between the basket and the fastener plate, I bought a genuine basket to chop up and salvage but it wasn't on that basket (apparently they're fitted to 1986 models and later). I managed to find a company that sell them so ordered from them and fitted. Wasn't cheap but I'm glad it's in.
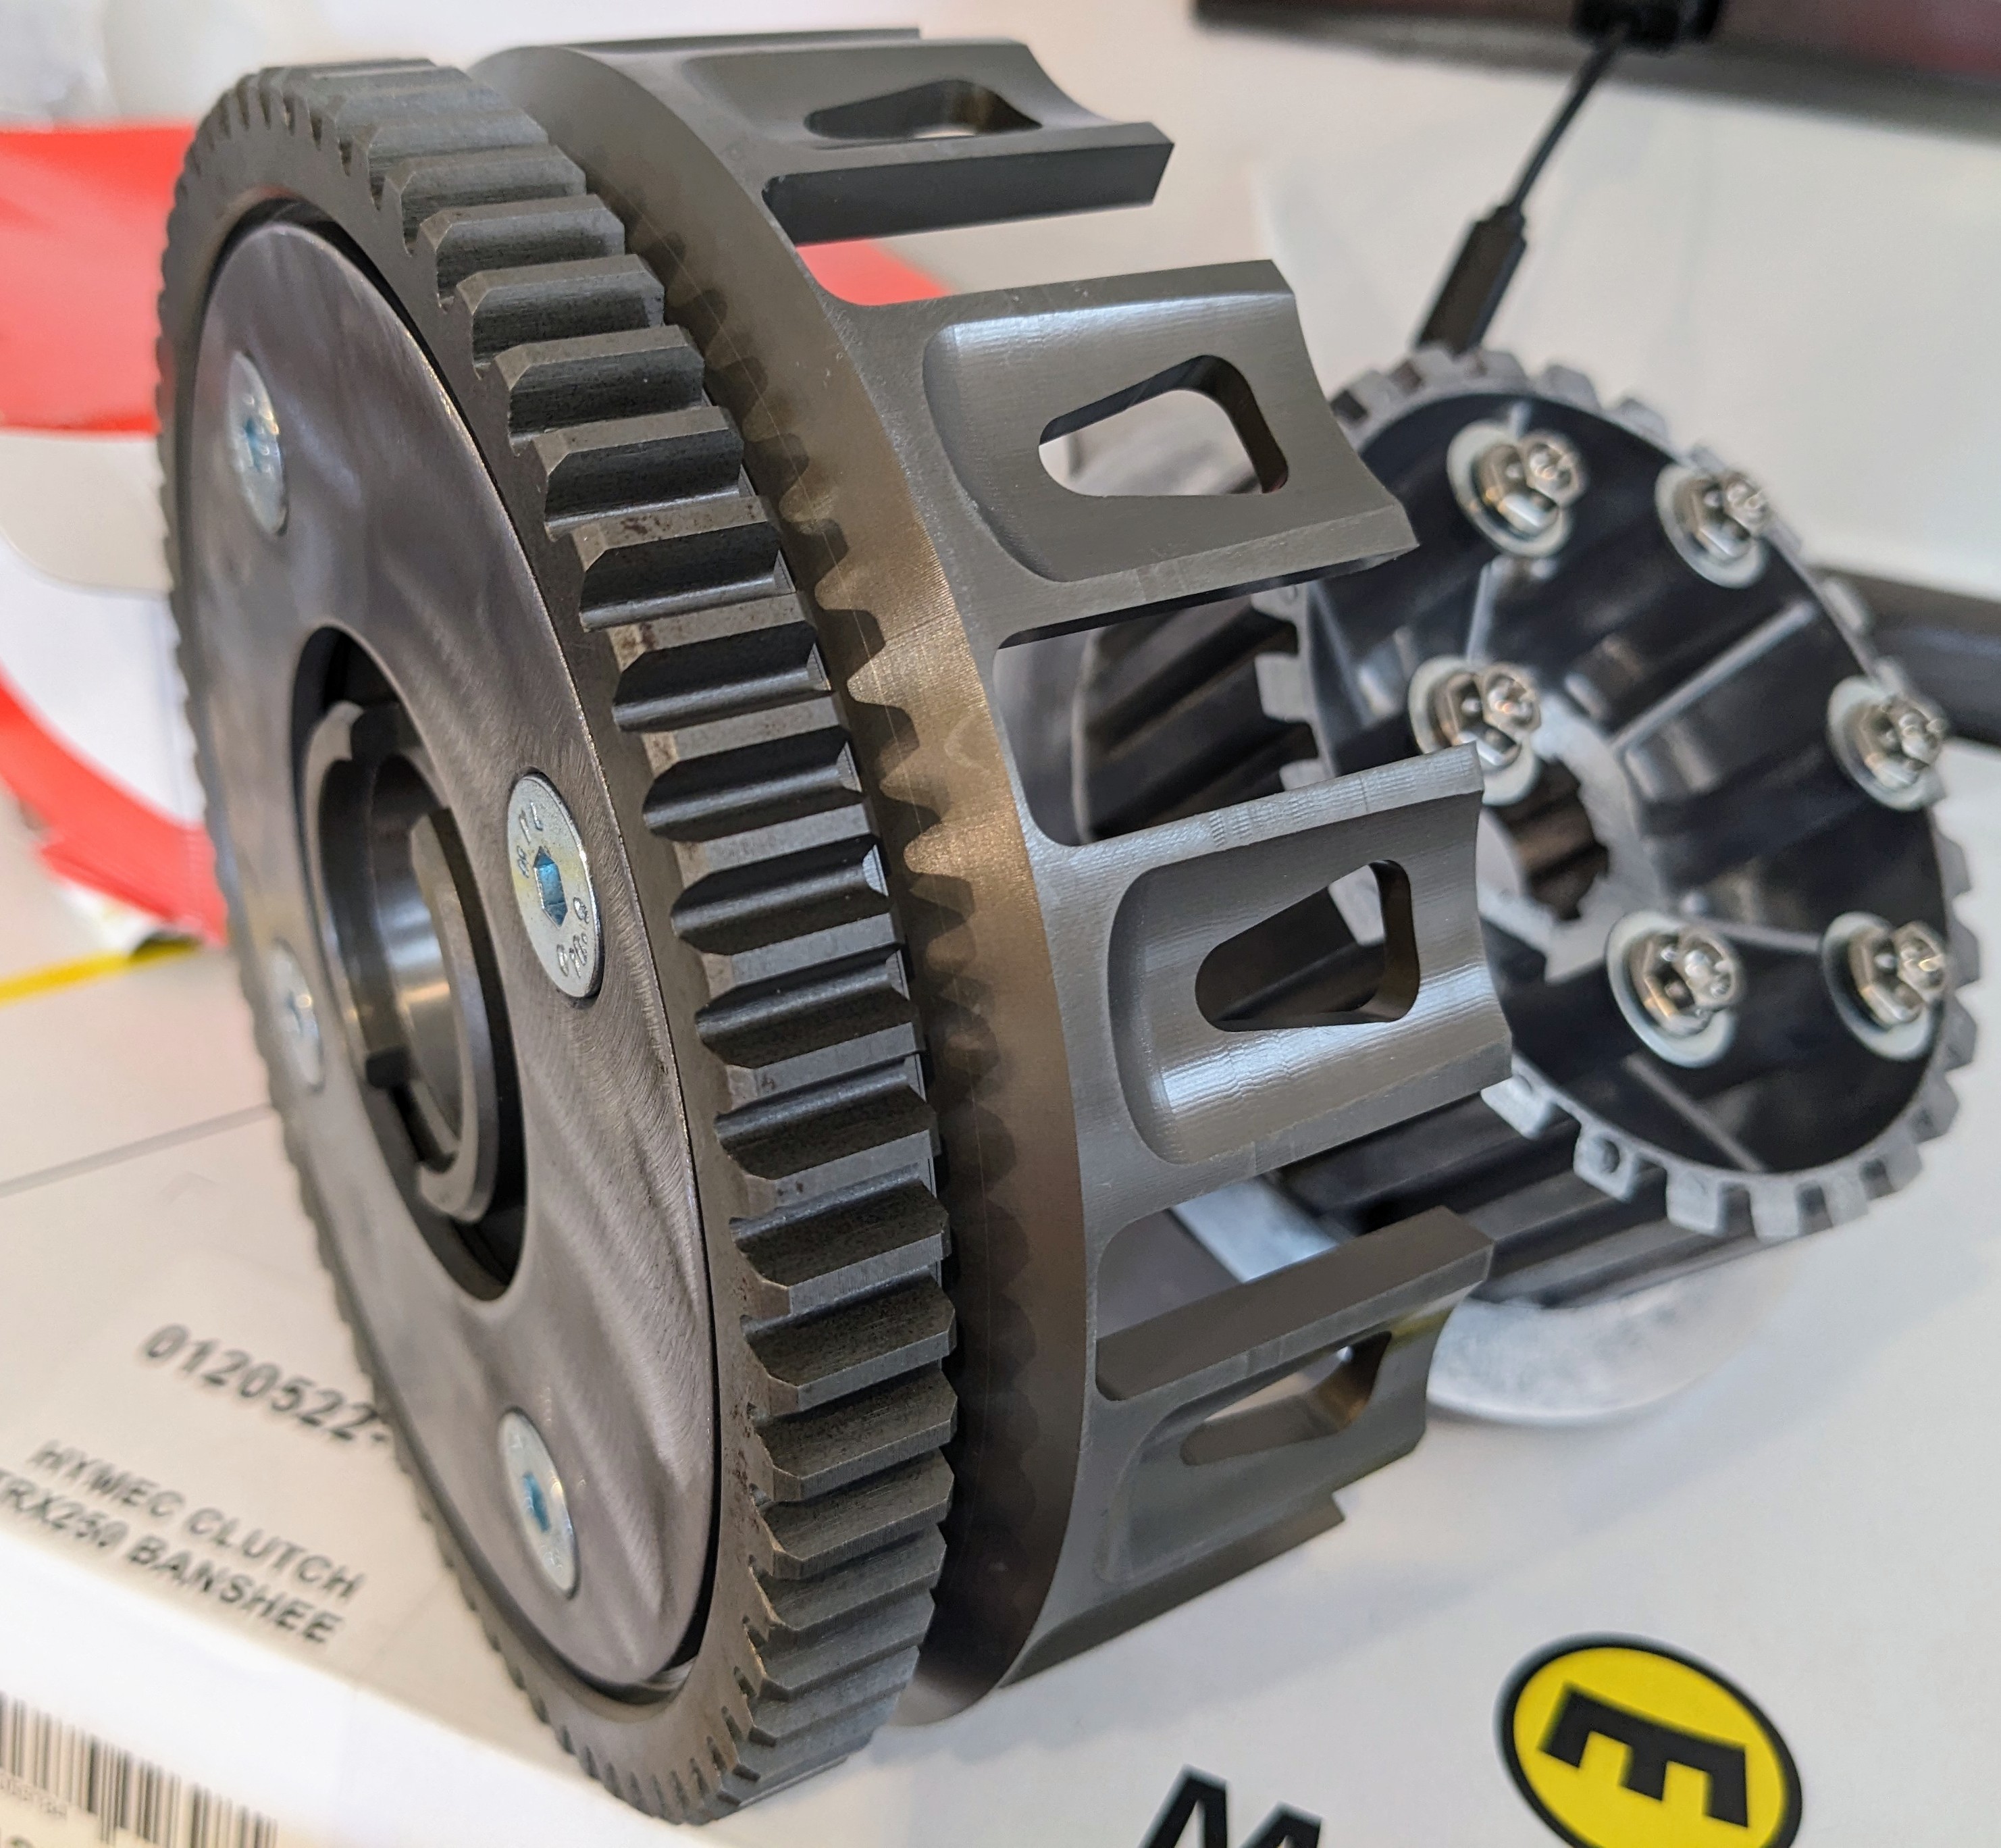
I did replace the steel bolts with some lighter titanium ones (hopefully they withstand the abuse the basket is going to take!)
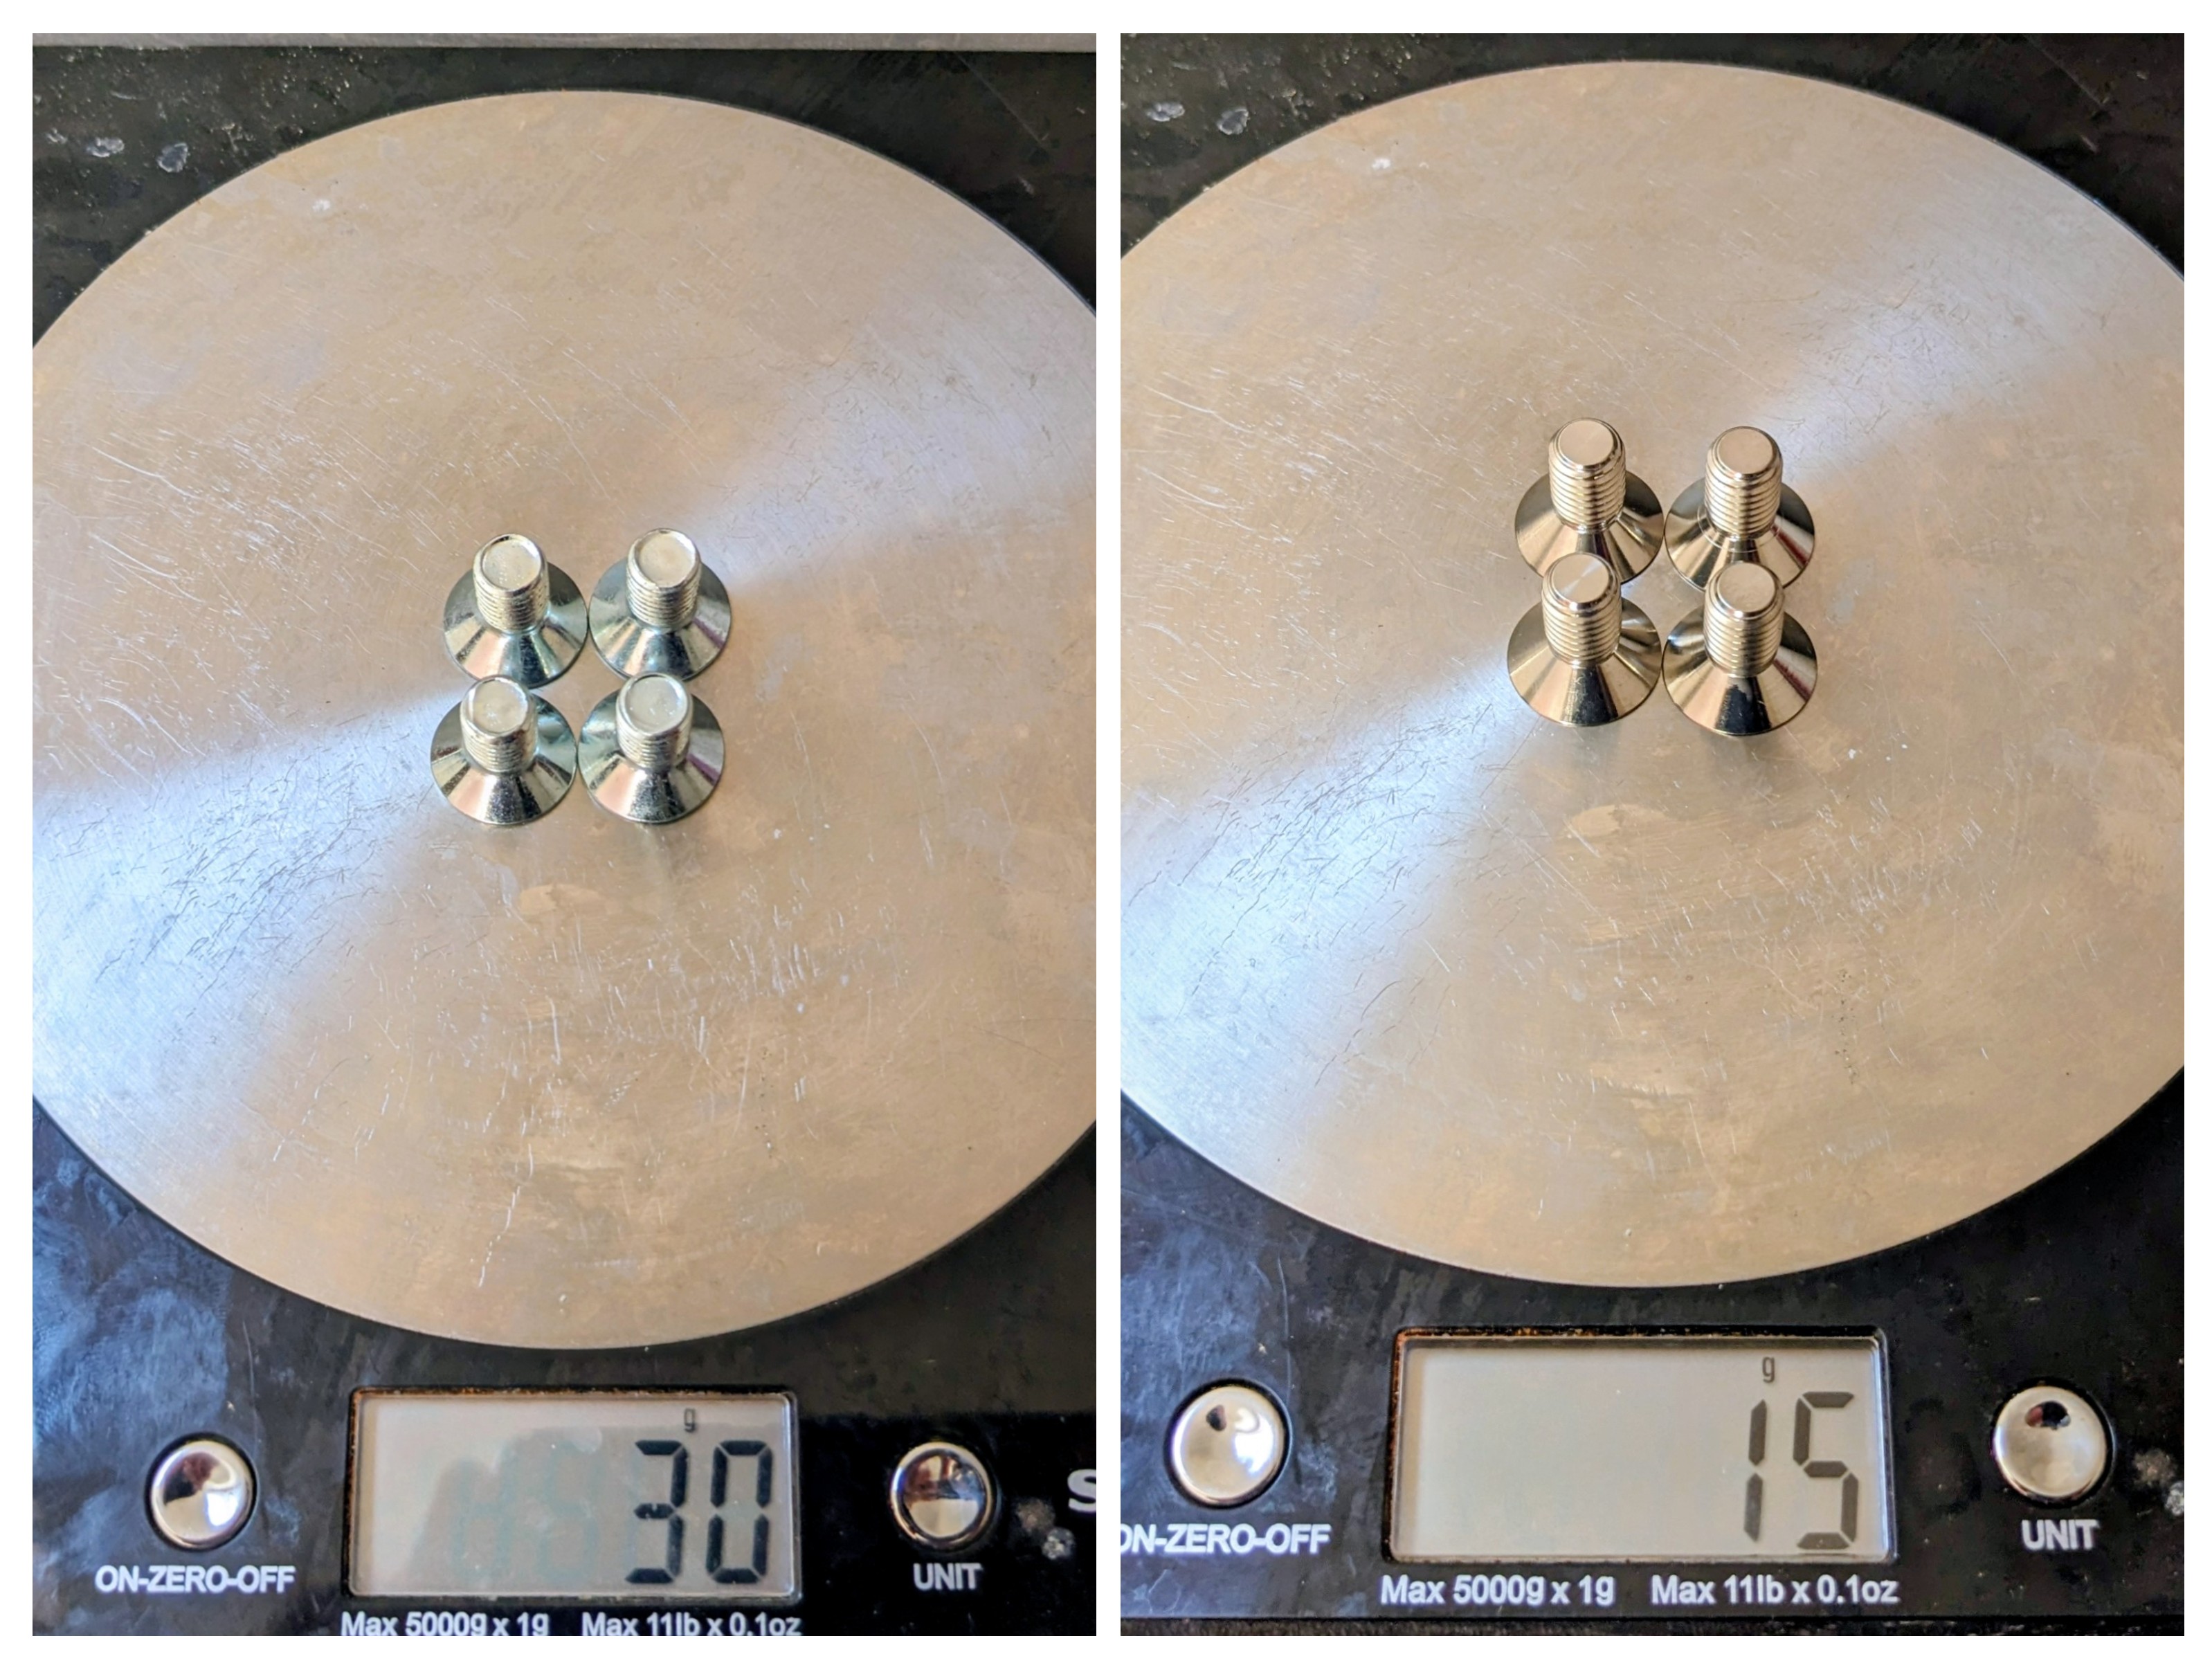
About 50% of the weight, but hopefully not at the expense of strength!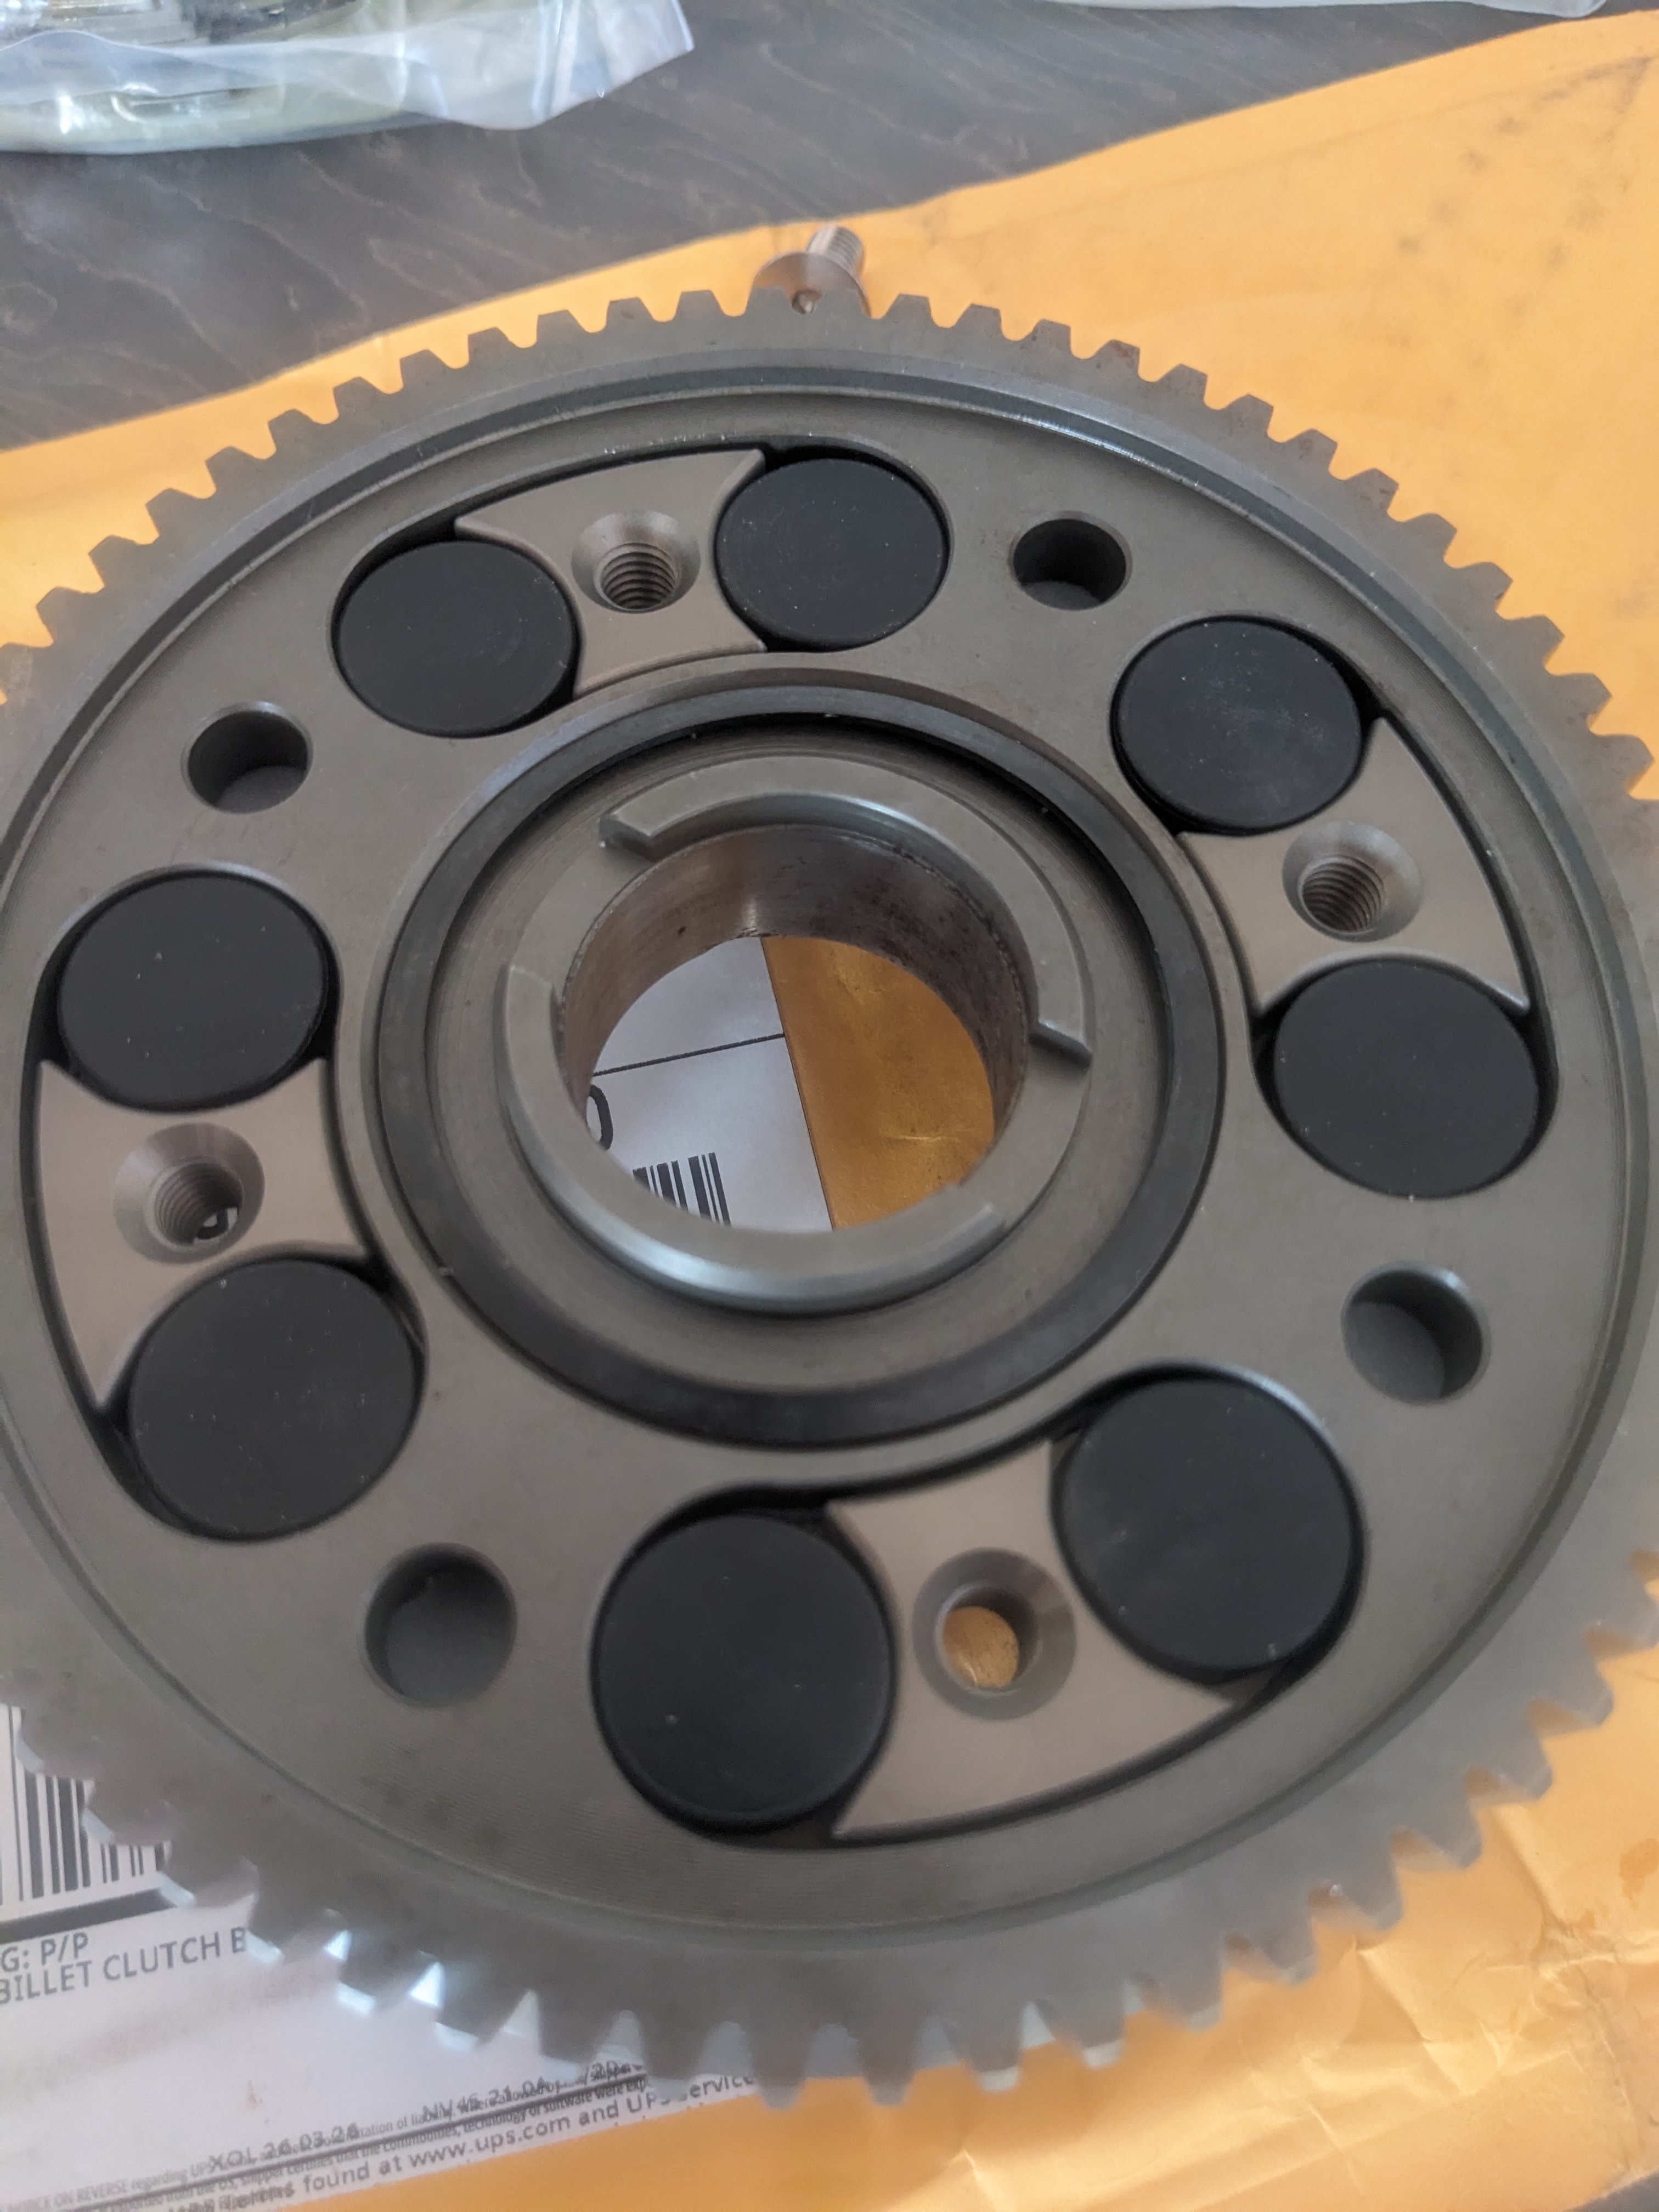
The washer is installed with the raised edge facing you. The fastener plate will clamp down onto this edge.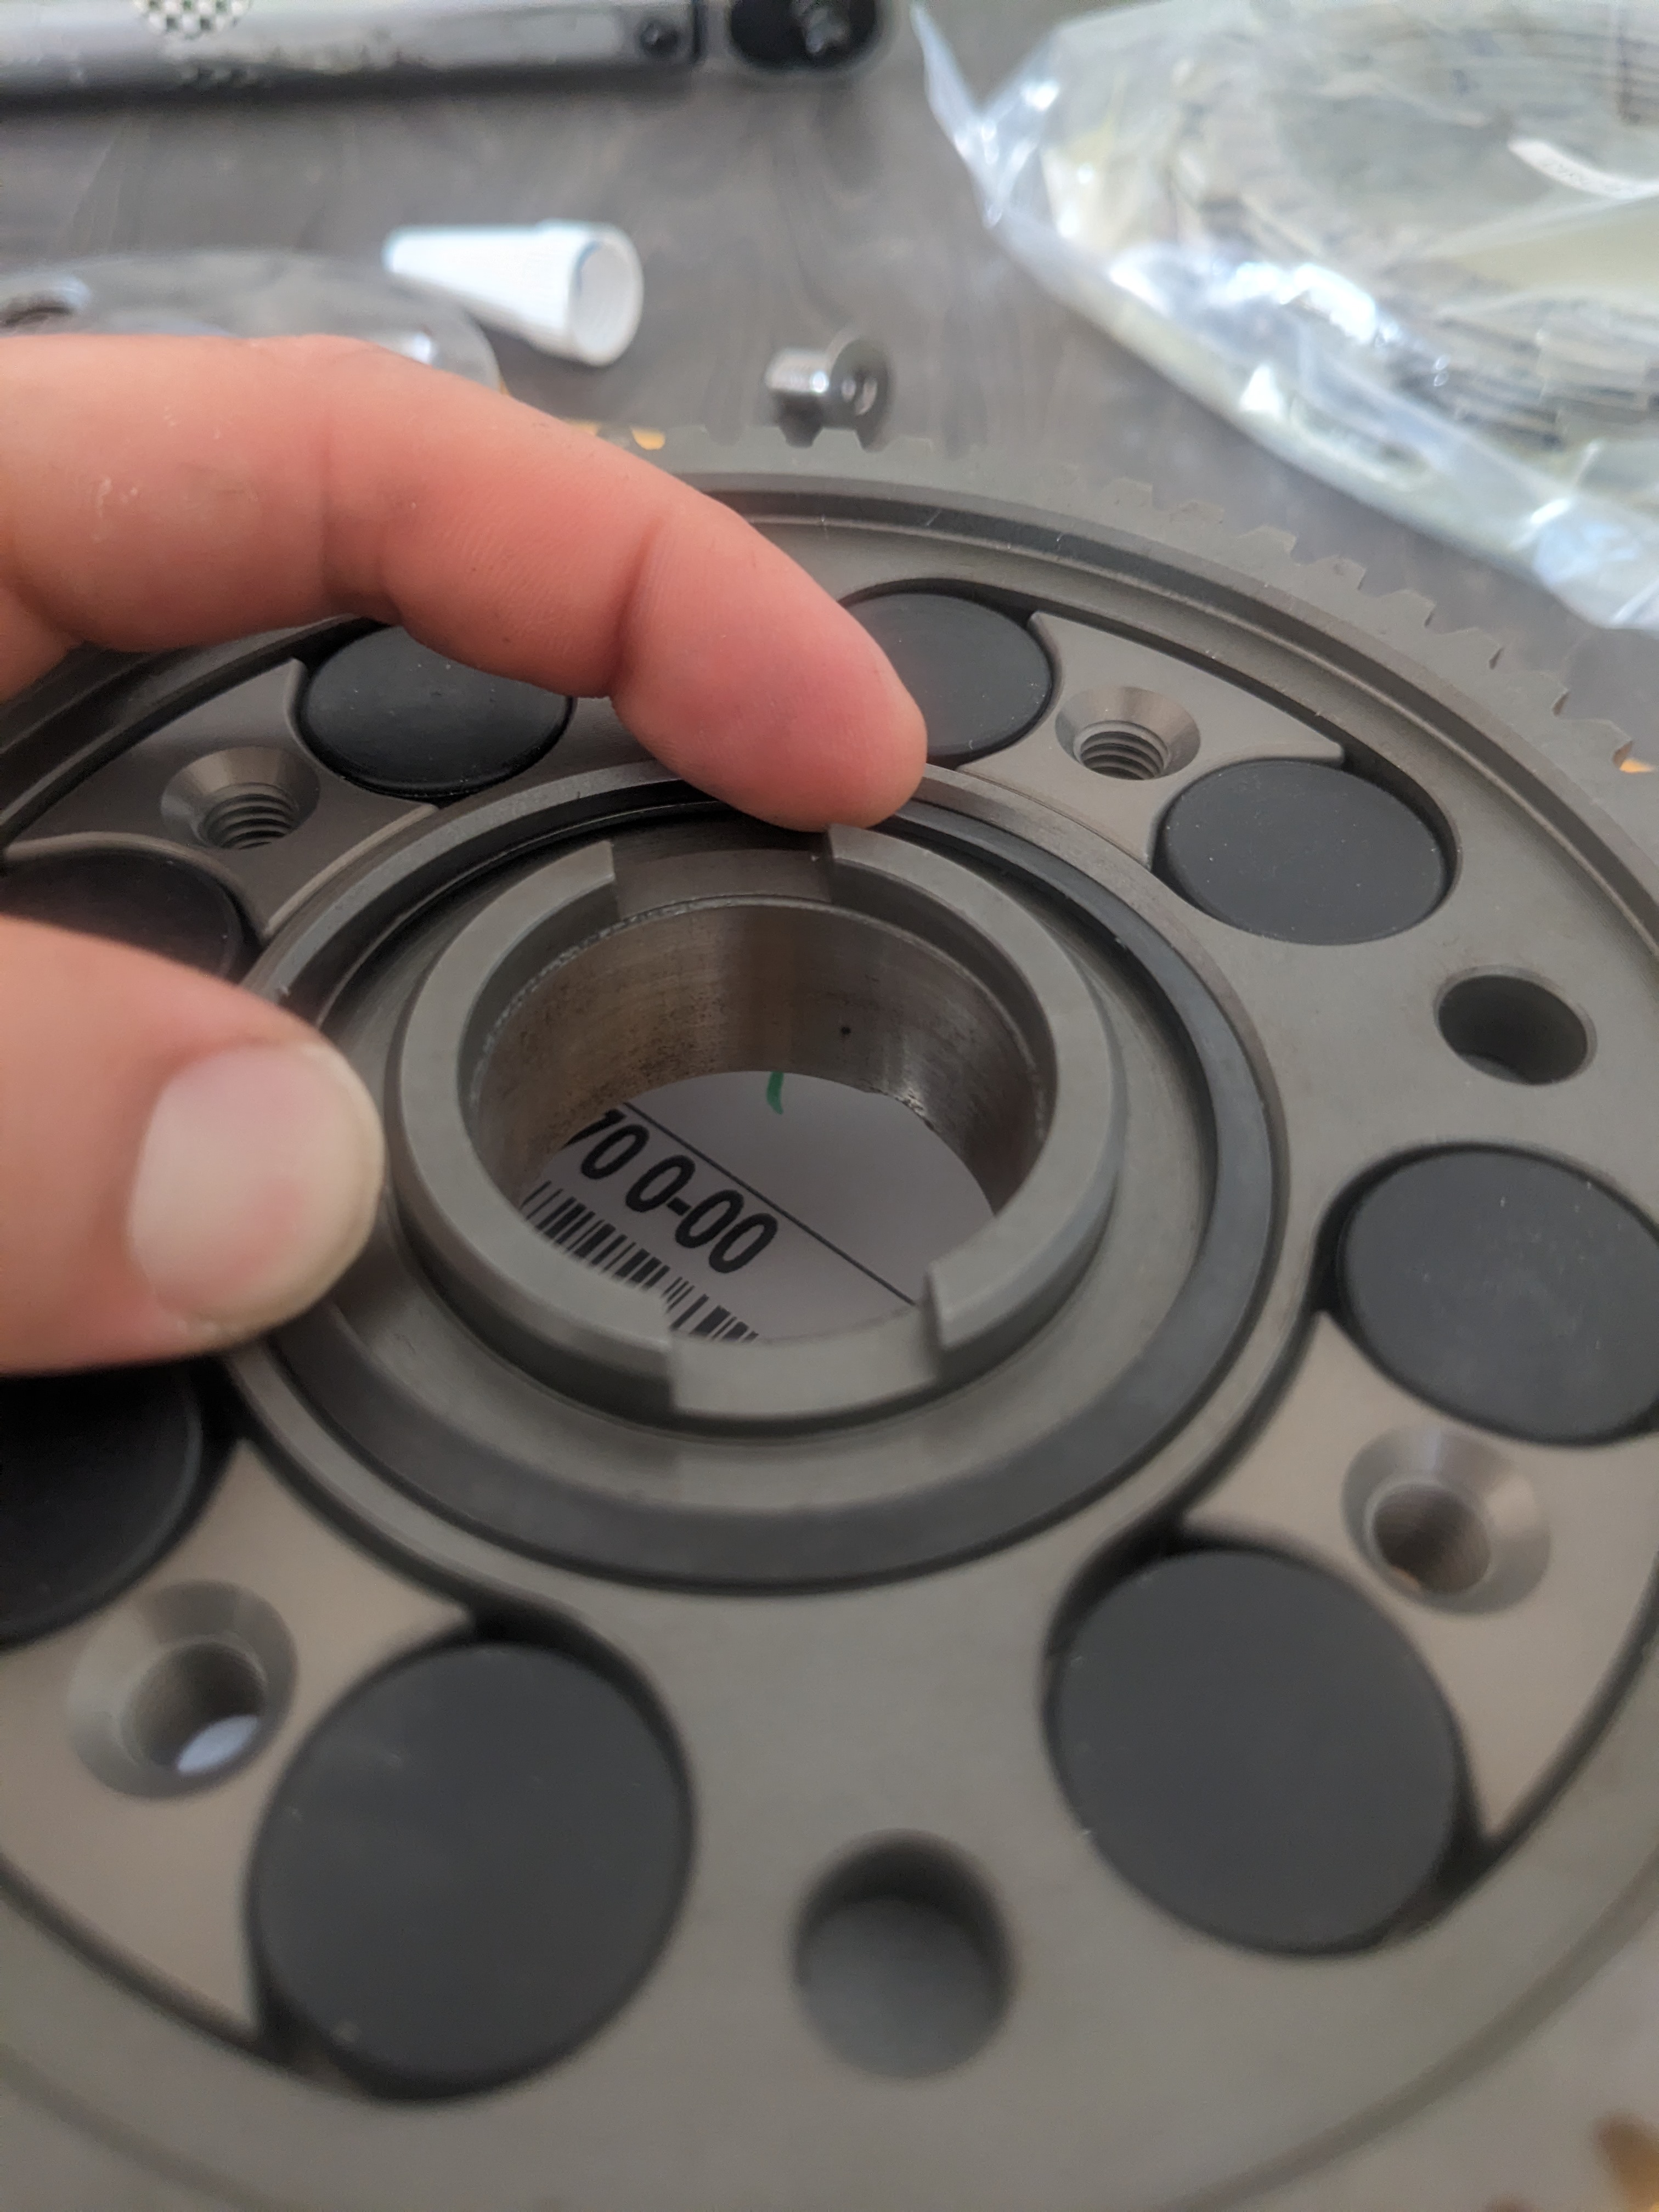
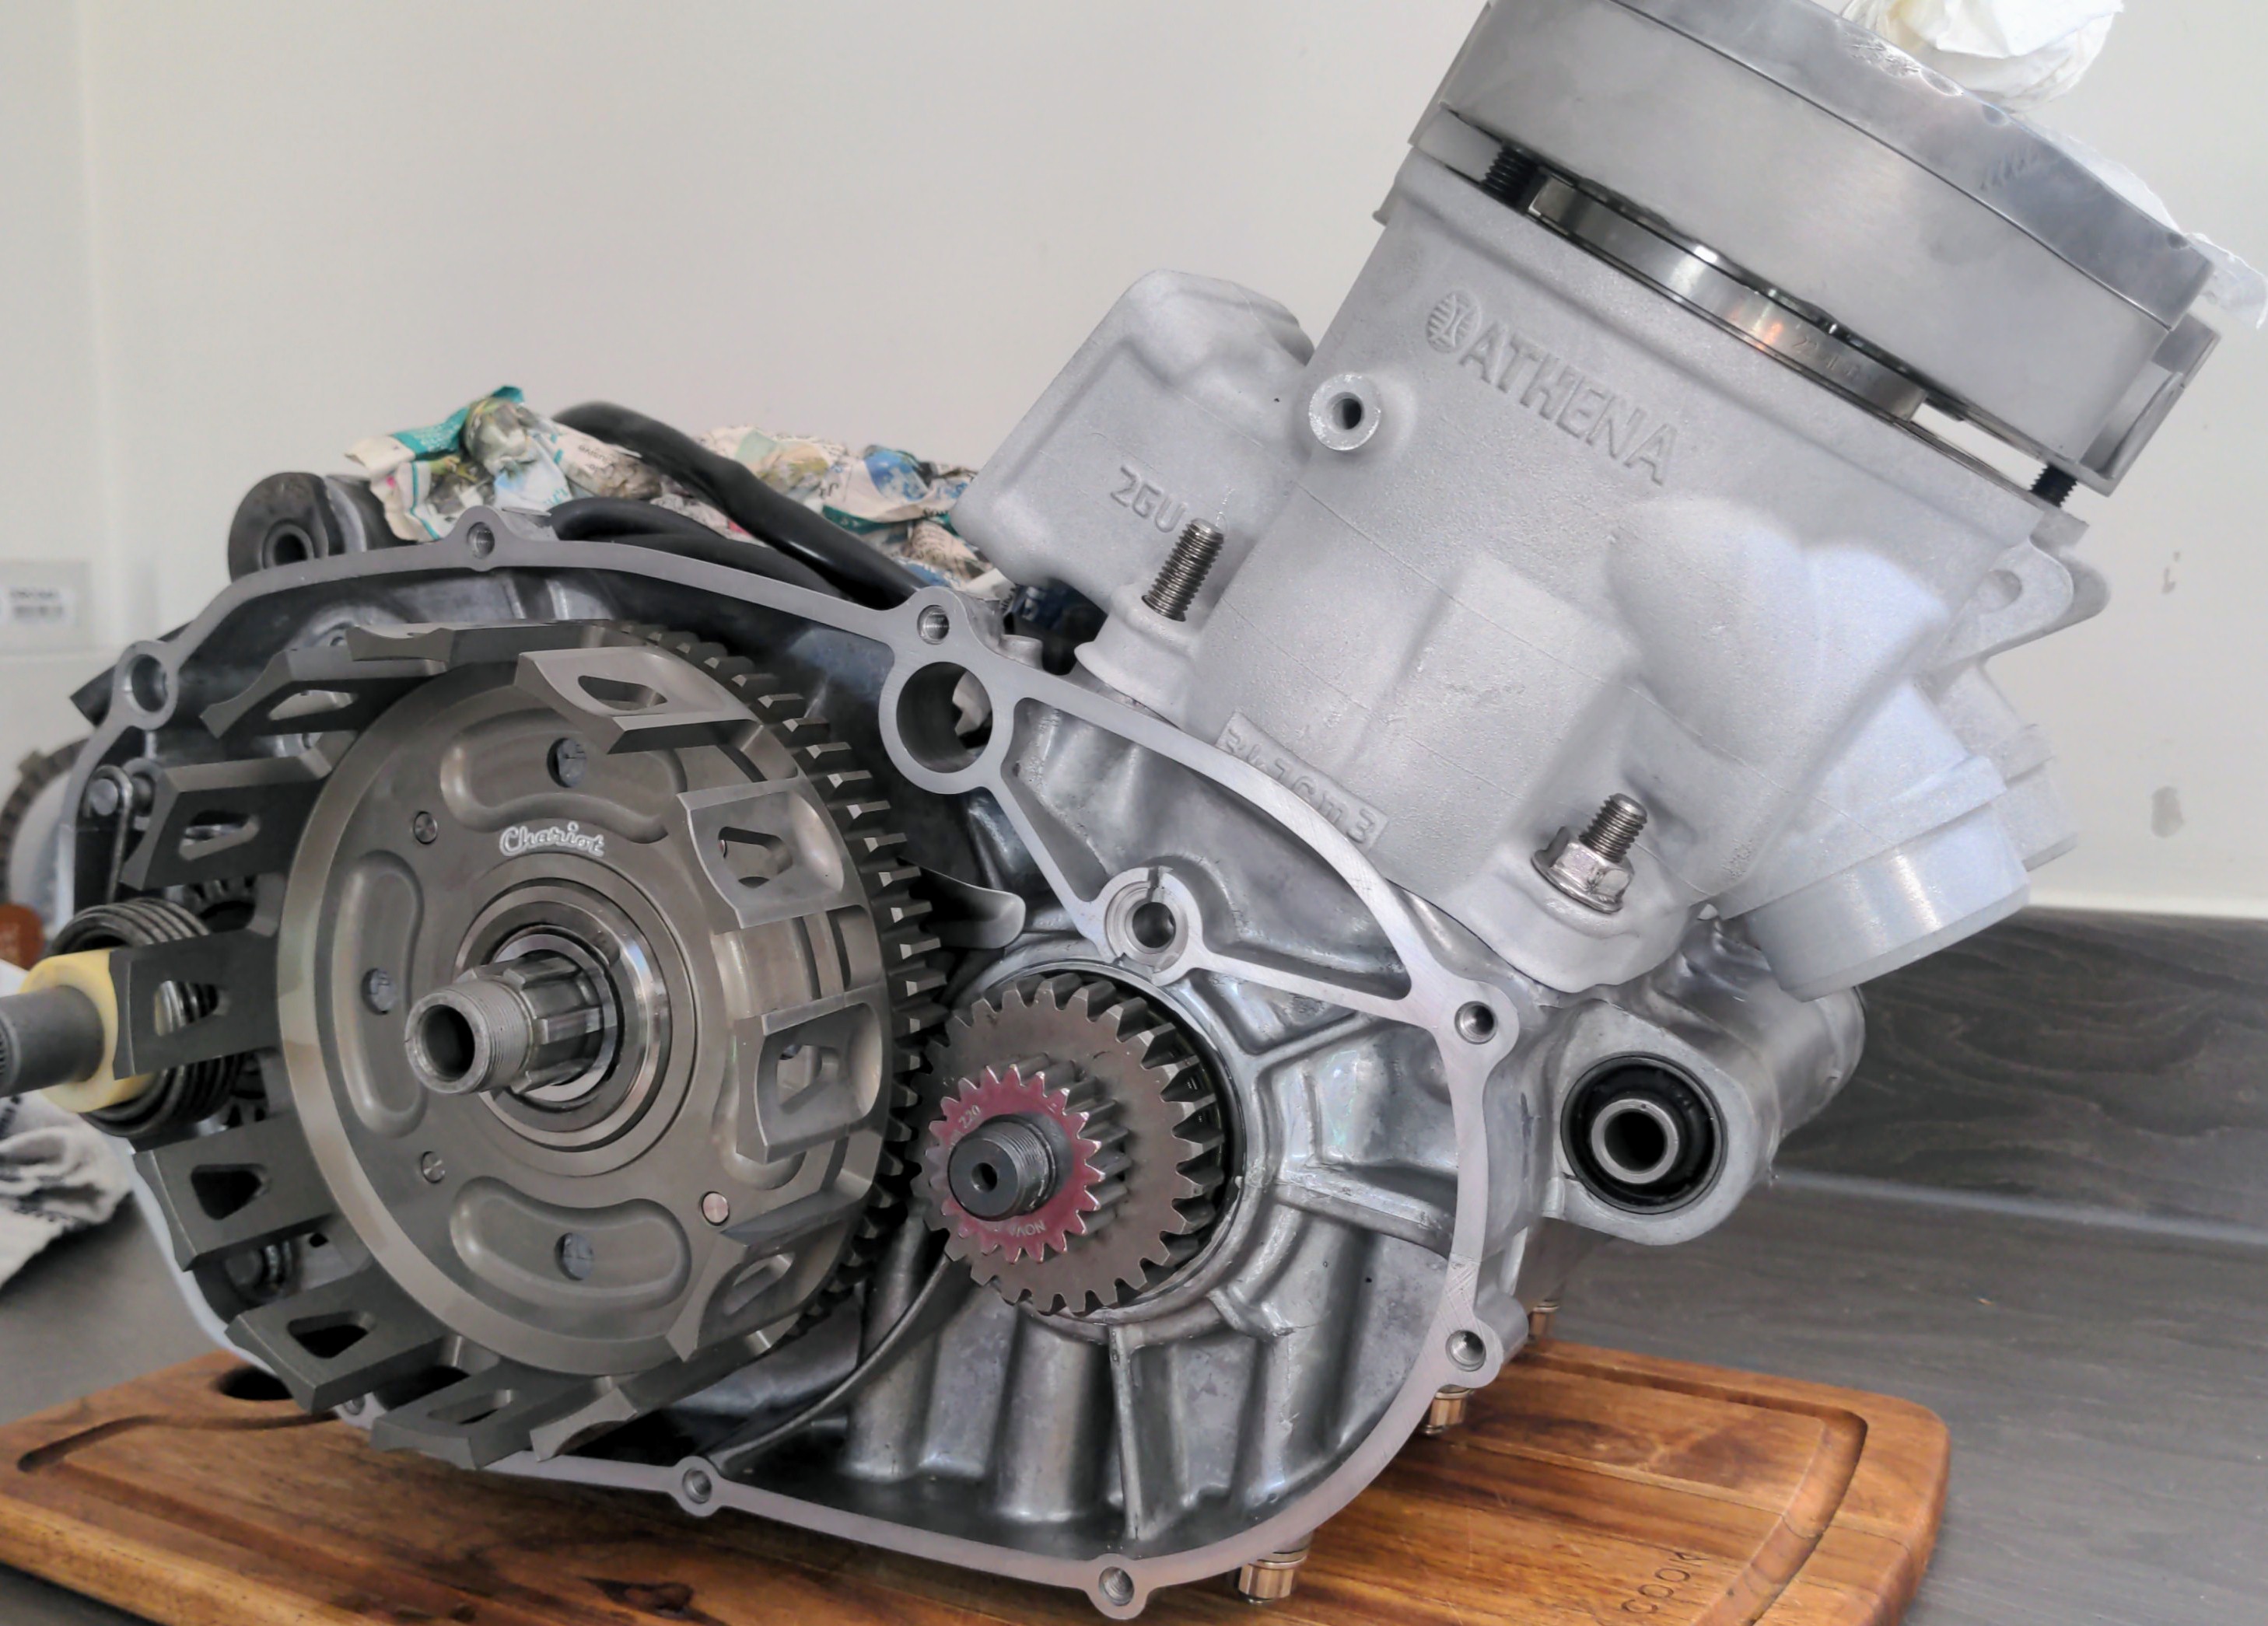
Engine is coming together nicely now though.
-
Okay, a few more NOS parts ordered and now the primary drive gear, clutch basket and generator nut all torqued to spec!

All 6 TZ750 clutch springs fitted with brand new clutch plates and NOS OEM damper rings installed.
I also replaced the factory pressure plate with a gorgeous billet
RDLC Crazypressure plate.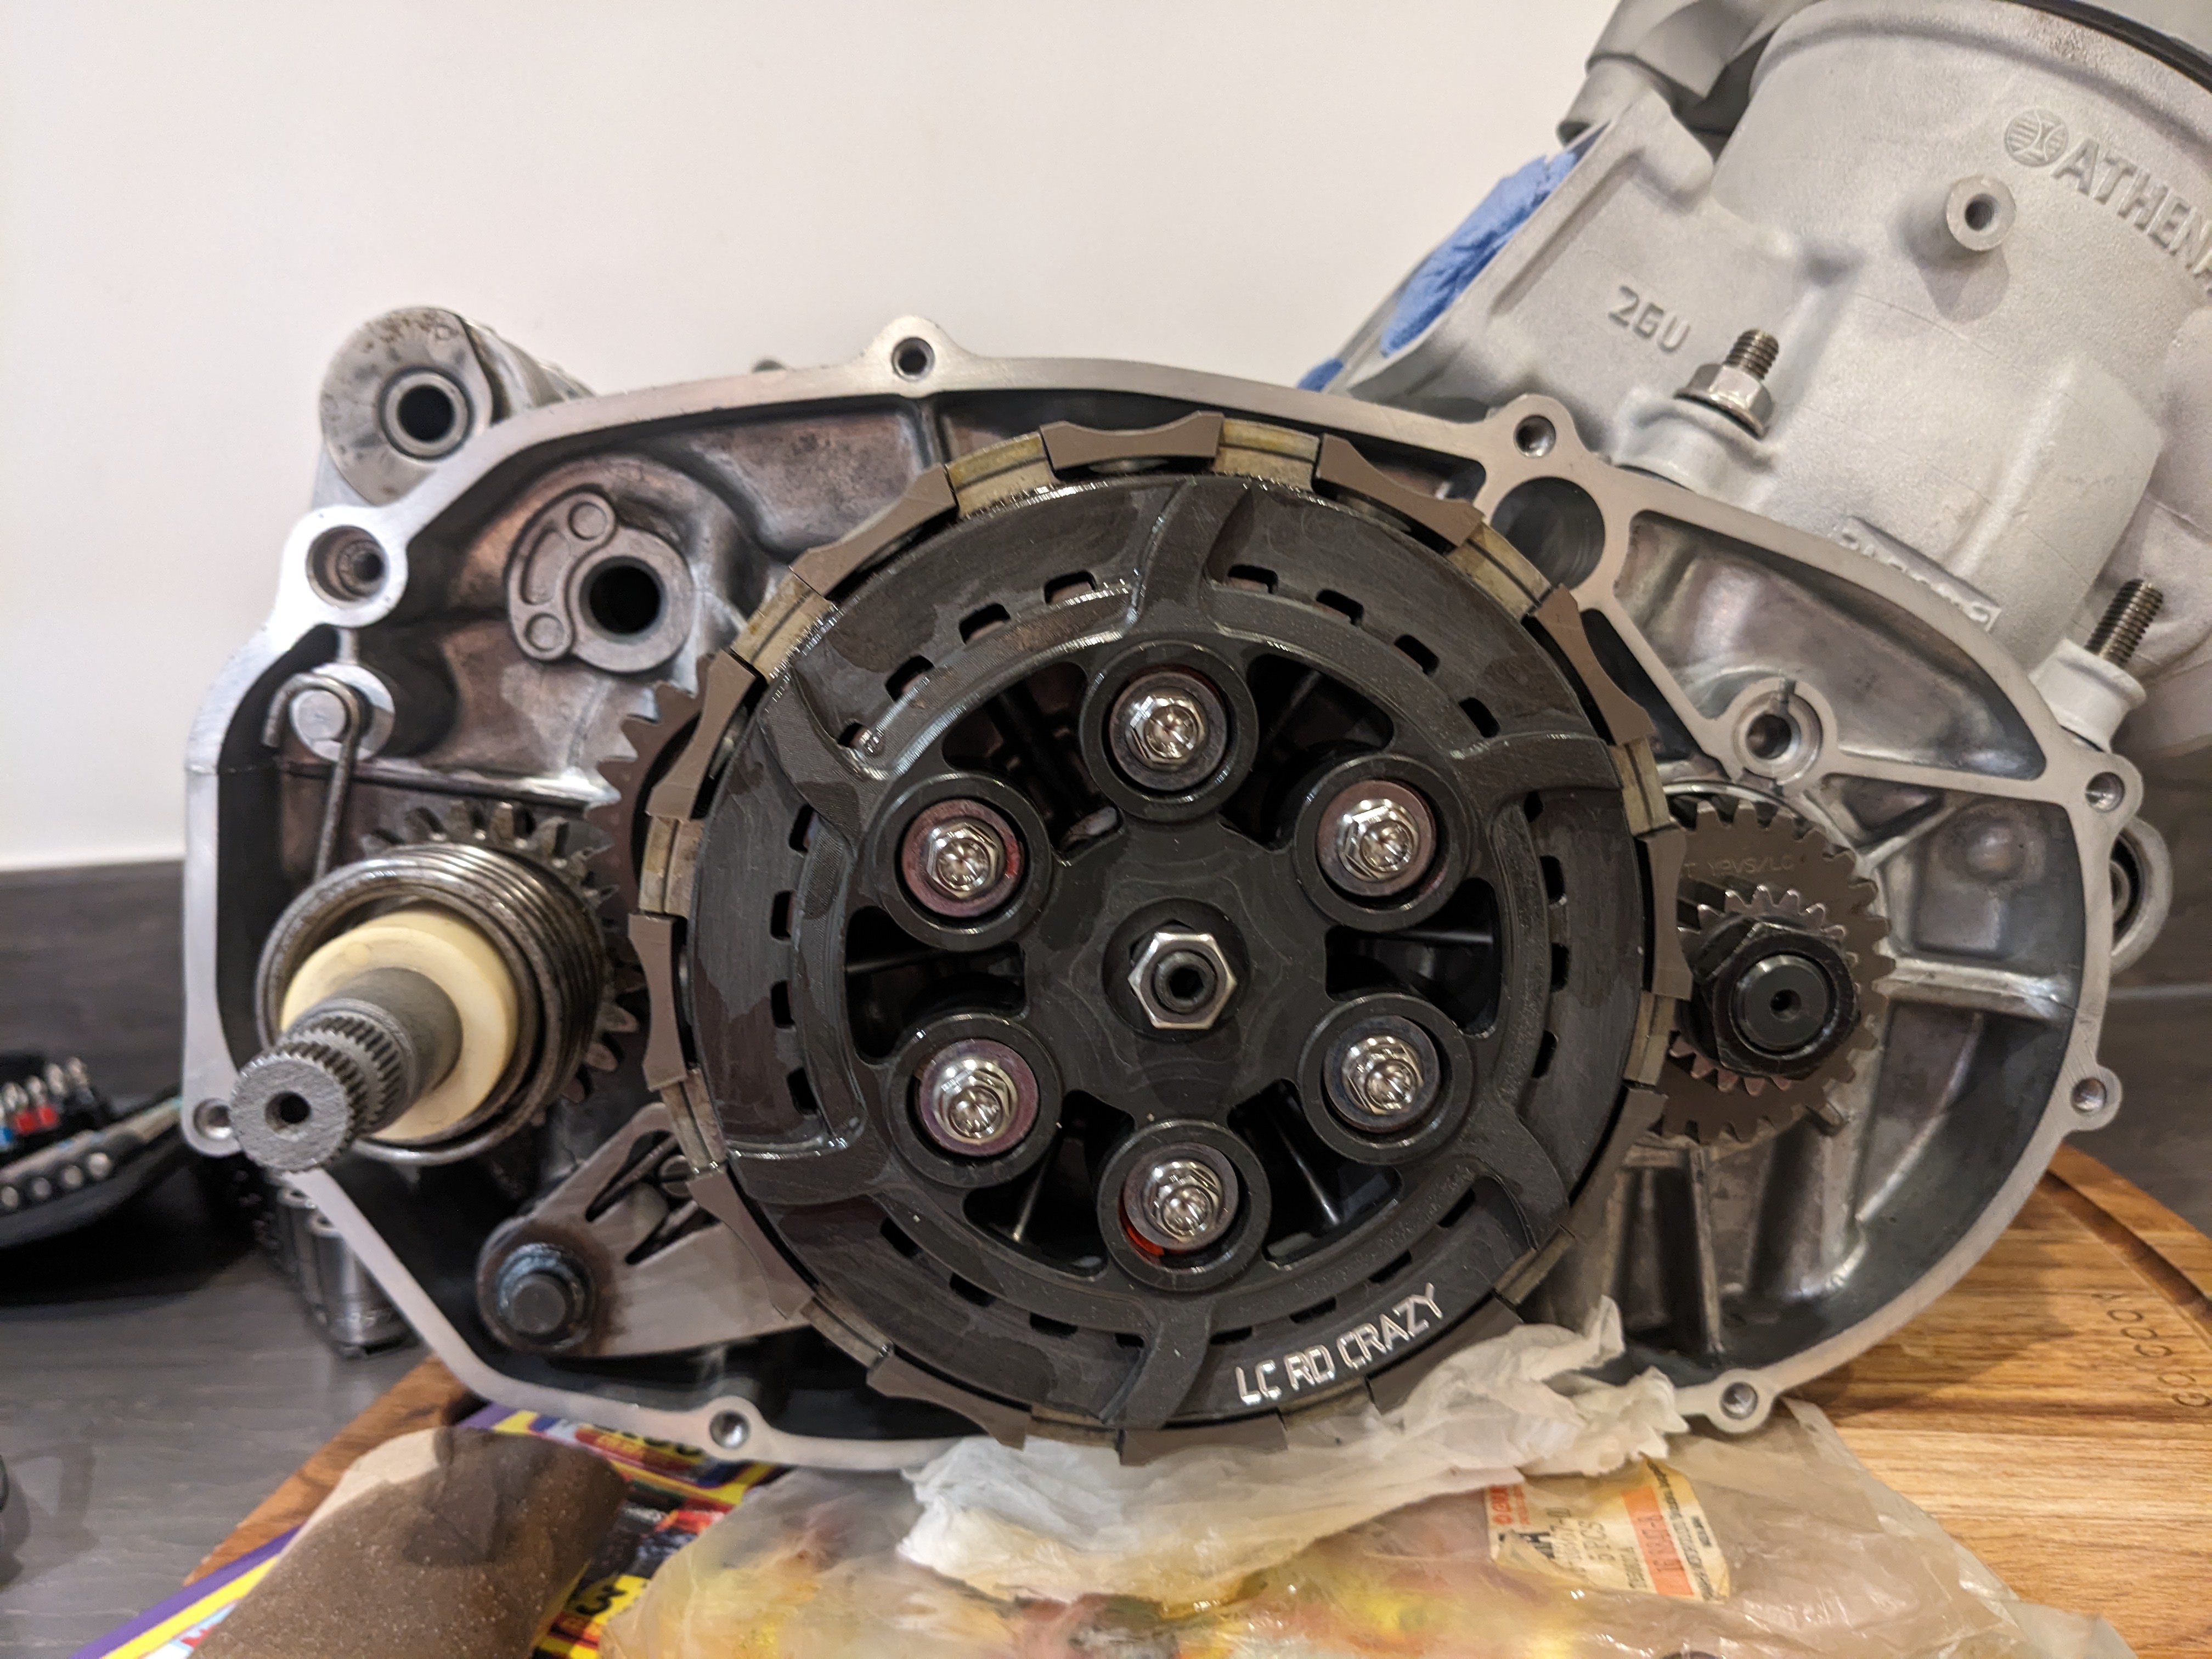
It's said to have better oil flow and looks to have a fair amount machined out of it, but I was surprised to see it's slightly heavier than the factory setup.
This milestone marks the completion of the bottom end
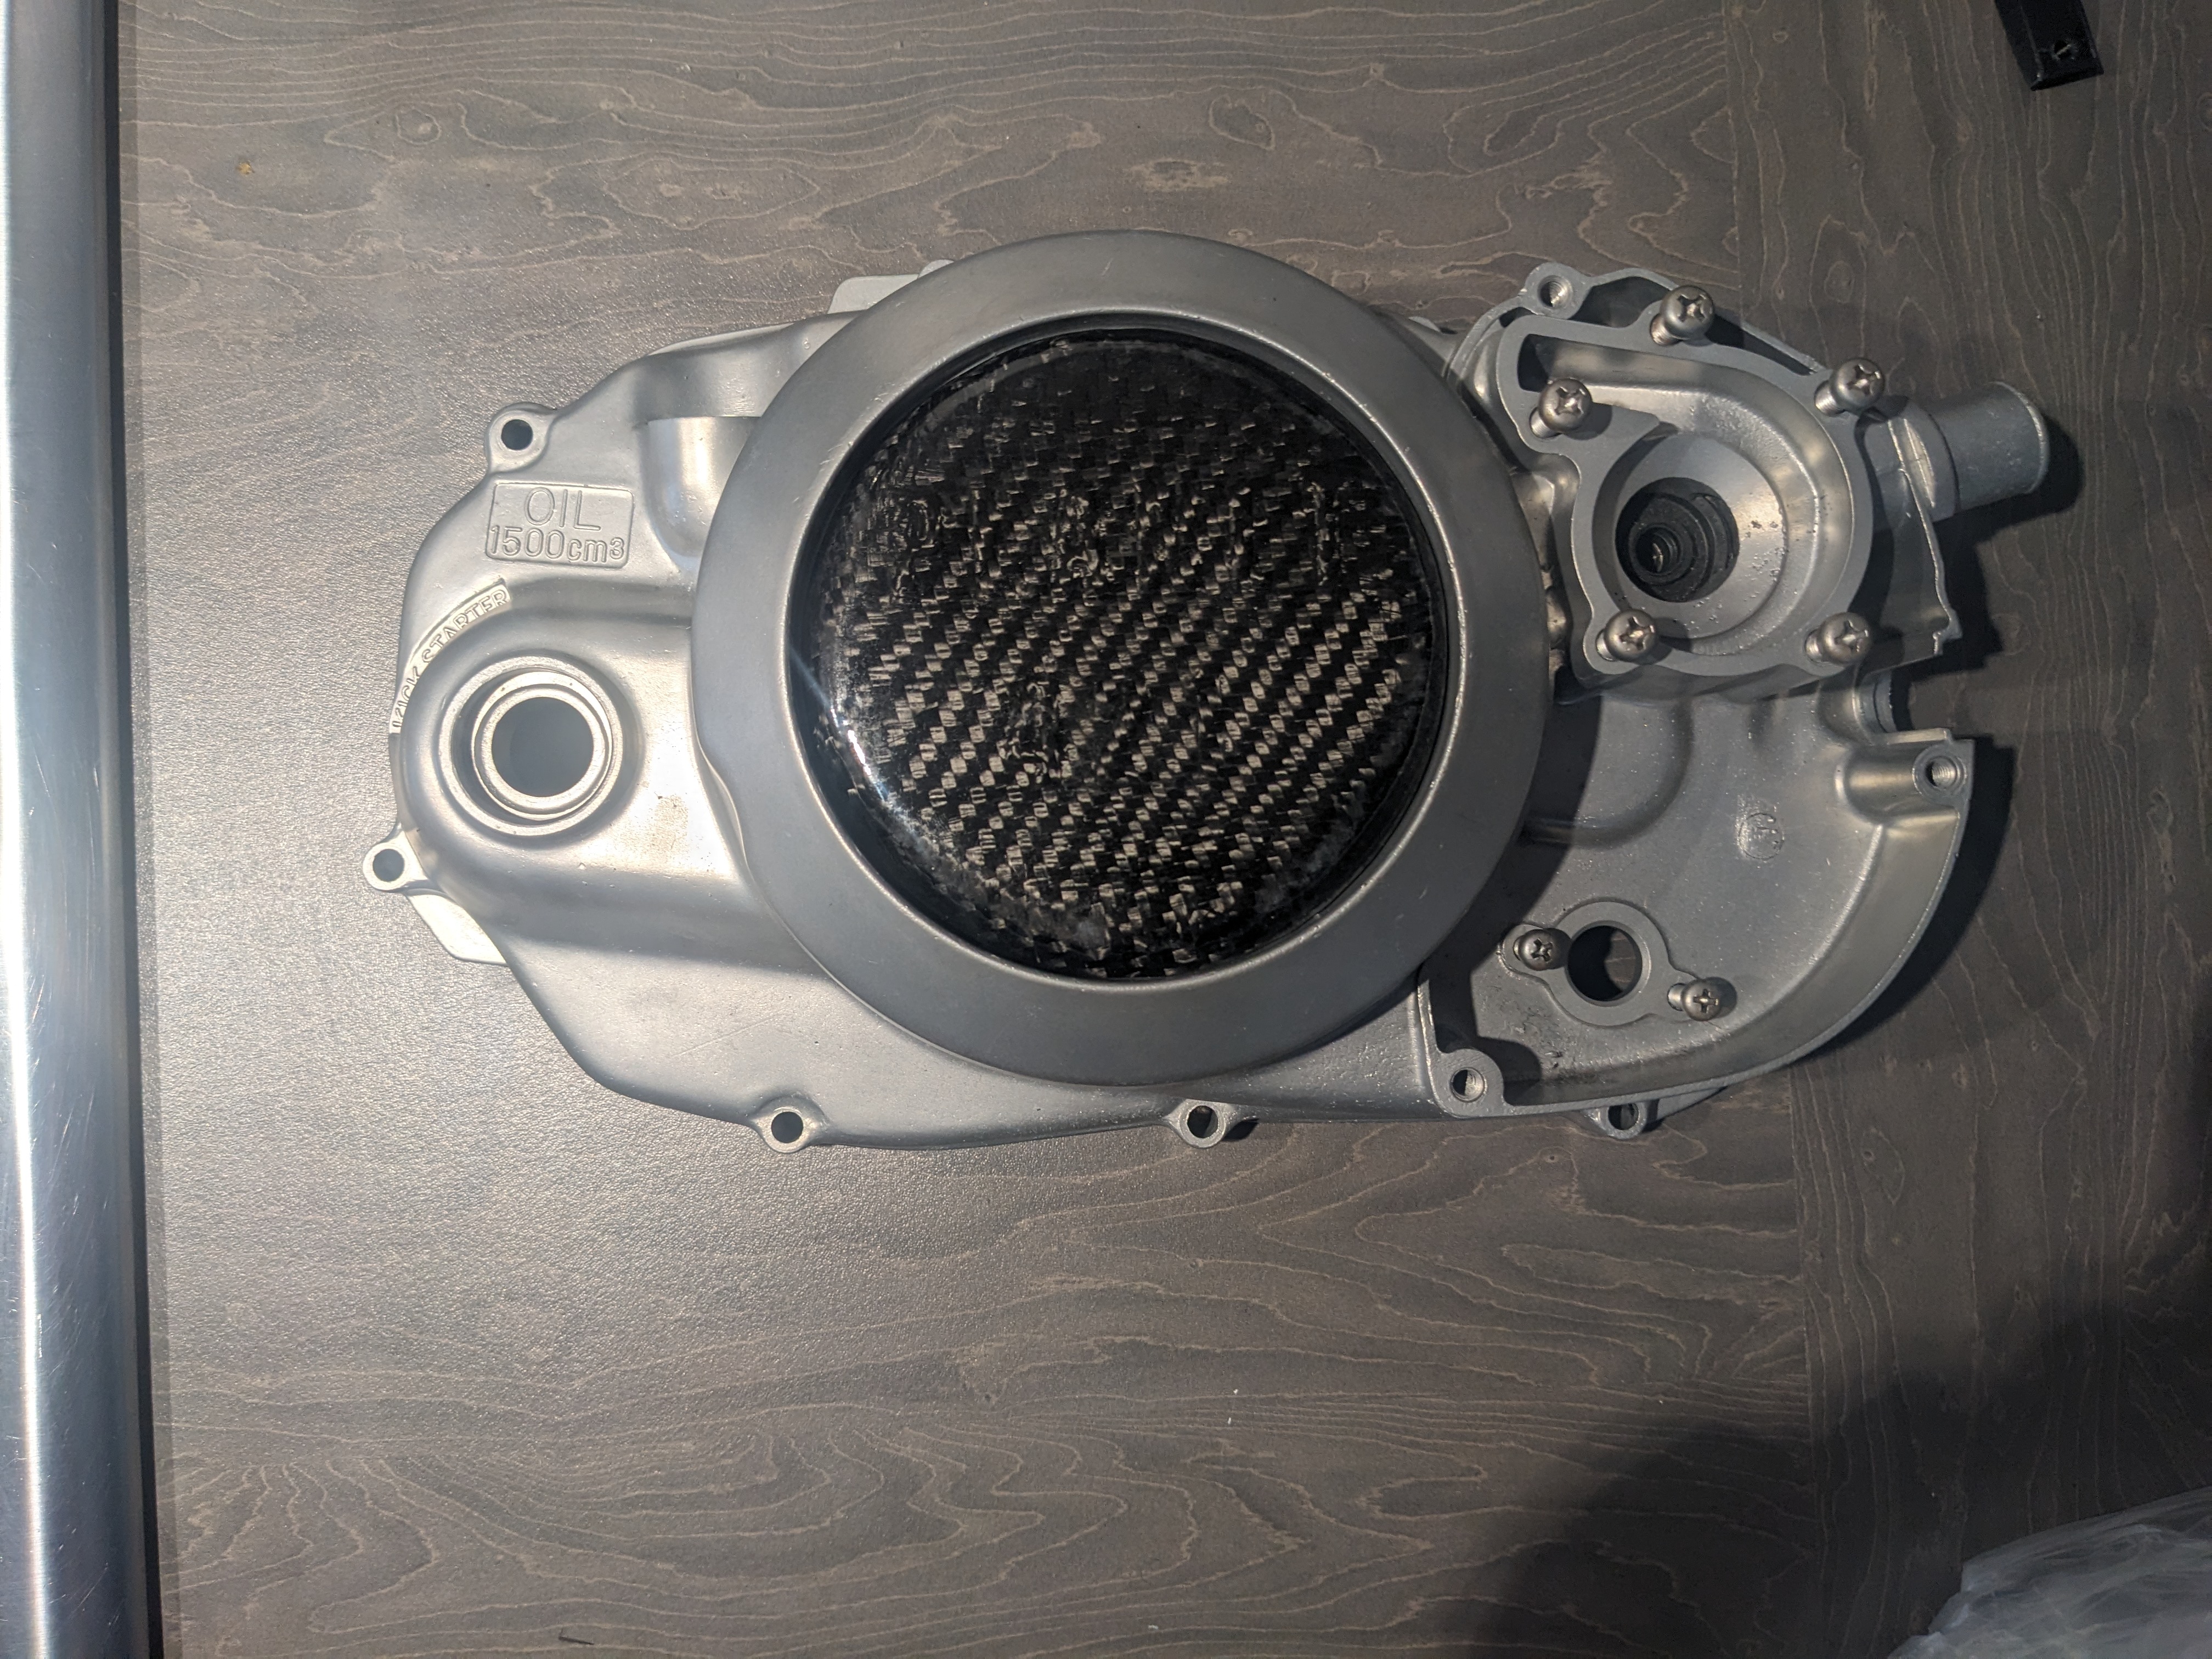
 There's just the matter of the water pump to install, I was really hoping to get a
 Chariot Performanceuprated one, but they're no longer manufacturing them. And then there is a company that makes a stunning carbon fibre generator cover/chain guard. I did have my eye on aChariot Performanceone, but again they seem to no longer be making them sadly.The cylinders are booked in with
Mick Abbeyfor some mild porting work, then the heads need to be sent off for machining.But once that's done it will mark the engine work completed for this project and I will turn my attention to the frame.
The frame has now been moved into the garage and I'm just trying to figure out how/where the steering damper should be fitted!


Hello! It looks like you're interested in this conversation, but you don't have an account yet.
Getting fed up of having to scroll through the same posts each visit? When you register for an account, you'll always come back to exactly where you were before, and choose to be notified of new replies (either via email, or push notification). You'll also be able to save bookmarks and upvote posts to show your appreciation to other community members.
With your input, this post could be even better 💗
Register Login