Seized rear suspension relay arm nut removal hack
-
Here's a copy of a post I did on a DTR FB group a while back showing how to remove the rear suspension relay arm nut (it's a nut which looks like a bolt) which always seizes on the DTR.
Some people chop them out with an angle grinder; this risks damaging the frame if you slip and you'll need to buy/recondition another relay arm which can be expensive.
It's also difficult to beat the nut out because the sidestand bracket is in the way and you can easily damage its internal thread. This method presses the nut out square and you can usually re-use it.You need:
A length (approx. 160mm) of M6 studding (hi-tensile is tougher than stainless)
M6 nuts or studding connectors (studding connectors in the pics are much deeper and stronger than normal nuts)
A 24mm socket (nut hex is 22mm but the spigot on the frame prevents a 22mm socket from fitting over it squarely)
Loads of different sized M6 washersFirst take off the lower chain roller and spray the whole area with WD40 or similar to let it start to work.
Take out the retaining bolt from the chain side and put that and its washer to one side. Find 2 or 3 washers small enough to fit through the hole in the frame but big enough to sit on the end of the nut like in pic 1 (if they disappear inside the nut they'll damage the thread).
Pic 2 shows the brake side. Put the socket over the head of the nut followed by some bigger washers and then the M6 nut.

Start doing up the nut on the brake side (the one on the chain side will disappear inside the relay arm). This pushes on the nut on the chain side, pressing it out square while allowing the head of the nut to move into the socket. Pics 3-6 show why it seizes; even with a grease nipple to lube the bearing, no grease ever reaches the surface where the nut and the bearing's inner race contact each other. Clean these up with wet and dry an make sure you get loads of copper grease in this space when putting it back together!!


If your relay arm doesn't have a grease nipple, now is the time to fit one!! Pic 7 is the original needle roller bearing from my '93 DTR which is still fitted in the bike now and passed an MOT in April 2021. Grease nipples cost pence, drilling and tapping a hole is an easy job for any engineering shop and a grease gun costs £25 on ebay. If you keep greasing the linkage/swingarm bearings they take years to wear out and you'll hardly ever need to take them apart (the 1990 bike I owned in 1992 as a teenager covered over 30,000 miles without my ever needing to do anything to the rear linkage; a big part of what swayed me to choose the DTR as a hobby 30 years later), I do mine every time I wash the bike.

Hope this post helps someone, any questions don't hesitate!!
-
 C Calum pinned this topic on
-
Here's a copy of a post I did on a DTR FB group a while back showing how to remove the rear suspension relay arm nut (it's a nut which looks like a bolt) which always seizes on the DTR.
Some people chop them out with an angle grinder; this risks damaging the frame if you slip and you'll need to buy/recondition another relay arm which can be expensive.
It's also difficult to beat the nut out because the sidestand bracket is in the way and you can easily damage its internal thread. This method presses the nut out square and you can usually re-use it.You need:
A length (approx. 160mm) of M6 studding (hi-tensile is tougher than stainless)
M6 nuts or studding connectors (studding connectors in the pics are much deeper and stronger than normal nuts)
A 24mm socket (nut hex is 22mm but the spigot on the frame prevents a 22mm socket from fitting over it squarely)
Loads of different sized M6 washersFirst take off the lower chain roller and spray the whole area with WD40 or similar to let it start to work.
Take out the retaining bolt from the chain side and put that and its washer to one side. Find 2 or 3 washers small enough to fit through the hole in the frame but big enough to sit on the end of the nut like in pic 1 (if they disappear inside the nut they'll damage the thread).Pic 2 shows the brake side. Put the socket over the head of the nut followed by some bigger washers and then the M6 nut.
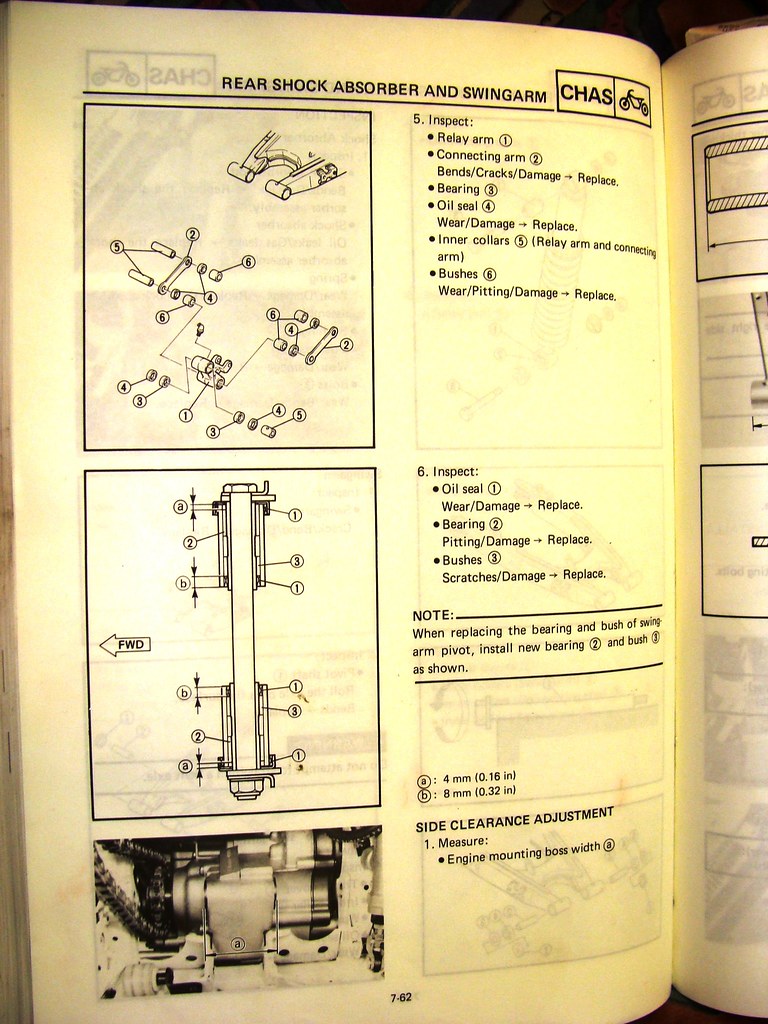
Start doing up the nut on the brake side (the one on the chain side will disappear inside the relay arm). This pushes on the nut on the chain side, pressing it out square while allowing the head of the nut to move into the socket. Pics 3-6 show why it seizes; even with a grease nipple to lube the bearing, no grease ever reaches the surface where the nut and the bearing's inner race contact each other. Clean these up with wet and dry an make sure you get loads of copper grease in this space when putting it back together!!
If your relay arm doesn't have a grease nipple, now is the time to fit one!! Pic 7 is the original needle roller bearing from my '93 DTR which is still fitted in the bike now and passed an MOT in April 2021. Grease nipples cost pence, drilling and tapping a hole is an easy job for any engineering shop and a grease gun costs £25 on ebay. If you keep greasing the linkage/swingarm bearings they take years to wear out and you'll hardly ever need to take them apart (the 1990 bike I owned in 1992 as a teenager covered over 30,000 miles without my ever needing to do anything to the rear linkage; a big part of what swayed me to choose the DTR as a hobby 30 years later), I do mine every time I wash the bike.
Hope this post helps someone, any questions don't hesitate!!
-
Did you find a good bearings, bushes & seals kit for the linkage?...
-
@SpookDog Pretty sure I just measured the ones that come out and ordered the same again off SimplyBearings.co.uk
@Calum said in Seized rear suspension relay arm nut removal hack:
@SpookDog Pretty sure I just measured the ones that come out and ordered the same again off SimplyBearings.co.uk
@Calum do the same just measure then buy Koyo from Henderson Bearings on ebay. Use these for swinging arm https://www.ebay.co.uk/itm/274836296252?ssPageName=STRK%3AMEBIDX%3AIT&var=575083436083&_trksid=p2060353.m1438.l2649
-
HotShot! have you ever removed the bearing races from the linkage. i was searching to see if i could remove the linkage without removing the swing arm. i remember buying new bearings (needle rollers) but keeping the original bolts/nuts with the grease nipples (somebody told me they don't wear much), i cant remember if i bought phosphur bronze bushes for the non bearing bolts. its been so long since i worked on the dtr. i had to put a new clutchside crankshaft seal on my sisters Astra along with a 100 other jobs. i cant remember whether the dogbones end has bushing or the bottom of the rear spring as well. i need to remember what im raiding the shed for cause i don't remember what i got or the whereabouts of any of the bits i bought...
i guess its gonna take some heat to drift out the old bearing shells (& maybe bushes) then some delicate drawing them in. Good job i bought them the linkage came up as an MOT advisory cause it put almost a CM play of movement into the linkage...
any help or advice will be well apreciated...
@SpookDog Hey bud, didn't think I'd seen you on here for a while

You can remove the relay arm without taking the swingarm out, and at both ends of the dogbones there are just plain bushes (the needle roller bearings go where the relay arm attaches to the frame). However at the upper end of the dogbone the bushes are in the swingarm so if you have the time, I personally would take it out which will make the job a lot easier, and it's also a great time to replace the swingarm bearings and set the swingarm side clearance if you haven't done this already.


This guarantees perfect chain/sprocket alignment and without the rear wheel/linkage fitted, you can get the arm to fall under its own weight with <1mm side-to-side play even with the swingarm pivot bolt fully tightened. A lot of the "specialist DTR restorers" on Facebook etc. miss this step but it makes a huge difference to the bike's handling and chain/sprocket life.
From memory I think I always just drifted the linkage bushes out with a hammer and punch, and pressed the new ones in in the vice using a socket. Same goes for the needle roller bearings except I pressed these out as well, and be sure to take out the grease nipple first otherwise the outer cage of the roller bearing will vandalise the protruding end of its thread as it goes past.
The linkage bolts with grease nipples shouldn't be worn at all because assuming they're done up tight with the linkage assembled correctly, they, the bearing sleeves and the dogbones form a rigid sub-assembly and so should never move relative to one another.
If you've bought the eBay linkage repair kit, unfortunately the long inner sleeves (i.e the tubes which fit between the linkage bolts and bushes) lack the 2mm holes necessary to allow greasing of the pivots via the grease nipples. It's well worth getting these drilled as it makes a massive difference to how long the bushes last if you keep re-greasing them. I say get them drilled because I think they're case-hardened; I once tried doing it myself on a pillar drill and even using a cobalt drill bit set that cost me 50 quid in Screwfix, I couldn't make any impression on them so this needs doing by some engineering firm somewhere.
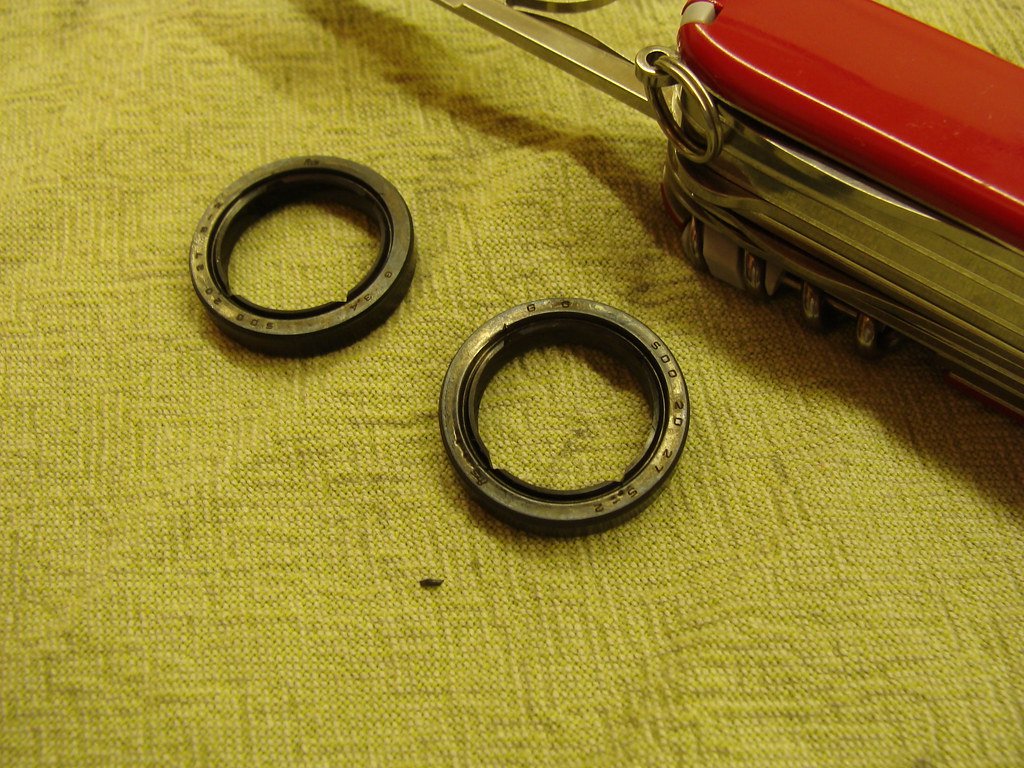
If you have double-lipped seals from Simply Bearings etc., another hack you can do when assembling the linkage/relay arm is to flip the seals so the garter spring faces outwards away from the bearing; the lip without the spring is just a dust wiper so you can then cut small sections out of this with Swiss Army Knife scissors (best/sharpest scissors I've ever used) or one of those leather punches so when you re-lube the linkage bearings with a grease gun, the hydraulic pressure is less likely to force the seals out. The grease is free to pass through the gaps in the dust seal lip (now on the inside) and lift up the lip with the garter spring in its bid for freedom! The sprung lip then retracts, retaining enough grease inside the bearing and keeping dirt out.


If like me you're ham-fisted with the grease gun, it will still try and force out the seals so you can also hacksaw a section out of an M20 x 3mm washer and insert it in the gap between the tiebars and the arm during greasing to prevent this (with the linkage bolted together and the seals where they should be, you can actually move the tiebar/sleeve assembly 2-3mm side to side; useful after you've greased up everything as you can move it fully each way to make it splodge the excess grease away from the bearings/seals, then clean it all off thoroughly to prevent any getting on the rear tyre).

Lastly I'd also replace the lower rear shock bushing as this usually wears before any of the actual linkage bearings. It's held in the shock by two of those PITA C-clips and IIRC I destroyed a Lidl precision screwdriver set getting them out (mind your eyes as the speed one of mine flew out, I think explains why the Northern Lights were visible over Dorset that time). This one fits the DTR:
https://www.mandp.co.uk/products/29-5027-lower-rear-shock-bearing-kit-605946
All sounds like a lot of work I know but being able to externally grease up the rear suspension is one of the greatest features of the DTR, done like this you can just ride the bike week in week out, 10 minutes with the grease gun every week or two and you'll probably pass next year's MOT without even having to look at this again.
-
@SpookDog Hey bud, didn't think I'd seen you on here for a while
You can remove the relay arm without taking the swingarm out, and at both ends of the dogbones there are just plain bushes (the needle roller bearings go where the relay arm attaches to the frame). However at the upper end of the dogbone the bushes are in the swingarm so if you have the time, I personally would take it out which will make the job a lot easier, and it's also a great time to replace the swingarm bearings and set the swingarm side clearance if you haven't done this already.
This guarantees perfect chain/sprocket alignment and without the rear wheel/linkage fitted, you can get the arm to fall under its own weight with <1mm side-to-side play even with the swingarm pivot bolt fully tightened. A lot of the "specialist DTR restorers" on Facebook etc. miss this step but it makes a huge difference to the bike's handling and chain/sprocket life.
From memory I think I always just drifted the linkage bushes out with a hammer and punch, and pressed the new ones in in the vice using a socket. Same goes for the needle roller bearings except I pressed these out as well, and be sure to take out the grease nipple first otherwise the outer cage of the roller bearing will vandalise the protruding end of its thread as it goes past.
The linkage bolts with grease nipples shouldn't be worn at all because assuming they're done up tight with the linkage assembled correctly, they, the bearing sleeves and the dogbones form a rigid sub-assembly and so should never move relative to one another.
If you've bought the eBay linkage repair kit, unfortunately the long inner sleeves (i.e the tubes which fit between the linkage bolts and bushes) lack the 2mm holes necessary to allow greasing of the pivots via the grease nipples. It's well worth getting these drilled as it makes a massive difference to how long the bushes last if you keep re-greasing them. I say get them drilled because I think they're case-hardened; I once tried doing it myself on a pillar drill and even using a cobalt drill bit set that cost me 50 quid in Screwfix, I couldn't make any impression on them so this needs doing by some engineering firm somewhere.
If you have double-lipped seals from Simply Bearings etc., another hack you can do when assembling the linkage/relay arm is to flip the seals so the garter spring faces outwards away from the bearing; the lip without the spring is just a dust wiper so you can then cut small sections out of this with Swiss Army Knife scissors (best/sharpest scissors I've ever used) or one of those leather punches so when you re-lube the linkage bearings with a grease gun, the hydraulic pressure is less likely to force the seals out. The grease is free to pass through the gaps in the dust seal lip (now on the inside) and lift up the lip with the garter spring in its bid for freedom! The sprung lip then retracts, retaining enough grease inside the bearing and keeping dirt out.
If like me you're ham-fisted with the grease gun, it will still try and force out the seals so you can also hacksaw a section out of an M20 x 3mm washer and insert it in the gap between the tiebars and the arm during greasing to prevent this (with the linkage bolted together and the seals where they should be, you can actually move the tiebar/sleeve assembly 2-3mm side to side; useful after you've greased up everything as you can move it fully each way to make it splodge the excess grease away from the bearings/seals, then clean it all off thoroughly to prevent any getting on the rear tyre).
Lastly I'd also replace the lower rear shock bushing as this usually wears before any of the actual linkage bearings. It's held in the shock by two of those PITA C-clips and IIRC I destroyed a Lidl precision screwdriver set getting them out (mind your eyes as the speed one of mine flew out, I think explains why the Northern Lights were visible over Dorset that time). This one fits the DTR:
https://www.mandp.co.uk/products/29-5027-lower-rear-shock-bearing-kit-605946
All sounds like a lot of work I know but being able to externally grease up the rear suspension is one of the greatest features of the DTR, done like this you can just ride the bike week in week out, 10 minutes with the grease gun every week or two and you'll probably pass next year's MOT without even having to look at this again.
Jesus! Last time I saw them over Dorset was 1921 or so. It was like petrol on wet tarmac, herbaly enhanced but amazing just the same…
I don’t need swingarm roller bearings. I put some I a while ago. Thanks for the heads up that it can be removed without removing the swingarm. I’ve got2 roller bearings, 5 bushes & 6 new oil seals.
It’s good to know that you’re still out there saving green rookies…
Richy
-
Damn the ones recommended last year are the wrong size. The long dog bone bolts sit in a single long bush. Mine are 2 per bolt and too big. Not sure about the roller bearings but the look was too big for the bolt that joins the frame. More like swingarm size…
Anywhere do a complete kit bolts and all?…
-
Just found the allballs kit picks and everything I’ve got looks right except the full length bronze ‘tubes’ (x2) for the dog bones and the single tube (roller bearings) the fits inside the link that attaches to the frame. Any idea where I can get those 3 full length bushes?…
Cheers peeps, sorry for any confusion …
… -
Just found the allballs kit picks and everything I’ve got looks right except the full length bronze ‘tubes’ (x2) for the dog bones and the single tube (roller bearings) the fits inside the link that attaches to the frame. Any idea where I can get those 3 full length bushes?…
Cheers peeps, sorry for any confusion …@SpookDog There is a complete linkage repair kit on eBay that reconditions all 3 pivots but this is the one I was saying you'll need to get the long tubes drilled in order to grease them externally. Apart from that it's excellent quality and fits very well:
Only other thing you might need is the bolt/nut where the linkage joins the frame; this is no longer available but as long as you can get it out it's solid enough to clean up. Just try to resist whacking it as there's a good chance it will knacker the thread, the studding method gets them out clean. Long linkage bolts are still available but special order from Japan:
https://www.fowlersparts.co.uk/parts/4163783/dt125r-3rmj-2000-050-a/rear-arm
-
@SpookDog There is a complete linkage repair kit on eBay that reconditions all 3 pivots but this is the one I was saying you'll need to get the long tubes drilled in order to grease them externally. Apart from that it's excellent quality and fits very well:
Only other thing you might need is the bolt/nut where the linkage joins the frame; this is no longer available but as long as you can get it out it's solid enough to clean up. Just try to resist whacking it as there's a good chance it will knacker the thread, the studding method gets them out clean. Long linkage bolts are still available but special order from Japan:
https://www.fowlersparts.co.uk/parts/4163783/dt125r-3rmj-2000-050-a/rear-arm
Did you ever manage to get any of them drilled?
It might be easier to fit a nipple to the linkage and the swingarm (centre of) the rear dogbone join? At least the grease would be going where it should (like the frame mount with roller bearings). Not trying to work it’s way out of the centre of the 2mm holes in the 2 dog bone bolts and then through the full length bush, that’s if they even have holes…Does that make sense, Or has my dementia catching up on me?!


PS what grease to use. Normal,l lithium, red~rubber or CV joint black grease. Or am I missing something? There’s so little movement really…
-
Did you ever manage to get any of them drilled?
It might be easier to fit a nipple to the linkage and the swingarm (centre of) the rear dogbone join? At least the grease would be going where it should (like the frame mount with roller bearings). Not trying to work it’s way out of the centre of the 2mm holes in the 2 dog bone bolts and then through the full length bush, that’s if they even have holes…Does that make sense, Or has my dementia catching up on me?!
PS what grease to use. Normal,l lithium, red~rubber or CV joint black grease. Or am I missing something? There’s so little movement really…
@SpookDog Yes you could install grease nipples on the swingarm and linkage, might be easier because all you'd really need is a set of M6 taps. It would work exactly the same as the one in the roller bearing bush as you say.
I never got any of those sleeves drilled as every time I did the rear linkage job on a DTR I always found the sleeves aren't very prone to wear, two or three times IIRC I measured the OEM ones that came out with a digital vernier, found them to be almost exactly 20mm OD and just re-used them and replaced the bushes.
I always just used NLGI2 Lithium grease off eBay, it's the same spec as Silkolene Pro RG2 but a lot cheaper (it's also the same colour which kind of points to where Silkolene get it from lol).
-
@SpookDog Yes you could install grease nipples on the swingarm and linkage, might be easier because all you'd really need is a set of M6 taps. It would work exactly the same as the one in the roller bearing bush as you say.
I never got any of those sleeves drilled as every time I did the rear linkage job on a DTR I always found the sleeves aren't very prone to wear, two or three times IIRC I measured the OEM ones that came out with a digital vernier, found them to be almost exactly 20mm OD and just re-used them and replaced the bushes.
I always just used NLGI2 Lithium grease off eBay, it's the same spec as Silkolene Pro RG2 but a lot cheaper (it's also the same colour which kind of points to where Silkolene get it from lol).
@HOTSHOT-III
I thought that it’d do the same thing but without having to ‘fight’ it’s way through the two little holes in the bolts. The one I took apart and degreased last night had ‘scorch’ marks either end. That was with me having the original bush with the two holes as well. I think this would be a better ‘delivery system’ without having to drill the long centre bushes.
I’ve got an old swingarm that has a grease nipple either side in the middle of each part the swingarm bolt runs through…
I want to ‘up my game’ since finding the scorch marks on the ‘dogbone’ long bush…Cheers bud, I thought you were using red rubber grease which is excellent for certain applications, but I thought too sticky, with no ‘travel’ if that makes any sense? I was thinking of CV booot grease just because it moves so freely and might be easier when using the Grease Gun…
Lithium general purpose is tried and tested through. Cheers for the input, it’s given me a lot of confidence…
Richy… -
Hi! What’s the best way of removing the twin short bronze bushes from the rear suspension linkage, also the ones on the swingarm? One gets in the way of the other so I can’t press them out. I’ve tried heat and ‘hammer & screwdriver’ approach, so as to get to the other, but to no joy…
Cheers for any help, advice. I couldn’t find sh!t on the search engine…
Hello! It looks like you're interested in this conversation, but you don't have an account yet.
Getting fed up of having to scroll through the same posts each visit? When you register for an account, you'll always come back to exactly where you were before, and choose to be notified of new replies (either via email, or push notification). You'll also be able to save bookmarks and upvote posts to show your appreciation to other community members.
With your input, this post could be even better 💗
Register Login