Stevie’s French '98, Mid-90's WR/YZ/DT (An idiotproof guide to building your own DTR)
-
@SpookDog sorry I meant the outer surface which the seal presses against
And consider myself told! I think I haven’t spent much time with the engine apart either so I’m a little blurry and unfamiliar except from what I’ve read so it’ll be a good exercise to pull her apart.
Give me a couple weeks to get paid and I’ll be ordering the bit needed.
So far I need, gasket, new head studs + screws + copper washers, @HOTSHOT-III crankcase splitter tool thing, clutch holding tool (i think I have one already), cordless impact wrench, JIS screwdrivers (I already have a pack of 5 which are very good and I’m if I remember right I’ve got JIS ratchet attachments too), 1/4” torque wrench / a nice handheld torque wrench (i actually already have one except it’s for cars and is huge not very ideal for doing cylinder studs etc), lots of sandwich bags + sharpie and zip ties, sheet of cardboard for making a template to stick bolts that require being placed in a specific order into.
Anything I missed?
@Stevie-Wonder do you need new head studs? What's the matter with the existing ones?
You're definitely dotting the i's and crossing the t's.
If you are just doing the top end then you won't need much in the way of sandwich bags and zip ties. It only takes an hour, including time to take the tank off so there won't be any time to misplace stuff.
I didn't use an impact gun, instead stick a screwdriver inbetween the primary and secondary gearbox output cogs. That'll lock the crankshaft to get the clutch basket off. If you do it in situe then the engine mounts will hold the engine steady. Again no more than an hours job to replace the crankshaft seals.
-
@SpookDog sorry I meant the outer surface which the seal presses against
And consider myself told! I think I haven’t spent much time with the engine apart either so I’m a little blurry and unfamiliar except from what I’ve read so it’ll be a good exercise to pull her apart.
Give me a couple weeks to get paid and I’ll be ordering the bit needed.
So far I need, gasket, new head studs + screws + copper washers, @HOTSHOT-III crankcase splitter tool thing, clutch holding tool (i think I have one already), cordless impact wrench, JIS screwdrivers (I already have a pack of 5 which are very good and I’m if I remember right I’ve got JIS ratchet attachments too), 1/4” torque wrench / a nice handheld torque wrench (i actually already have one except it’s for cars and is huge not very ideal for doing cylinder studs etc), lots of sandwich bags + sharpie and zip ties, sheet of cardboard for making a template to stick bolts that require being placed in a specific order into.
Anything I missed?
@Stevie-Wonder
You lever on the seals centre, not it’s outer edge
You will need a tool to hold the clutch centre while you undo/do up the clutch centre nut. Sticking a screwdriver in will allow you to undo the crank nut though

-
Cheers for your help boys, I’m convinced it’s a piece of cake now and I honestly look forward to taking everything apart to see if we can get her running again.
I see why you love two strokes so much, very little to go wrong and very easy/cheap to replace.
With the head studs I thought may as well as everything else would be new, plus don’t you need to replace the washers anyway?
Also yeah thinking about it as long as I’m organised and methodical I should be good, most of the bolts that come off can be left or put back in the put it in to avoid them getting lost anyway
@SpookDog Ohhh like use a hook pic or a spikey to stab into the middle to pull/lever it out. If that’s the case I always thought it’d be much harder then that

Also can anyone reccomend a tool for that job.
I think it’ll be a couple weeks before I can order the bits too
-
Cheers for your help boys, I’m convinced it’s a piece of cake now and I honestly look forward to taking everything apart to see if we can get her running again.
I see why you love two strokes so much, very little to go wrong and very easy/cheap to replace.
With the head studs I thought may as well as everything else would be new, plus don’t you need to replace the washers anyway?
Also yeah thinking about it as long as I’m organised and methodical I should be good, most of the bolts that come off can be left or put back in the put it in to avoid them getting lost anyway
@SpookDog Ohhh like use a hook pic or a spikey to stab into the middle to pull/lever it out. If that’s the case I always thought it’d be much harder then that

Also can anyone reccomend a tool for that job.
I think it’ll be a couple weeks before I can order the bits too
Like I said, small flat head screwdriver

Only replace the head studs if you have to, then only with genuine ones. Never buy fleabay ones! They may as well be made of glass 🥴
Breaking a stud of in the barrel is a pain in the ass. My local reputable bike shop put in the helicoil pissed, like the tower of piza ...
... -
Engines out, ready to be stripped.
I’m going to leave the engine standard and focus on performance upgrades last.
In the mean time I’m just going to take things slowly and get her ready for next year.Whilst stripping the engine I noticed the swing arm bushings etc looking like they could use replacing.
Rather then rebuild the stock swingarm I’ll buy a bearing kit for the DT200wr swinger I’ve got, get it painted and finally chuck it on the bike. Im really really excited about seeing this on the bike and feeling the weight difference between the two swingarms.
Another thing is 19” rear wheel jacks the ass up a lot, the bigger wheel doesn’t look right and tire options are limited. Plus with USD’s on the front and knobbly tires it makes the DT a very tall bike. Even for someone 6ft.
For those reasons that’ll be going shortly.I have to wire in a trail tech vapor speedo too, I have been without working clocks for sometime now. Not good.
Im shit with electrics so I’ll probably pay someone to do that and save all the agg.
I wish they where just the standard DT clocks but that’s just not on option anymore with the front end I’ve got now.This is everything I reckon I’ve got to do
Everything the DT needs to make 100%
Front brake hose holder clip €22.50
5DH2587500Brake pad retaining pin £
5DH2593300Front wheel inner Axle threads needs heli-coil/tap and dye as does brake hose guard cover bolt
Cover, Hose €23 (UFO/Polisport disc cover will also do the same job and give 90’s aesthetics)
5DH2314E00Oem Fork guard bolts (Anodised ones are usually ally and the threads give way after a couple twists, it’s amazing it’s took until now for most of them to go missing/work their way free)
Rear panels + graphics (bikerpartshop + hazard)
Helmet lock 5H0-21308-01
Possibly oil + coolant for once engine’s drained
Seat cover - either custom or bikerpartshop dark blue replica
- Battery strap
22F-82131-00
https://sumorubber.com/straps ( a very handle little sight that specialises in battery straps for vintage bikes, the steel on my battery strap that clips to the frame had completely deteriorated)
DT125R headlight frame / bracket holder. (I love the 3et light for its slimmer profile but the smaller size with the bigger forks means there’s not a lot of space to put your dash, the original would be more practical, look better and fit better.)
Working fucking clocks!!!
Speedo cable wire for Vapor
&
Magnet pick up sensorDT200WR swinger needs difference in pivot mounts measuring + chain alignment checking
18x2.15 excel rim
-
Engines out, ready to be stripped.
I’m going to leave the engine standard and focus on performance upgrades last.
In the mean time I’m just going to take things slowly and get her ready for next year.Whilst stripping the engine I noticed the swing arm bushings etc looking like they could use replacing.
Rather then rebuild the stock swingarm I’ll buy a bearing kit for the DT200wr swinger I’ve got, get it painted and finally chuck it on the bike. Im really really excited about seeing this on the bike and feeling the weight difference between the two swingarms.
Another thing is 19” rear wheel jacks the ass up a lot, the bigger wheel doesn’t look right and tire options are limited. Plus with USD’s on the front and knobbly tires it makes the DT a very tall bike. Even for someone 6ft.
For those reasons that’ll be going shortly.I have to wire in a trail tech vapor speedo too, I have been without working clocks for sometime now. Not good.
Im shit with electrics so I’ll probably pay someone to do that and save all the agg.
I wish they where just the standard DT clocks but that’s just not on option anymore with the front end I’ve got now.This is everything I reckon I’ve got to do
Everything the DT needs to make 100%
Front brake hose holder clip €22.50
5DH2587500Brake pad retaining pin £
5DH2593300Front wheel inner Axle threads needs heli-coil/tap and dye as does brake hose guard cover bolt
Cover, Hose €23 (UFO/Polisport disc cover will also do the same job and give 90’s aesthetics)
5DH2314E00Oem Fork guard bolts (Anodised ones are usually ally and the threads give way after a couple twists, it’s amazing it’s took until now for most of them to go missing/work their way free)
Rear panels + graphics (bikerpartshop + hazard)
Helmet lock 5H0-21308-01
Possibly oil + coolant for once engine’s drained
Seat cover - either custom or bikerpartshop dark blue replica
- Battery strap
22F-82131-00
https://sumorubber.com/straps ( a very handle little sight that specialises in battery straps for vintage bikes, the steel on my battery strap that clips to the frame had completely deteriorated)
DT125R headlight frame / bracket holder. (I love the 3et light for its slimmer profile but the smaller size with the bigger forks means there’s not a lot of space to put your dash, the original would be more practical, look better and fit better.)
Working fucking clocks!!!
Speedo cable wire for Vapor
&
Magnet pick up sensorDT200WR swinger needs difference in pivot mounts measuring + chain alignment checking
18x2.15 excel rim
@Stevie-Wonder With the engine removed from the frame, now would be an opportune moment to test the fitting of your DT200WR swingarm. Sounds counter-intuitive I know, but assuming the swingarm pivot bosses are the same width/distance apart as the stock steel arm (meaning it will fit into the chassis), it's the engine boss which dictates it's (and in turn the rear sprocket/wheel) position in the bike. Sprocket alignment is the biggest enemy here; you won't notice front/rear wheel alignment being a few mm out as once you factor in tyres, rims etc. (MOT allows 4mm lateral rim runout) most bikes on the road aren't perfect anyway.
Here's an explanation how to do the swingarm side clearance with pics from the Yamaha manual. Don't forget you'll need to do this again after splitting and reassembling the crankcases as this process might alter the engine boss width:
https://dt125r.co.uk/post/29135
It's actually possible to do this without going near the chassis if you have the engine out; I went through the process using a 3ET swingarm and a spare set of crankcases to do a workbench mock-up to assess sprocket alignment. 3ET swingarm, spindle, drive side spacer and rear caliper mount (it's thinner due to the fatter ends of the alloy arm) and stock DT125R hub produced almost perfect sprocket alignment according to my 600mm straight edge. I might need to play around with this slightly to get it perfect; there was a 3mm thick M20 washer between the caliper mount and arm when this pic was taken and the sprockets look about 1mm out.
Good shout going back to an 18" rim. If you can, go back to your stock 18" DTR rear wheel as well because stock rear wheel with good sprocket alignment = wheel alignment (or at least it places your stock rear wheel where it should be) which will keep things simple for now. Also 19" rear wheels on MX bikes were largely an attempt to reduce the rear wheel's weight which reduces unsprung weight/inertia to improve acceleration and suspension responsiveness on the track; most Enduro bikes run 18" because the flabbier tyre sidewall is more forgiving and offers better puncture resistance against rocks, roots, Ferguson tractor parts in the corner of farmers' fields etc.
https://www.thumpertalk.com/forums/topic/213621-18-vs-19-wheels/
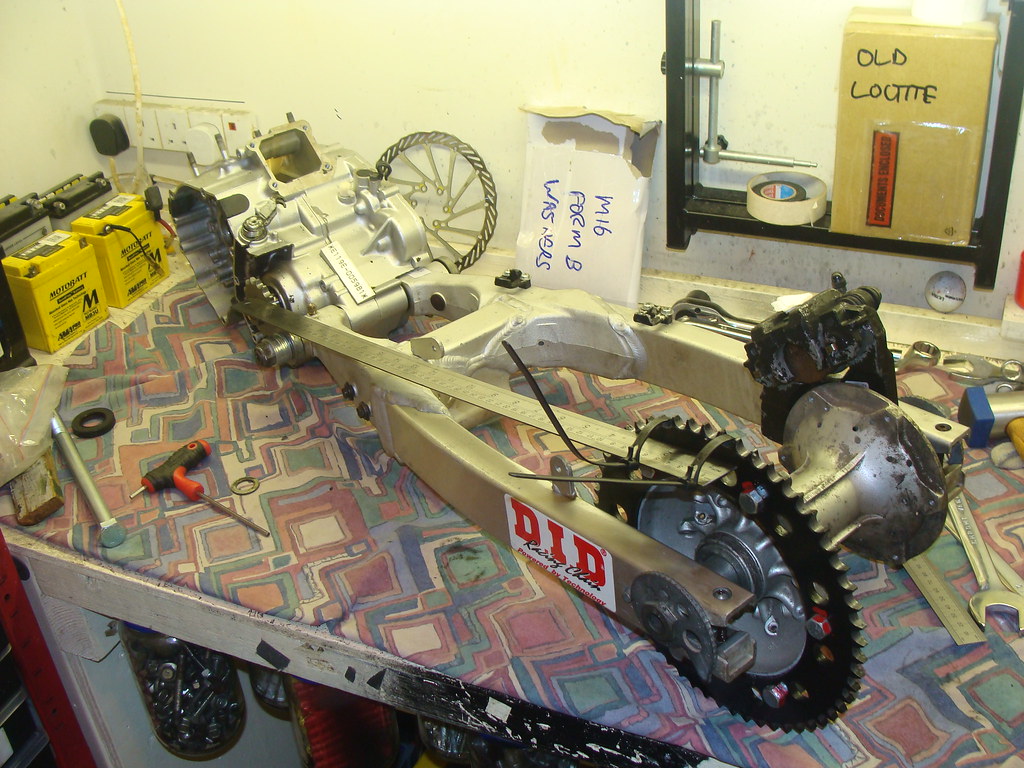
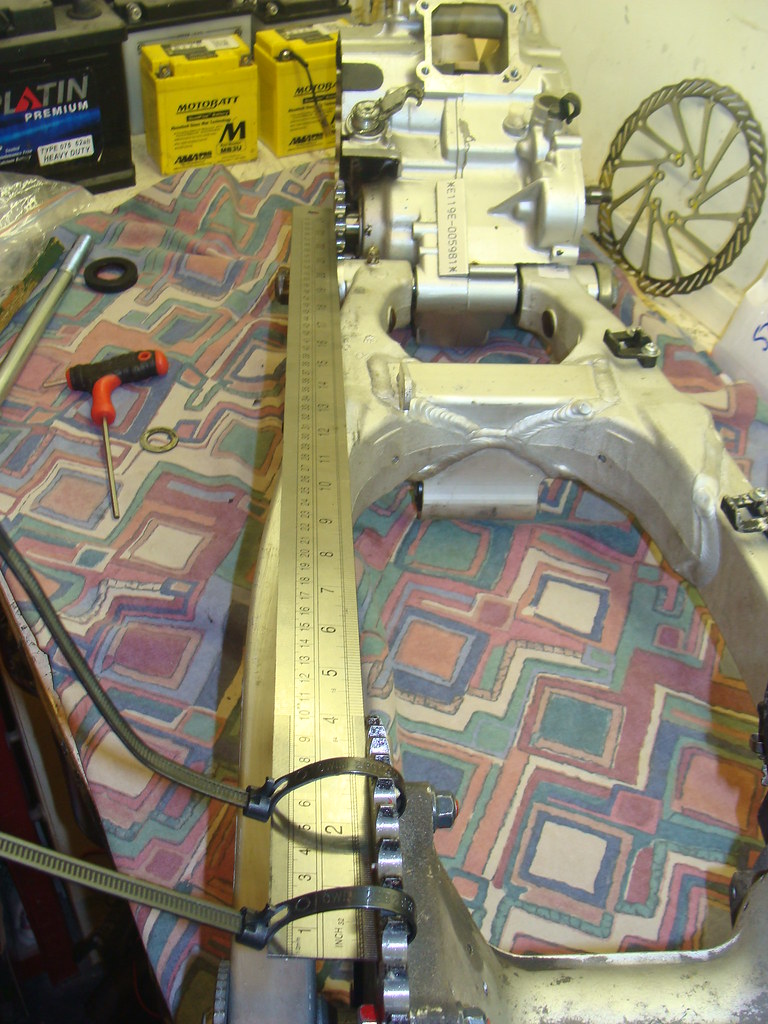

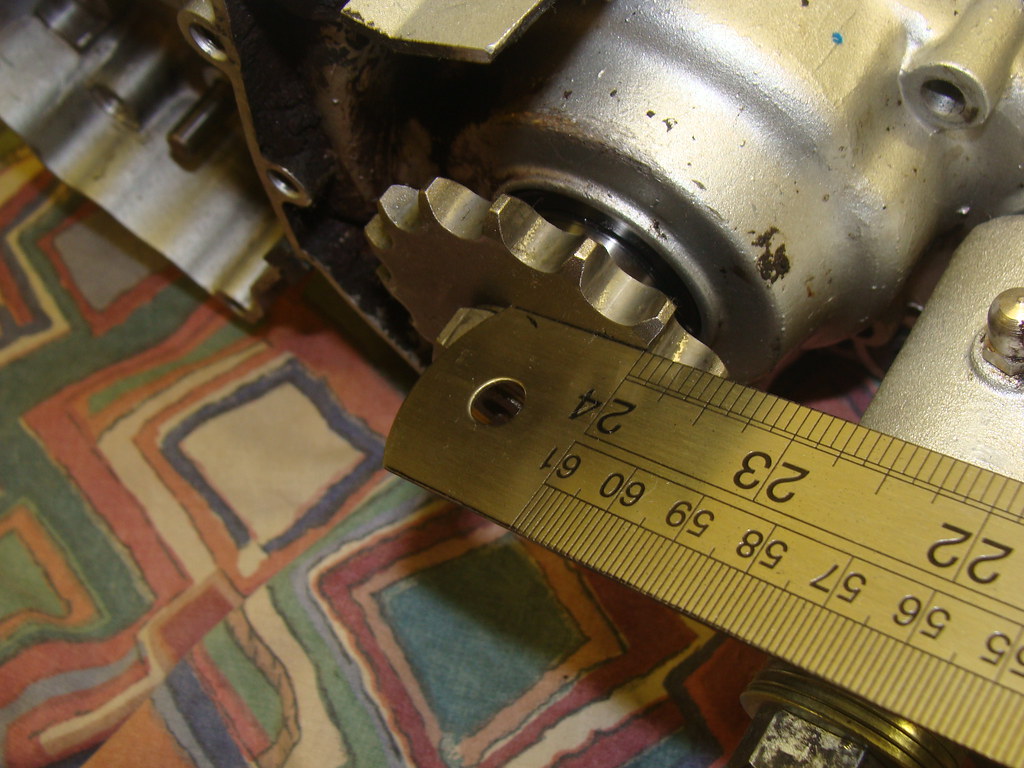
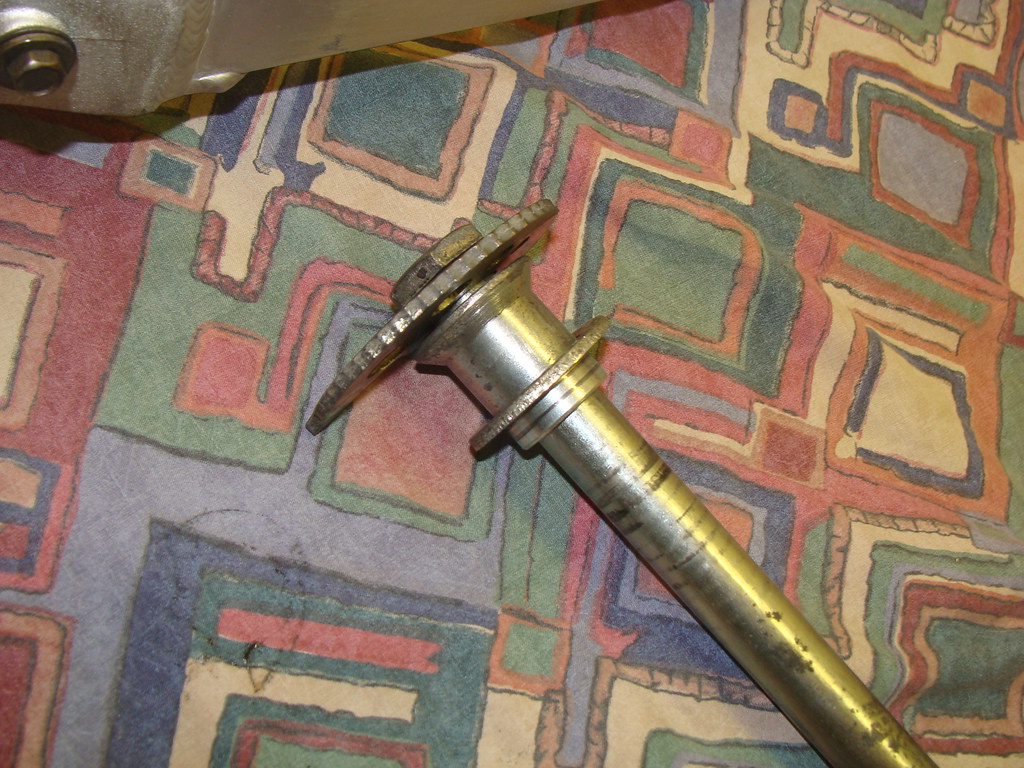

I can't comment on the DT200WR arm as the chassis is different from the DT125R as well meaning you might need the entire rear suspension assembly to make it work (the DT200WR shared a much beefier relay arm and linkage with the WR200 IIRC). And compared to the 125 steel arm I'd be looking at overall length as well as the distance between the pivot and where the linkage attaches to try and get an idea whether the leverage ratio will change noticeably.
-
@Stevie-Wonder With the engine removed from the frame, now would be an opportune moment to test the fitting of your DT200WR swingarm. Sounds counter-intuitive I know, but assuming the swingarm pivot bosses are the same width/distance apart as the stock steel arm (meaning it will fit into the chassis), it's the engine boss which dictates it's (and in turn the rear sprocket/wheel) position in the bike. Sprocket alignment is the biggest enemy here; you won't notice front/rear wheel alignment being a few mm out as once you factor in tyres, rims etc. (MOT allows 4mm lateral rim runout) most bikes on the road aren't perfect anyway.
Here's an explanation how to do the swingarm side clearance with pics from the Yamaha manual. Don't forget you'll need to do this again after splitting and reassembling the crankcases as this process might alter the engine boss width:
https://dt125r.co.uk/post/29135
It's actually possible to do this without going near the chassis if you have the engine out; I went through the process using a 3ET swingarm and a spare set of crankcases to do a workbench mock-up to assess sprocket alignment. 3ET swingarm, spindle, drive side spacer and rear caliper mount (it's thinner due to the fatter ends of the alloy arm) and stock DT125R hub produced almost perfect sprocket alignment according to my 600mm straight edge. I might need to play around with this slightly to get it perfect; there was a 3mm thick M20 washer between the caliper mount and arm when this pic was taken and the sprockets look about 1mm out.
Good shout going back to an 18" rim. If you can, go back to your stock 18" DTR rear wheel as well because stock rear wheel with good sprocket alignment = wheel alignment (or at least it places your stock rear wheel where it should be) which will keep things simple for now. Also 19" rear wheels on MX bikes were largely an attempt to reduce the rear wheel's weight which reduces unsprung weight/inertia to improve acceleration and suspension responsiveness on the track; most Enduro bikes run 18" because the flabbier tyre sidewall is more forgiving and offers better puncture resistance against rocks, roots, Ferguson tractor parts in the corner of farmers' fields etc.
https://www.thumpertalk.com/forums/topic/213621-18-vs-19-wheels/


I can't comment on the DT200WR arm as the chassis is different from the DT125R as well meaning you might need the entire rear suspension assembly to make it work (the DT200WR shared a much beefier relay arm and linkage with the WR200 IIRC). And compared to the 125 steel arm I'd be looking at overall length as well as the distance between the pivot and where the linkage attaches to try and get an idea whether the leverage ratio will change noticeably.
@HOTSHOT-III said in Stevie’s French '98, Mid-90's WR/YZ/DT (An idiotproof guide to building your own DTR):
@Stevie-Wonder With the engine removed from the frame, now would be an opportune moment to test the fitting of your DT200WR swingarm. Sounds counter-intuitive I know, but assuming the swingarm pivot bosses are the same width/distance apart as the stock steel arm (meaning it will fit into the chassis), it's the engine boss which dictates it's (and in turn the rear sprocket/wheel) position in the bike. Sprocket alignment is the biggest enemy here; you won't notice front/rear wheel alignment being a few mm out as once you factor in tyres, rims etc. (MOT allows 4mm lateral rim runout) most bikes on the road aren't perfect anyway.
Here's an explanation how to do the swingarm side clearance with pics from the Yamaha manual. Don't forget you'll need to do this again after splitting and reassembling the crankcases as this process might alter the engine boss width:
https://dt125r.co.uk/post/29135
It's actually possible to do this without going near the chassis if you have the engine out; I went through the process using a 3ET swingarm and a spare set of crankcases to do a workbench mock-up to assess sprocket alignment. 3ET swingarm, spindle, drive side spacer and rear caliper mount (it's thinner due to the fatter ends of the alloy arm) and stock DT125R hub produced almost perfect sprocket alignment according to my 600mm straight edge. I might need to play around with this slightly to get it perfect; there was a 3mm thick M20 washer between the caliper mount and arm when this pic was taken and the sprockets look about 1mm out.
Good shout going back to an 18" rim. If you can, go back to your stock 18" DTR rear wheel as well because stock rear wheel with good sprocket alignment = wheel alignment (or at least it places your stock rear wheel where it should be) which will keep things simple for now. Also 19" rear wheels on MX bikes were largely an attempt to reduce the rear wheel's weight which reduces unsprung weight/inertia to improve acceleration and suspension responsiveness on the track; most Enduro bikes run 18" because the flabbier tyre sidewall is more forgiving and offers better puncture resistance against rocks, roots, Ferguson tractor parts in the corner of farmers' fields etc.
https://www.thumpertalk.com/forums/topic/213621-18-vs-19-wheels/


I can't comment on the DT200WR arm as the chassis is different from the DT125R as well meaning you might need the entire rear suspension assembly to make it work (the DT200WR shared a much beefier relay arm and linkage with the WR200 IIRC). And compared to the 125 steel arm I'd be looking at overall length as well as the distance between the pivot and where the linkage attaches to try and get an idea whether the leverage ratio will change noticeably.
Thank you for that @HOTSHOT-III thats really helpful. The swinger still needs painting, which I’ll get round to eventually none the less I’ll be doing what you said.
My 19” rear is just a YZ rim laces to DTR hub so in theory the alignment should be the same. -
I’ve since split the cases, I don’t have photos but the top end was pristine. The head had no plinking/det marks, crosshatching on the bore still, perfect even burn pattern along the piston crown and a beautiful bronze/brown colour. No play in the crank either.
My suspicions were right and both seals had in fact given up. A quick call to PJME for a round of oem seals, power valve rebuild kit, Yamaha seals and some koyo crank bearings for good measure and we’re sorted.
I also did some tinkering today and found out what’s wrong with my clocks as I was having issues with using the stock ones with my USD forks.
-The Speedo side of the clocks fine, however when I hooked up I didn’t get reading so the speedo drive is possibly faulty. Plus to make matters worse speedo drive is to opposite side of the clocks meaning you can’t route the cable properly.-I found out the rev side of my clocks has seized somehow which is why my bike snapped two cables.
(If anyone has any experience with taking the clocks apart that’d be great, are they complicated/fiddly?) -
I’ve since split the cases, I don’t have photos but the top end was pristine. The head had no plinking/det marks, crosshatching on the bore still, perfect even burn pattern along the piston crown and a beautiful bronze/brown colour. No play in the crank either.
My suspicions were right and both seals had in fact given up. A quick call to PJME for a round of oem seals, power valve rebuild kit, Yamaha seals and some koyo crank bearings for good measure and we’re sorted.
I also did some tinkering today and found out what’s wrong with my clocks as I was having issues with using the stock ones with my USD forks.
-The Speedo side of the clocks fine, however when I hooked up I didn’t get reading so the speedo drive is possibly faulty. Plus to make matters worse speedo drive is to opposite side of the clocks meaning you can’t route the cable properly.-I found out the rev side of my clocks has seized somehow which is why my bike snapped two cables.
(If anyone has any experience with taking the clocks apart that’d be great, are they complicated/fiddly?)Standard clocks? You have to separate the base with a Stanley knife. Then stick it back together with mastic/sealant…
I’d try wd40 and try to get it moving with a screwdriver or such. The bit that spins has a magnet inside the unit that sits inside a kinda steel ‘bell’ that connects to the needle. The spinning magnet moves the ‘bell’ which has a very delicate return spring…
It’s fiddly but doable. If the gauge is fubar you’ve got nothing to loose… -
Standard clocks? You have to separate the base with a Stanley knife. Then stick it back together with mastic/sealant…
I’d try wd40 and try to get it moving with a screwdriver or such. The bit that spins has a magnet inside the unit that sits inside a kinda steel ‘bell’ that connects to the needle. The spinning magnet moves the ‘bell’ which has a very delicate return spring…
It’s fiddly but doable. If the gauge is fubar you’ve got nothing to loose… -
Cheers man I’ll give that a try
Engines back together now, took an afternoon to do between me and Stacey of VJMC Suffolk division, the crank bearings and seals come out no trouble and it was fun educational experience. They’re surprisingly simple and light.
Still learning about the gearbox aspect. That’s gonna take a couple more goes before I get.I polished the piston crown, rebuilt the powervalve and through a set of koyo main bearings and used OEM everything else.
Unfortunately I forgot to order a Reed gasket so we’ve had to put it on hold until that comes back, then we can see if she runs.
-
Cheers man I’ll give that a try
Engines back together now, took an afternoon to do between me and Stacey of VJMC Suffolk division, the crank bearings and seals come out no trouble and it was fun educational experience. They’re surprisingly simple and light.
Still learning about the gearbox aspect. That’s gonna take a couple more goes before I get.I polished the piston crown, rebuilt the powervalve and through a set of koyo main bearings and used OEM everything else.
Unfortunately I forgot to order a Reed gasket so we’ve had to put it on hold until that comes back, then we can see if she runs.
@Stevie-Wonder
More hands on you get, the more confidence you gain. Good to hear you’re still around
You been riding that FZR, wasn’t it? Revvy 4/ fun!…. -
Yes my FZS600, a great bike with plenty of power. Very Rev happy, very reliable too. I’d definitely own one again. Unfortunately I had to sell it. My only complaint isn’t really so much a complaint but more personal preference and that’s that it felt like riding a two stroke, the power was very linear yet flat at low revs but increased more and more with the revs. It makes for a lot of fun but personally if I wanted that feeling I’d just experience the real deal by riding a two stroke. If I’m riding four stroke I like bottom end and not having to constantly be on revving the tits of it. It gets annoying after a while, that is unless it’s a two stroke.
Update with the bike, I’ve sourced some parts for the DTR thanks to a certain someone (forget their @). I’m getting rid of the 200r headlight, making a second rear plate holder and at some point I might buy some replica OEM indicators. The 19” rear will eventually go but I’m not replacing it with anything other than an excel 18” so that’ll take time and $$$. From the parts I sourced was a headlight frame to put the original back on, quite looking forward to putting the original back on to be honest!
I do need to somehow sort out a mount for it. I also replaced the rear mud flap as my one got eaten by a whopping great big knobbly that I put on my bike when I first got it. 140/80-18’s aren’t for your bike is what I’d tell myself if I could .
.So far so good with everything really, since being rebuilt I’ve only rid her around a couple times, she’s yet to go on any proper outings though.
On my list of jobs to do was to change the pads as the right side of my EBC pad had literally just fallen off. What was meant to be a quick job turned into a bit of a nightmare though as the calliper wouldn’t come away from the hanger. Many hits and a lot of heat made absolutely no difference at all. When it finally did budge it was just the thread of the pin coming loose
I’ve since disconnected the calliper from the hose and left it to soak in methylated spirit as the Aussie’s on fb said that remedied their issue with the calliper fusing/seizing to the pin to their 200r’s.
I’ve been told it’s a common problem, if any one has any advice for this then let me know.Id noticed the seals of the piston protruding out too, so whilst I am tempted to push the piston in give it all a thorough clean and then Chuck it back together so it’s sorted, I know it’s only going to be a temporary fix and it’ll need to be done one day.
Plus knowing that my callipers seized to the hangar bucks the shit out of me because everything else on my bike has been perfect,
-
Uuuhhmmm, two strokes aren't linear power. I think you've misphrased that.
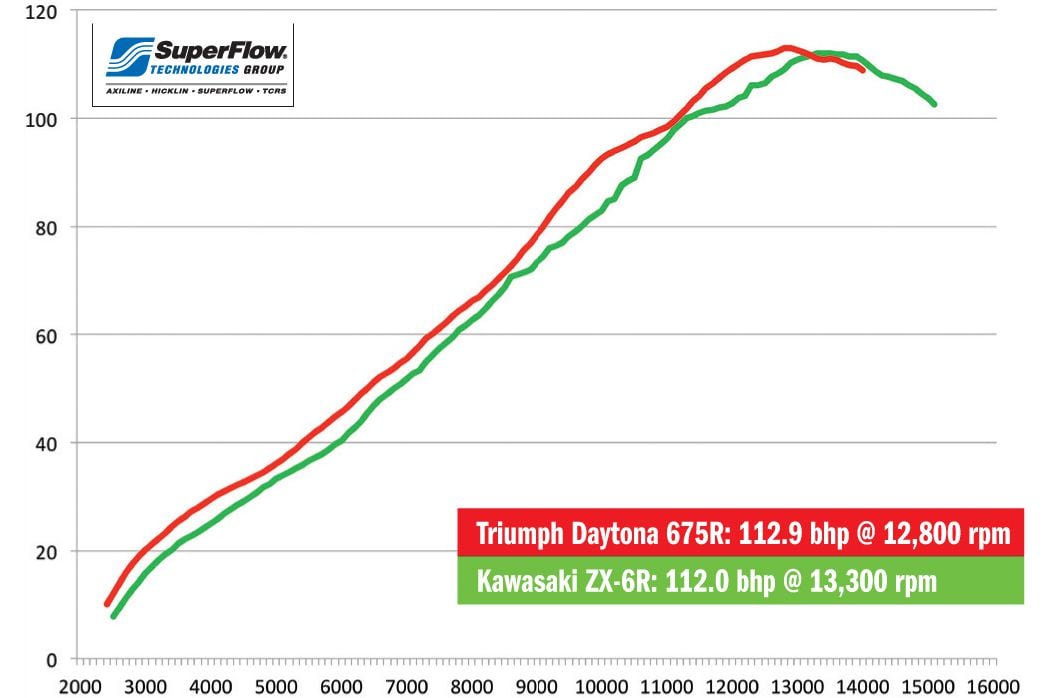
A lot of road going four strokes I've ridden are gutless and you have to wring their necks to actually make them fast. I don't see that as being akin to a two stroke.
ZX6R
Where as an RD350LC, or two stroke will have a much more erratic explosive powerband.
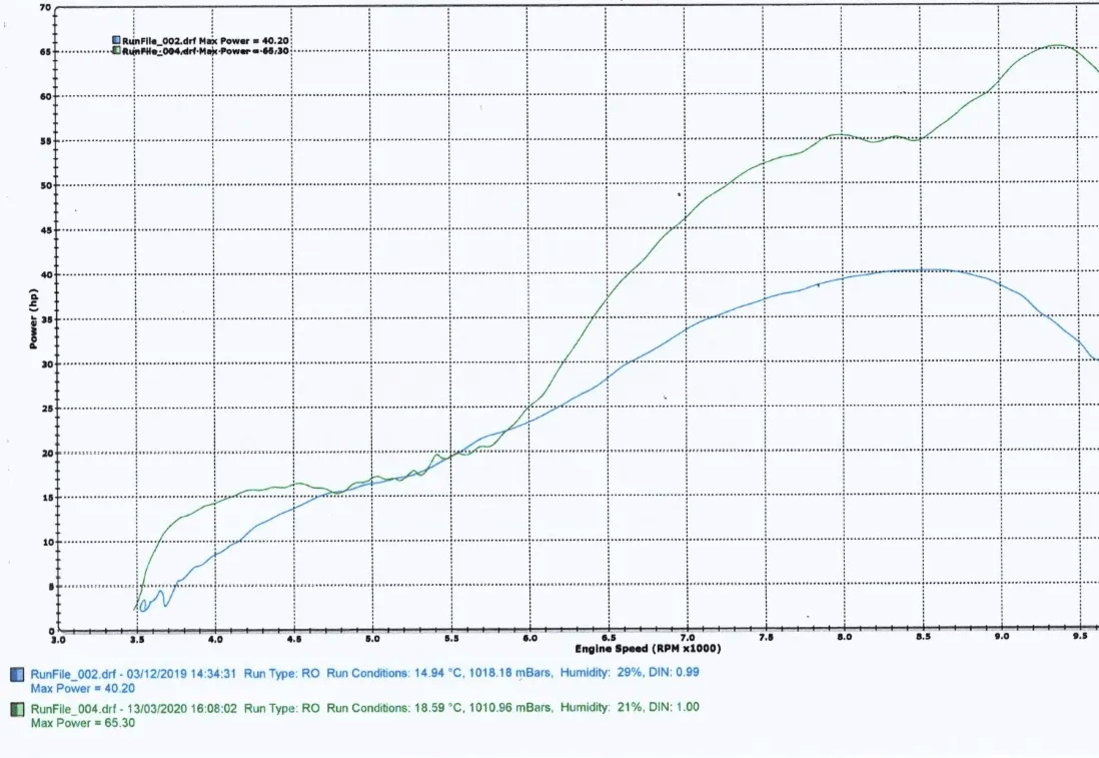
Bear in mind on the RD, you're talking about something which makes DTR power just above idle. So they are very rideable, but the real fun/power is up at those higher RPMs.
You really need to be up there (750cc+) on four strokes for them to actually be fast IMO.
-
Uuuhhmmm, two strokes aren't linear power. I think you've misphrased that.
A lot of road going four strokes I've ridden are gutless and you have to wring their necks to actually make them fast. I don't see that as being akin to a two stroke.
ZX6R

Where as an RD350LC, or two stroke will have a much more erratic explosive powerband.

Bear in mind on the RD, you're talking about something which makes DTR power just above idle. So they are very rideable, but the real fun/power is up at those higher RPMs.
You really need to be up there (750cc+) on four strokes for them to actually be fast IMO.
A lot of road going four strokes I've ridden are gutless and you have to wring their necks to actually make them fast. I don't see that as being akin to a two stroke.
That’s exactly what I mean, I’m not talking about the literal powerband but the way the bike feels and is ridden. That revvy in-line four akin to the DT is begging to have its necks wrung because you literally double the amount of power high up in the revs and like said that’s how you make them fast
-
A lot of road going four strokes I've ridden are gutless and you have to wring their necks to actually make them fast. I don't see that as being akin to a two stroke.
That’s exactly what I mean, I’m not talking about the literal powerband but the way the bike feels and is ridden. That revvy in-line four akin to the DT is begging to have its necks wrung because you literally double the amount of power high up in the revs and like said that’s how you make them fast
@Stevie-Wonder Yeah, I see what you're saying. With a bigger 4 stroke it's not like that so much. I haven't yet ridden a super bike however.
-
A lot of road going four strokes I've ridden are gutless and you have to wring their necks to actually make them fast. I don't see that as being akin to a two stroke.
That’s exactly what I mean, I’m not talking about the literal powerband but the way the bike feels and is ridden. That revvy in-line four akin to the DT is begging to have its necks wrung because you literally double the amount of power high up in the revs and like said that’s how you make them fast
I had an old Suzuki gn/dr 400 single cylinder mongrel that I put a sidecar on so I could ride it on L plates. It was like riding a tractor it was so torque’y. Uphill or down, pull away whatever gear, it just loved to pull

Gotta love torque!I lost a lot of brake power to having a worn slide pin. The calliper just kinda tilted sideways for a big part on the levers throw. I was going to drill out the calliper (the hole was oval-ed) and put an oversized pin in, but couldn’t find one.
Failing that put a brass sleeve in it and a standard size new one, but couldn’t find one! Got a titanium one that turned out to be too small diameter. Gave up and just stripped it and replaced the rubbers and seals. Grease the pin!
Apart from major heat I’d soak it in vinegar or washing soda, or even caustic soda to try and release it. Also, if it’s that corroded I’d replace the piston with a stainless or titanium one…
Good luck bud, nice to know you’re still about…
-
@Stevie-Wonder Yeah, I see what you're saying. With a bigger 4 stroke it's not like that so much. I haven't yet ridden a super bike however.
@Calum when I rode a CBR900rr fire blade it still produces that same style of power but was no where near as revvy as the fazer.
The fazer wanted to be ridden past 8k everywhere, by all means you could ride it under but it just didn’t feel like you was using it properly
-
I had an old Suzuki gn/dr 400 single cylinder mongrel that I put a sidecar on so I could ride it on L plates. It was like riding a tractor it was so torque’y. Uphill or down, pull away whatever gear, it just loved to pull

Gotta love torque!I lost a lot of brake power to having a worn slide pin. The calliper just kinda tilted sideways for a big part on the levers throw. I was going to drill out the calliper (the hole was oval-ed) and put an oversized pin in, but couldn’t find one.
Failing that put a brass sleeve in it and a standard size new one, but couldn’t find one! Got a titanium one that turned out to be too small diameter. Gave up and just stripped it and replaced the rubbers and seals. Grease the pin!
Apart from major heat I’d soak it in vinegar or washing soda, or even caustic soda to try and release it. Also, if it’s that corroded I’d replace the piston with a stainless or titanium one…
Good luck bud, nice to know you’re still about…
@SpookDog thank you mate. I hope you’re well. I had a lot of plans this year but life decided otherwise

I’ll keep everyone posted with things coming
-
@Stevie-Wonder That sounds grand. I love my SM setup, but trust me, the bike is most fun in stock trim. 100% believe that. Want a fast bike, do your test, want a bike that puts smiles on your face.... Well you found it!
My bike got stolen and smashed to pieces and I was sick of the sight of it, hence why it went and got modified. But if the bike never got stolen then I would have left it stock.
Part of the my enjoyment back then came from the rebuild. But I have long since grown tired of that and the headaches!
Good looking thing! Love the decals in front.
My bike got stolen and smashed to pieces and I was sick of the sight of it, hence why it went and got modified.
Both my previous DT125's were stolen, smashed up, and found in a ditch. First in 1991, second in 1999. What it is with DT's and sadistic thieves?
The second one had done a thorough job, there were wooden sticks protruding from holes in the expansion chamber and headlight.