Skip to content
  • Recent
  • Tags
  • Popular
  • Users
  • Groups
Skins
  • Light
  • Cerulean
  • Cosmo
  • Flatly
  • Journal
  • Litera
  • Lumen
  • Lux
  • Materia
  • Minty
  • Morph
  • Pulse
  • Sandstone
  • Simplex
  • Sketchy
  • Spacelab
  • United
  • Yeti
  • Zephyr
  • Dark
  • Cyborg
  • Darkly
  • Quartz
  • Slate
  • Solar
  • Superhero
  • Vapor

  • Default (Slate)
  • No Skin
Collapse
Brand Logo

DT125R FORUM

CalumC

Calum

@Calum
About
Posts
6.5k
Topics
153
Shares
0
Groups
0
Followers
60
Following
5

Posts

Recent Best Controversial

  • SVG's Are Coming
    CalumC Calum

    Hello All,

    Introduction

    So I know I keep spouting on about the updates to the forum, and yes these things take time.

    I am not even through the first stages of these updates, but I've got plenty of ideas about what could be useful things to have.

    I will take this opportunity to give a shout out to @Arite who has been spending time heading up designs for some of the systems more complicated features.

    Scalar Vector Graphics

    One of the things that I have been working on however, has started to take shape over the last couple of days.

    The ability to view the parts diagram is no doubt an extremely useful feature, and it's probably one of the only reasons I use websites such as Fowlers.

    I figured as this is the place for DTR's that we should in fact have our very own exploding diagrams.

    Unlike all of the other parts diagrams available, I have instead opted to make these graphics Scalar Vector. Essentially what this means is that as you zoom in on the image, the image will redraw itself. This results in a crystal clear image every time.

    Don't believe me?

    Have a look at our Logo

    Use Ctrl and the mouse wheel to zoom in on the image. Notice how it doesn't lose resolution

    Integration With the DTR Forum

    With that cleared up then, how is this going to be incorporated to the DTR forum.

    I have created a dedicated section for these images to be stored.

    Users will be able to navigate to this section, select the vehicle they're interested in, select the part, then explore the diagram in infinite detailing.

    0_1503866991538_svg1.png

    The beauty of having it in our community is that I have made it so that the parts are linkable to other members.

    From the URL you can specify the bike and part that you are viewing, allowing you to help other members with the high resolution graphics.

    0_1503867053064_svg2.png

    This part is far from complete yet, there is still lots to do. I presume many users will be using their mobile devices, as such these high resolution images may impede performance. Work needs to be done to minimise the network payload too.

    0_1503867125431_svg3.png

    Since the SVG's total to around 120Mb per bike, I will have to ensure that alternatives are provided for those of you on lower power devices.

    Conclusion

    This is still very much in early days yet, the ideas will get revised and the layouts shuffled, but I feel that it's a feature worth investing time into.

    I shall continue to make good progress on the extension to this forum, in due course time I will be releasing updates to this forum that should help keep the community alive.

    Comments welcome.

    Announcements

  • Outage
    CalumC Calum

    Hi Everyone,

    Sorry for the recent outages I've been upgrading the machine and forum software, consequently something bad happened and the box refused to come back on line.

    Some things during investigation grabbed my attention so I saw to them whilst fixing the issues.

    We're now on the latest version of the forum software, but I can already see some potential bugs and what not.

    I will keep an eye on them, and upgrade at the latest opportunity.

    For now just bare with any bugs we see.

    Kind Regards,

    Calum

    Announcements

  • Covid-19
    CalumC Calum

    Hi Everyone,

    I just want to say that I hope everyone is self isolating, staying safe and keeping themselves busy through these trying times.

    I know times are dark at the moment and we all have our demons to battle. We'll get through this and I am really proud that as a nation we have come together.

    https://www.justgiving.com/fundraising/tomswalkforthenhs

    If you haven't seen the incredible charity of our nation as we collectively donated 10 million pounds for Captain Tom to walk his garden on behalf of the NHS, then please do check it out.

    It's so heart warming to see that we can set aside our differences and come together for a fantastical cause. Big up to all you key workers out there. Maximum respect for each and every one of you.

    My nan passed away to the virus early last week, it came as a shock to us all and she is dearly missed. She is just one of the many victims of the deadly virus.

    Stay safe.

    Calum

    Off Topic

  • Suns Out Bikes Out!
    CalumC Calum

    alt text

    First time riding it since I built the damn thing!

    Lots of teething issues to sort out!

    Off Topic

  • New Moderator
    CalumC Calum

    I would like to announce that @Mightyman has now become a moderator to the forum.

    He's been with us since the launch of the new site and is always quick to spot things I miss.

    Hopefully he can help out around here.

    Cheers bud.

    Announcements

  • Swindon Meet
    CalumC Calum

    So unfortunately I broke my phone, but I borrowed a phone from a friend and took a few snaps of this little gem.

    0_1498429858593_image1.JPG

    0_1498429871427_image4.JPG

    0_1498429884301_image2.JPG

    General Discussion

  • The Leviathan Project
    CalumC Calum

    Two long years

    https://youtu.be/n8NCG4xdbqY

    DTRE 4dl zeeltronic dtre leviathan belgarda

  • Forum Updates
    CalumC Calum

    Forum Update

    There is going to be a forum outage at some point this weekend.

    The forums software has become out of date and I may as well update the machine as well.

    I don't know how long this will take, or when I will actually get around to doing it. Either way if you find you can't access the forum, that'll be why.

    It will all come back up on Monday.

    Emails

    As has been request, I will also get around to setting up the emails on this server so that they actually work. I shall try and include this for the outage this weekend

    Hardware Update

    Also, I would like to note, there will be another outage in the next few weeks or so. The hardware I am using is going to be upgrade for a faster machine and just a general refresh.

    URL Change

    I also intend to move the location of the forum to dt125r.co.uk/forum and instead have a home page not related to the forum software. This change is going to be massive under the hood, as all of the links are going to need to be changed.

    When I actually do this latter change I don't actually know. As said I will have to buy a new computer and stuff so it's whenever I got the spare cash.

    Website Upgrade

    I do want to shake the web site up a little bit and offer more content, this will come over the course of the year, but in order for these changes to be accommodated, I must first invest in some new hardware.

    Ultimately the majority of this work is not going to happen overnight, significant time is going to be invested to ensure that we do not lose the hard work we have put into this forum.

    If there are any questions be sure to let me know down below

    Regards,

    Calum

    Announcements

  • Forum Instability
    CalumC Calum

    0_1500408221183_20170718_210313.jpg

    There it is ladies a d gents, The DT Forum. And above it the bastard thing that burnt out earlier lol.

    Forum Related Issues

  • Forum Instability
    CalumC Calum

    Wow, there is always something else am I right?

    This forum is really suffering from instability issues at the moment I have no ideas why.

    I can't see anything in the logs to suggest that there is something wrong with the machine but I will continue to investigate.

    I have ordered a new machine and new hard disk, so I will look to migrate the server to this very soon. The machine is also slightly faster so should be able to handle more concurrent users.

    Sorry for the inconvinience guys I will do my best to try and resolve the issues we're having.

    Kind Regards,

    Calum

    Forum Related Issues

  • Forum Outage
    CalumC Calum

    Forum upgraded to the latest version and servers patched 😃

    Forum Related Issues

  • Hall of fame
    CalumC Calum

    Soon, I am going to upgrade the forum software and buy a new computer for the forum and do a lot of other stuff.

    General Discussion

  • New section suggestion
    CalumC Calum

    @CYBER-NINJA So I am currenyly in the process of building a Hall of Fame section. Thisnwouod be a place where users can submit a photo of their bike to associate with profile.

    Maybe this could be Owners Garage. Where users could up load photos of their vehicles along with information.

    Off Topic

  • Hilarious Book Title
    CalumC Calum

    Not real, but had me ROARING!

    https://i.redditmedia.com/dBYEWPGmI3mlSM3rcZUaeoCQK4ZNTaceF86ZQsJUvqM.jpg?w=320&s=341a165760895a28a27d2683bdbce76e

    Off Topic

  • New Smoker
    CalumC Calum

    So I bought a new Two Stroke on the weekend, add to the collection and what not.

    alt text

    This is a Cagiva Raptor, effectively it's a Cagiva Mito but in a Streetfighter chassis.

    It's got Brembo Brakes (front and rear), marzocchi forks and a TYGA full system.

    It's not got the original barrel, missed out on an auction for that last night. The front mud guard needs attention.

    Otherwise it's all complete and together. I haven't ridden it yet, it's got no MOT/Tax. I probably won't use it this year, but all in good time.

    Off Topic

  • Kick Start Conversion (DTRE)
    CalumC Calum

    Kick Start Conversion

    This is a tutorial for future reference for anyone who is thinking of or is going to carry out a kick start conversion for their DT125RE. This may also help if you are going to dismantle the clutch to replace/inspect or repair. It may also help if you wish to replace the kick start or idle gear.

    Required parts for installation:

    • Kick Start Mechanism
    • Idle Gear
    • 2 X Circlips
    • 2 X Thrust washers
    • Kick start Lever
    • Nut (outer nut to secure lever)
    • Oil Seal

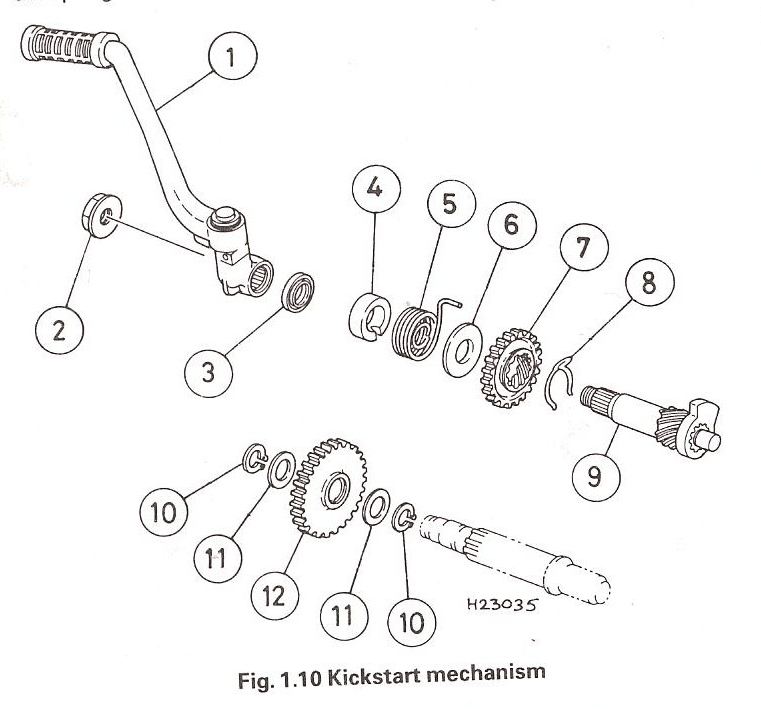
    If you cannot find the Kick start complete or are looking for parts then here is a list of the parts that comprise of the kick start mechanism:

    1. Kickstart Shaft
    2. Friction Clip
    3. Kickstart Pinion
    4. Washer
    5. Return Spring
    6. Spring Guide

    See Haynes Manual diagram from setup of the kickstart mechaism
    0_1502726265125_Kick Start Mechanism Diagram.png

    You may find that you may require a tool to take the nut off the clutch as the hardest part is removing the clutch to insert the Idle gear. It helps to have an assistant at this point however I was able to remove this bolt on my own using a homemade device.

    NORFE recommends the use of this the clutch removal tool:

    Ebay:

    Search-
    CLUTCH HOLDING TOOL

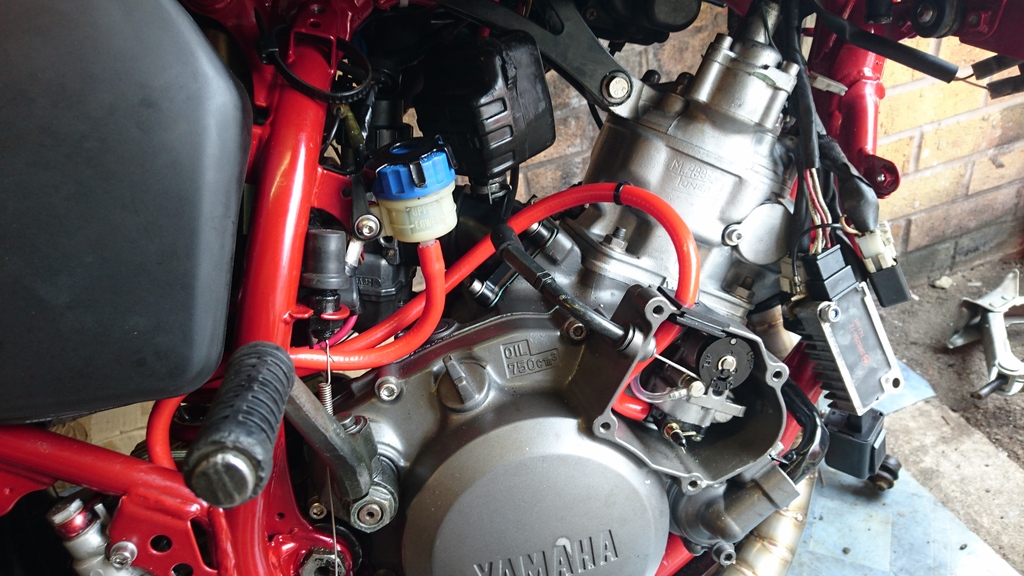
    I would say that this can be a fairly easy job to do yourself however this is a guide for interest and help should you need it and I am not responsible for your actions. When it's all done it will look like so...

    0_1502726492277_DSC_0095_zpshbmioh4a.jpg

    To start!

    • Put the bike into sixth gear

    • Remove fairing covering expansion bottle

    • Remove seat

    • Remove petrol tank

    • Remove exhaust

    To enable the gearbox casing to be removed it helps to remove the rear brake pedal. To do this first remove the return spring. This can be done by inserting a flat head screw driver and carefully leveraging the spring out of place. Remove the bolt holding the brake pedal in place. This bolt should have a split pin on the other side. This will need to be removed. From beneath the master cylinder remove the dowel holding it in place. This is secured by a split pin.

    If you are having trouble removing any bolts or items then it may help to first heat the item up by using a heat gun. If a heat gun is not available then you could try using a hair dryer. I highly recommend using an impact driver to remove stubborn bolts.

    The brake pedal can now be removed.

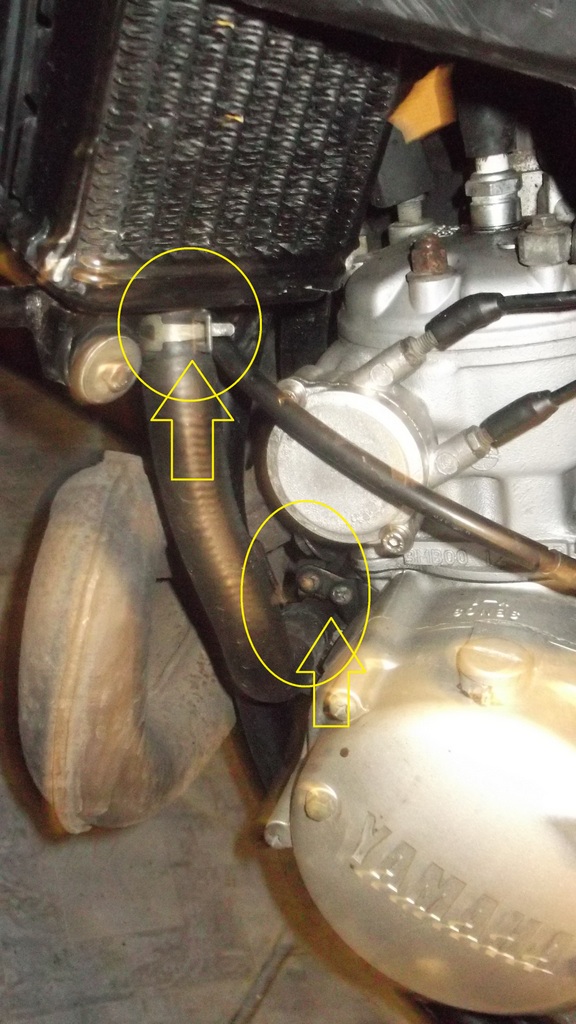
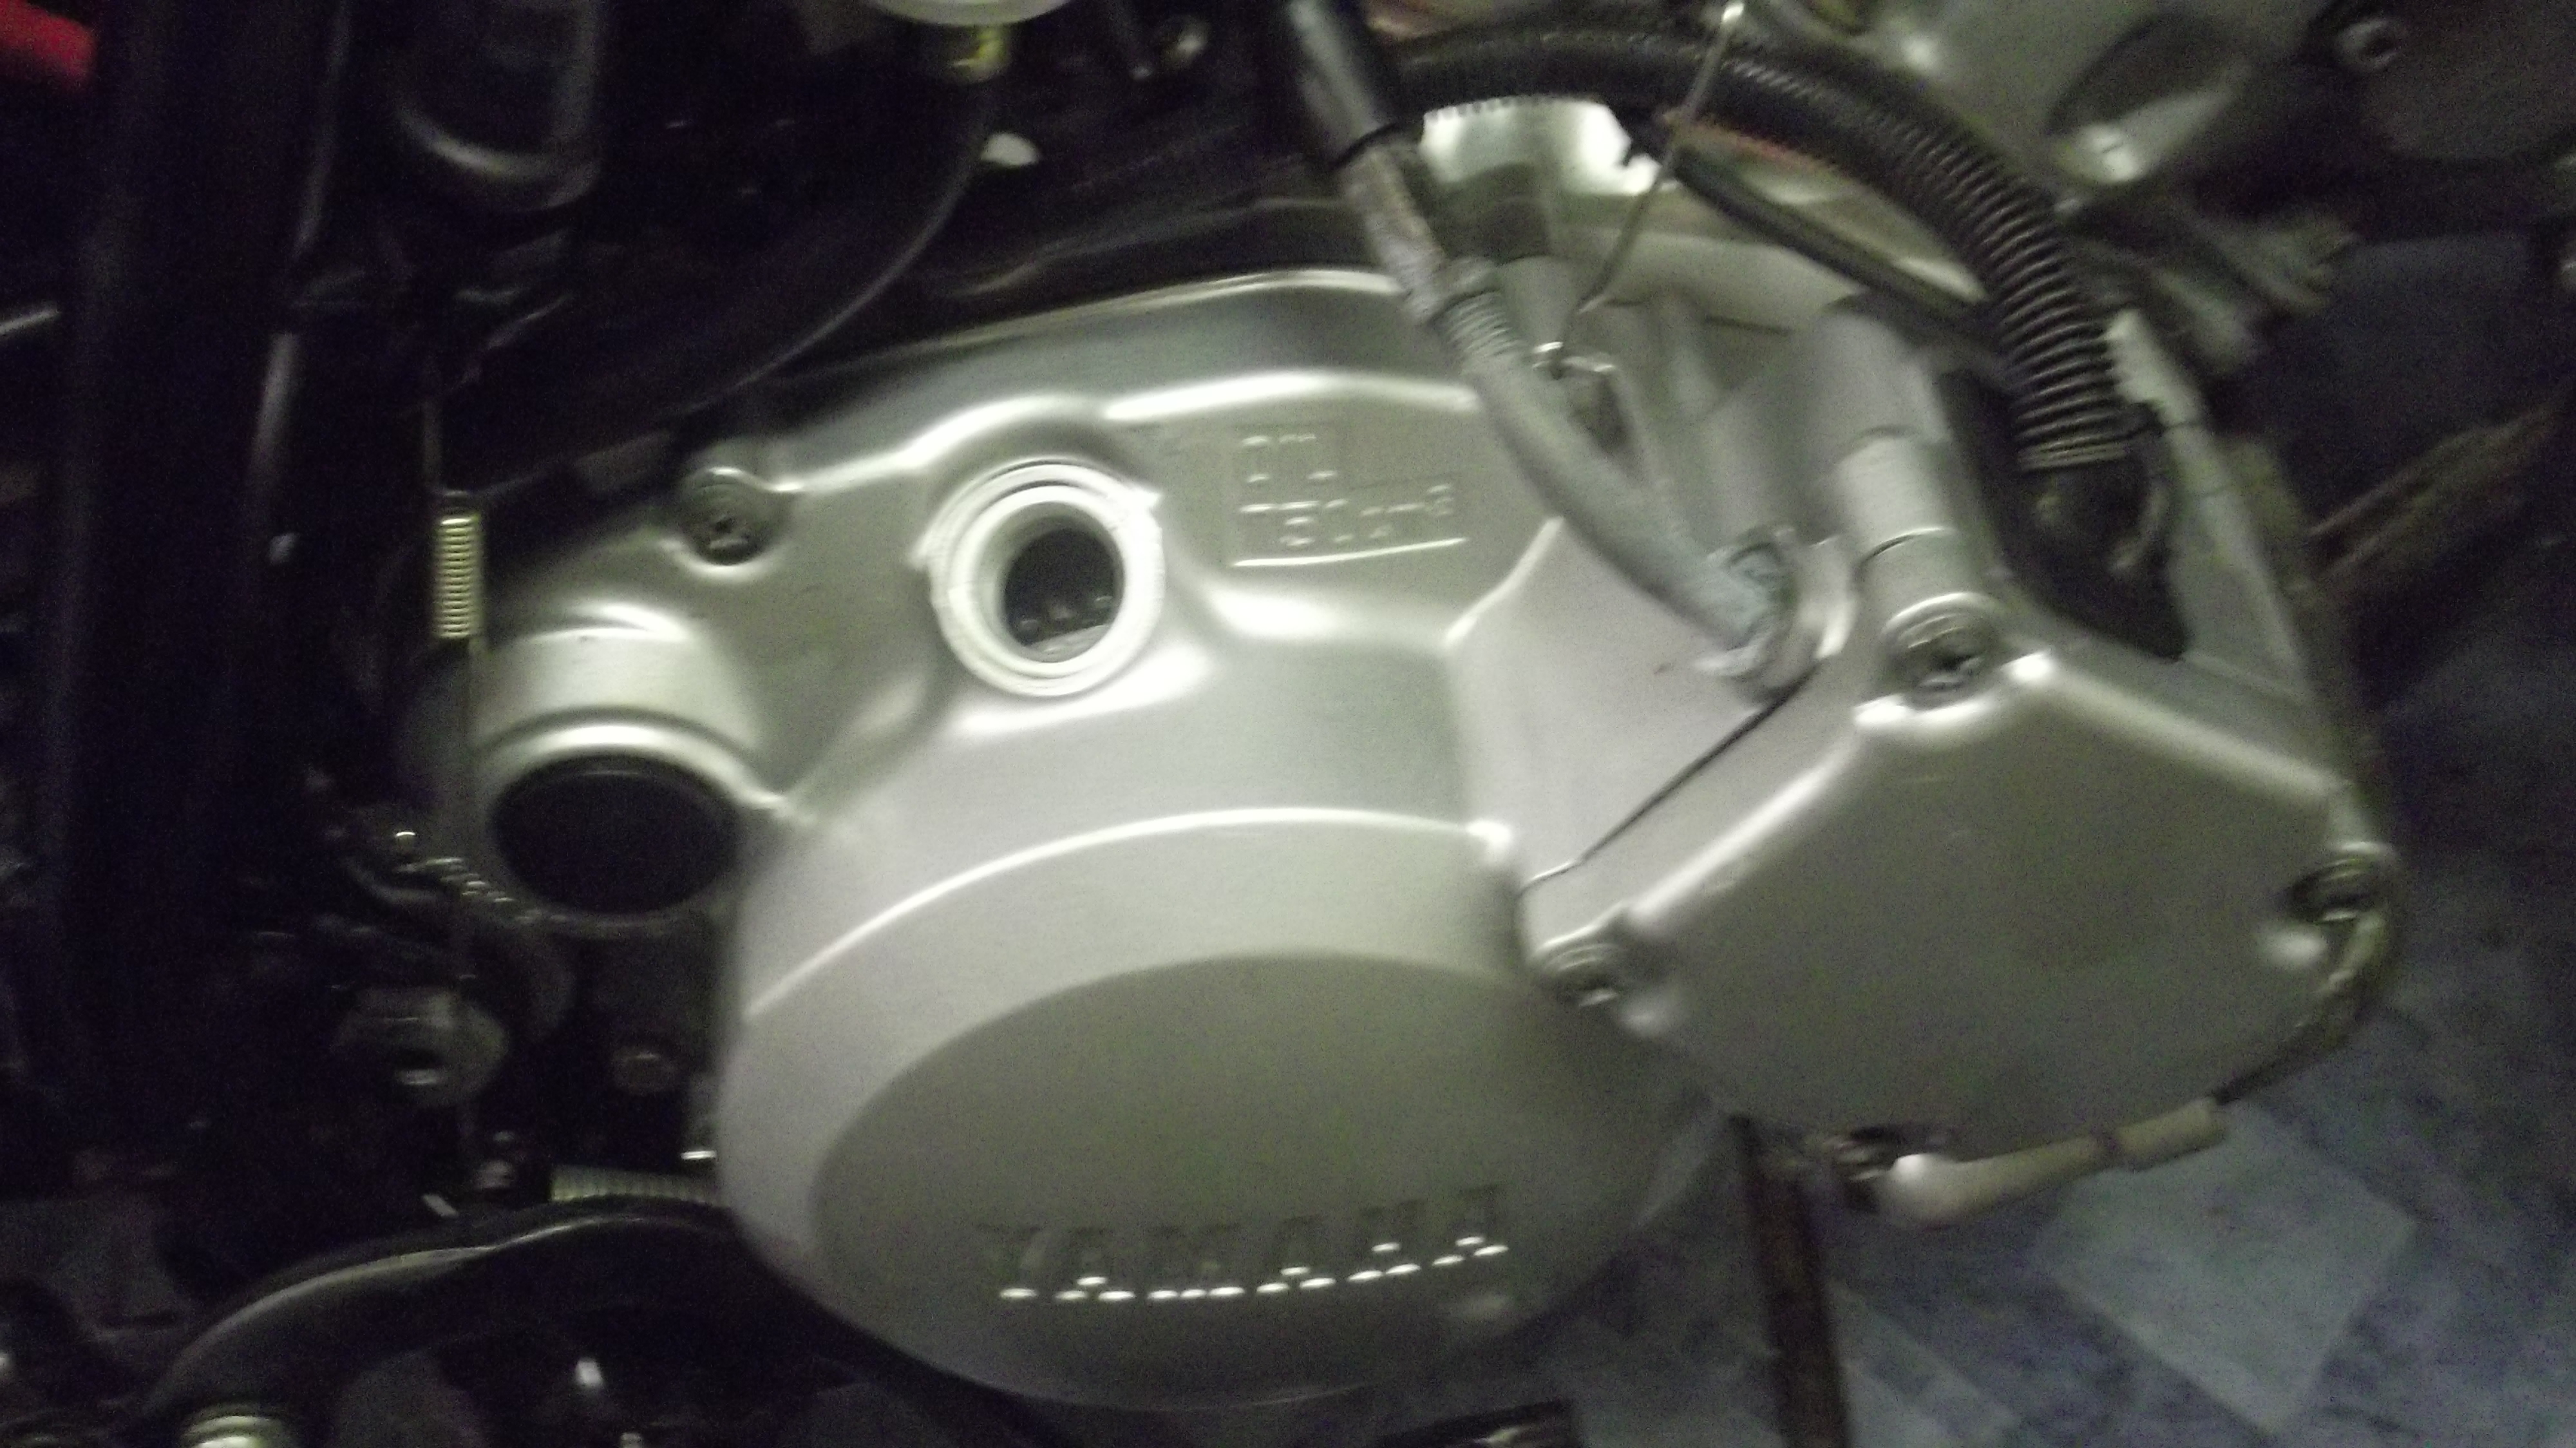
    Drain the coolant by unscrewing the drainage bolt and undoing the radiator cap. Detatch radiator hose from radiator tank. Attached the hose is a metal pipe that runs from the radiator to the water pump. Unscrew this as this will help when reinstalling the gearbox case. Examine picture to find cooland sump:

    0_1502726567533_Coolant Sump.jpg

    0_1502726589856_Cooland pipe.jpg

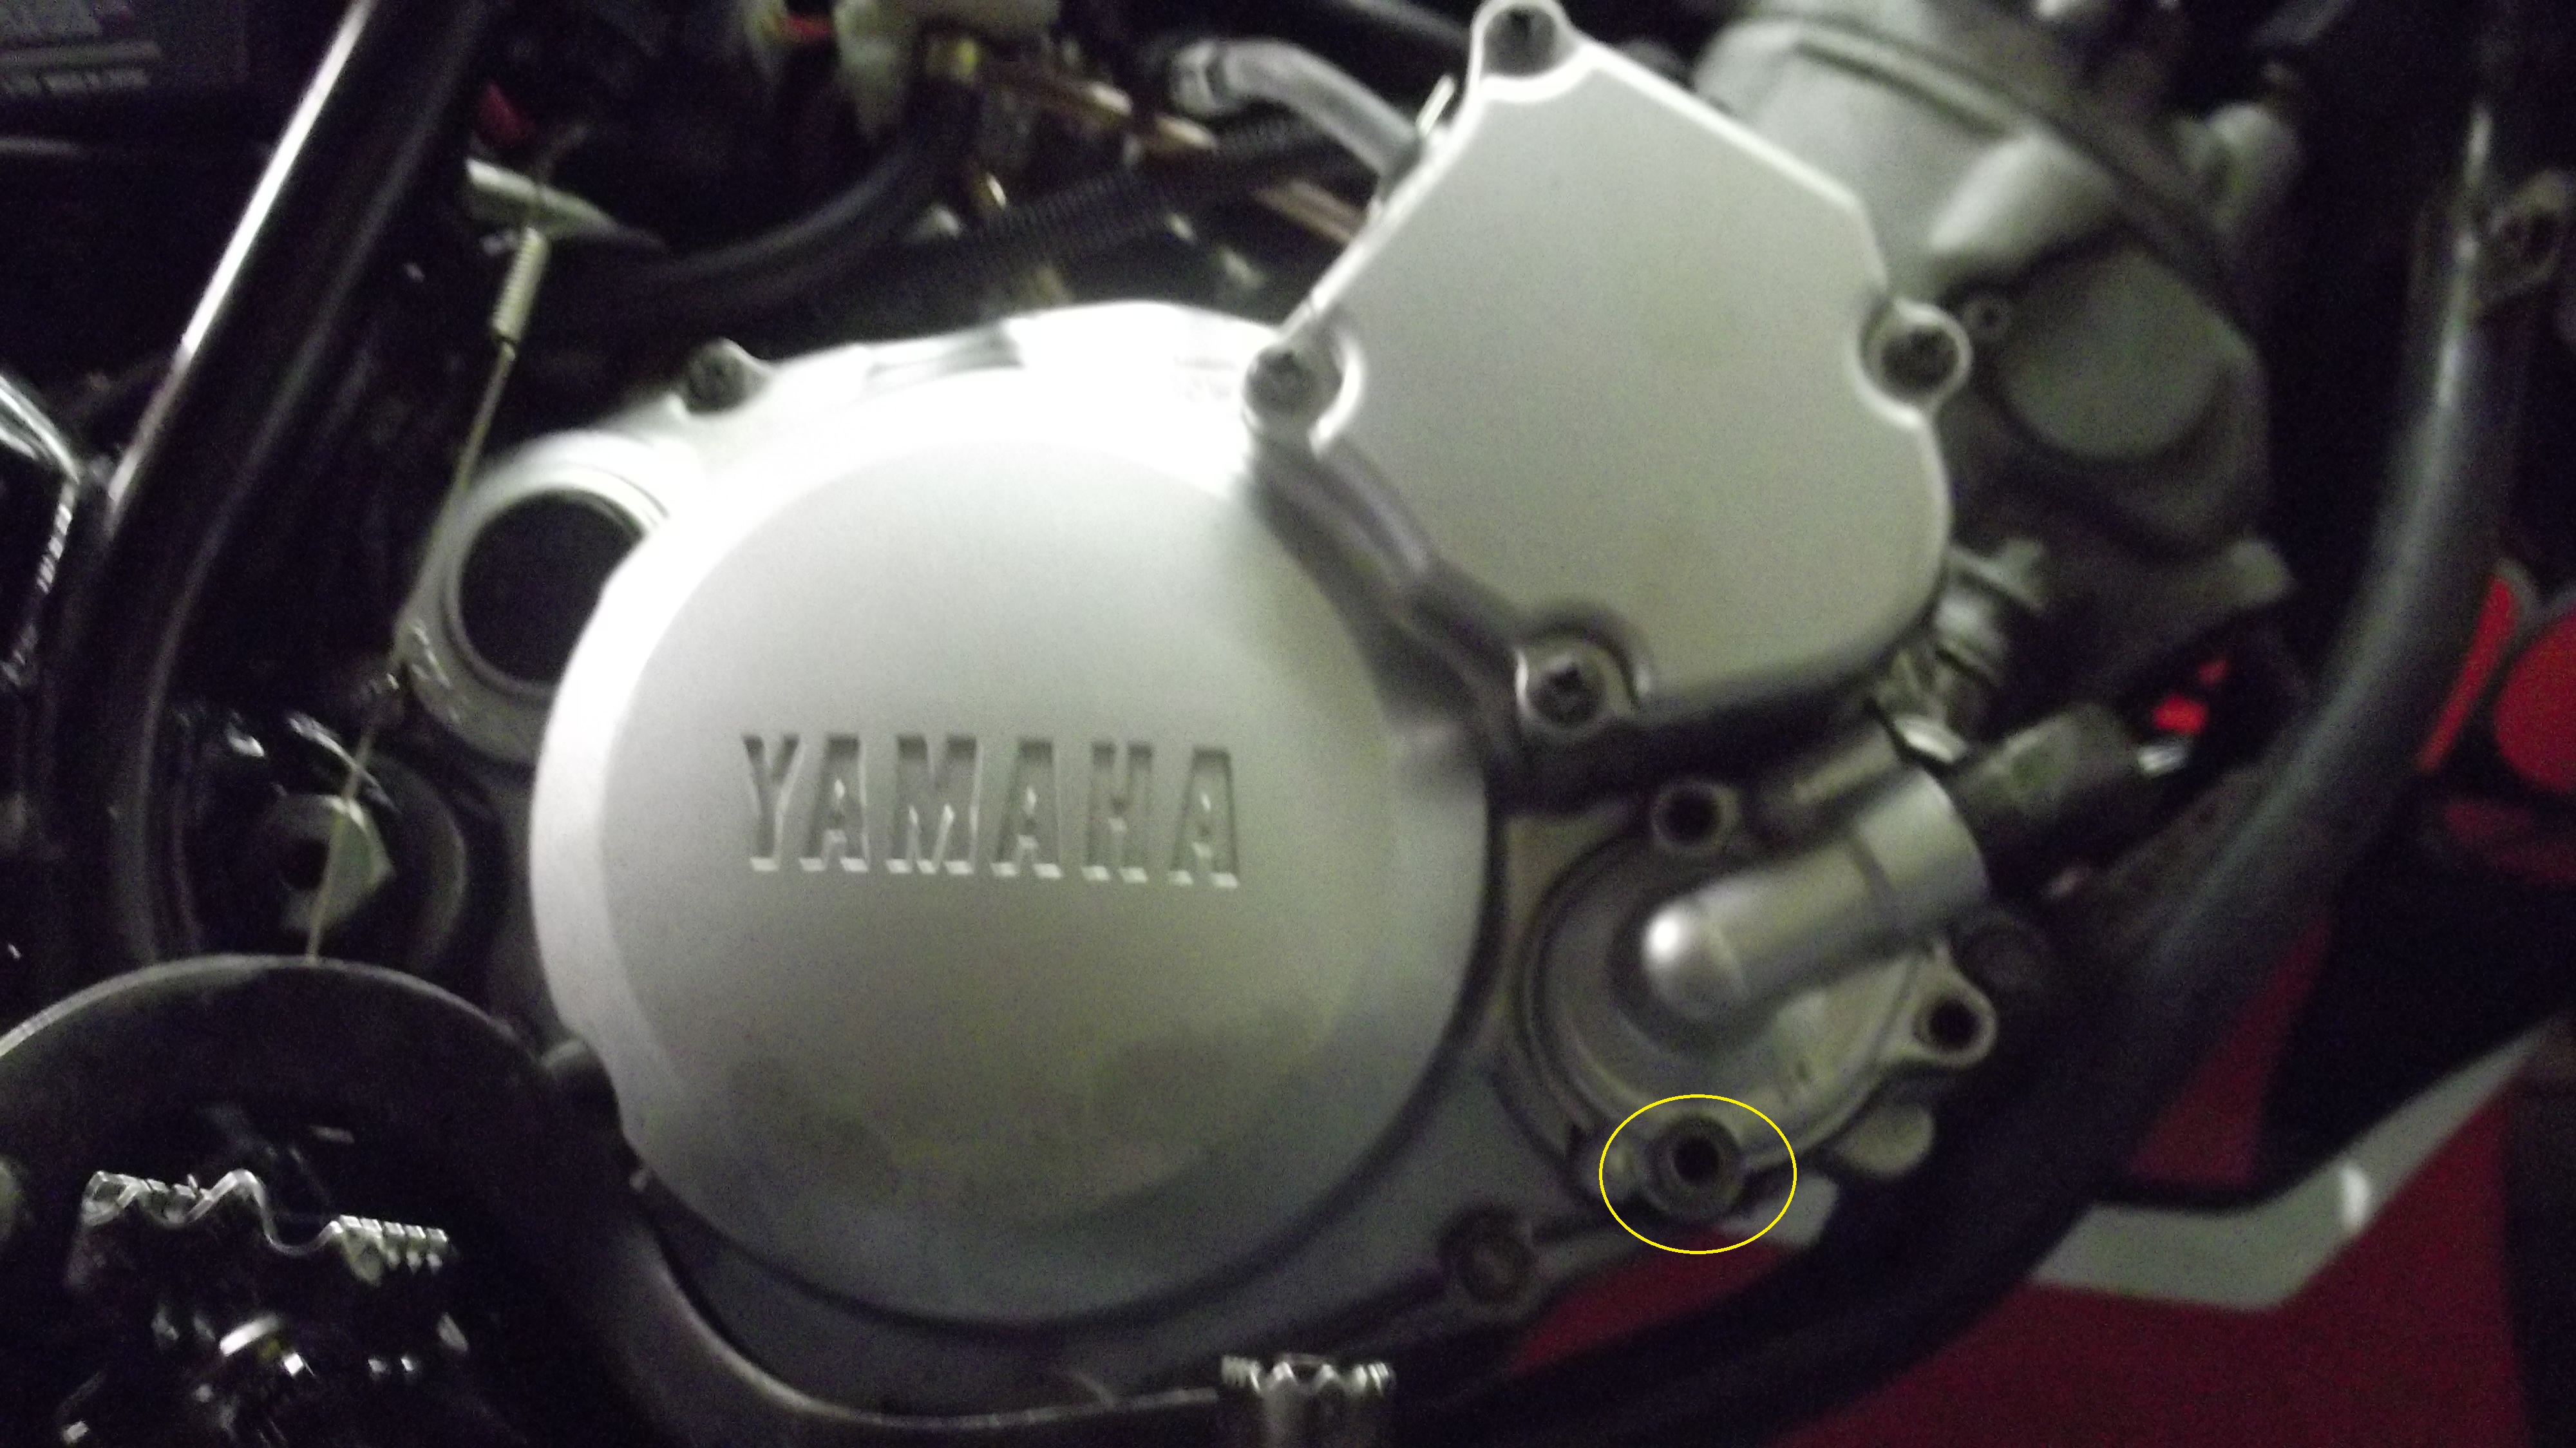
    Drain the gear box oil by unscrewing the oil drainage sump

    Loosen all case fasteners then remove all screws. Its a good idea to replace these bolts for stainless steel ones as I managed to round most mine off!

    I buy all my stainless bolts from ebay.

    Buy a range of M6 bolts and the drainage bolt is M8. I recommend kayfast as an ebay seller.

    0_1502726645460_DSCF0078.JPG

    0_1502726668357_DSCF0077.JPG

    0_1502726677546_DSCF0079.JPG

    Remove the gearbox casing. If this is being stubborn try tapping its sides with a hammer whilst still pulling back on the casing. Avoid using a flat blade as leverage as this may damage the casing itself. If the closing isnt completely flush then oil may seep through when reassembled. Once the casing has been removed the gasket may be taken off. You can use this gasket as a template to create your new one or discard it as you may have purchased one.

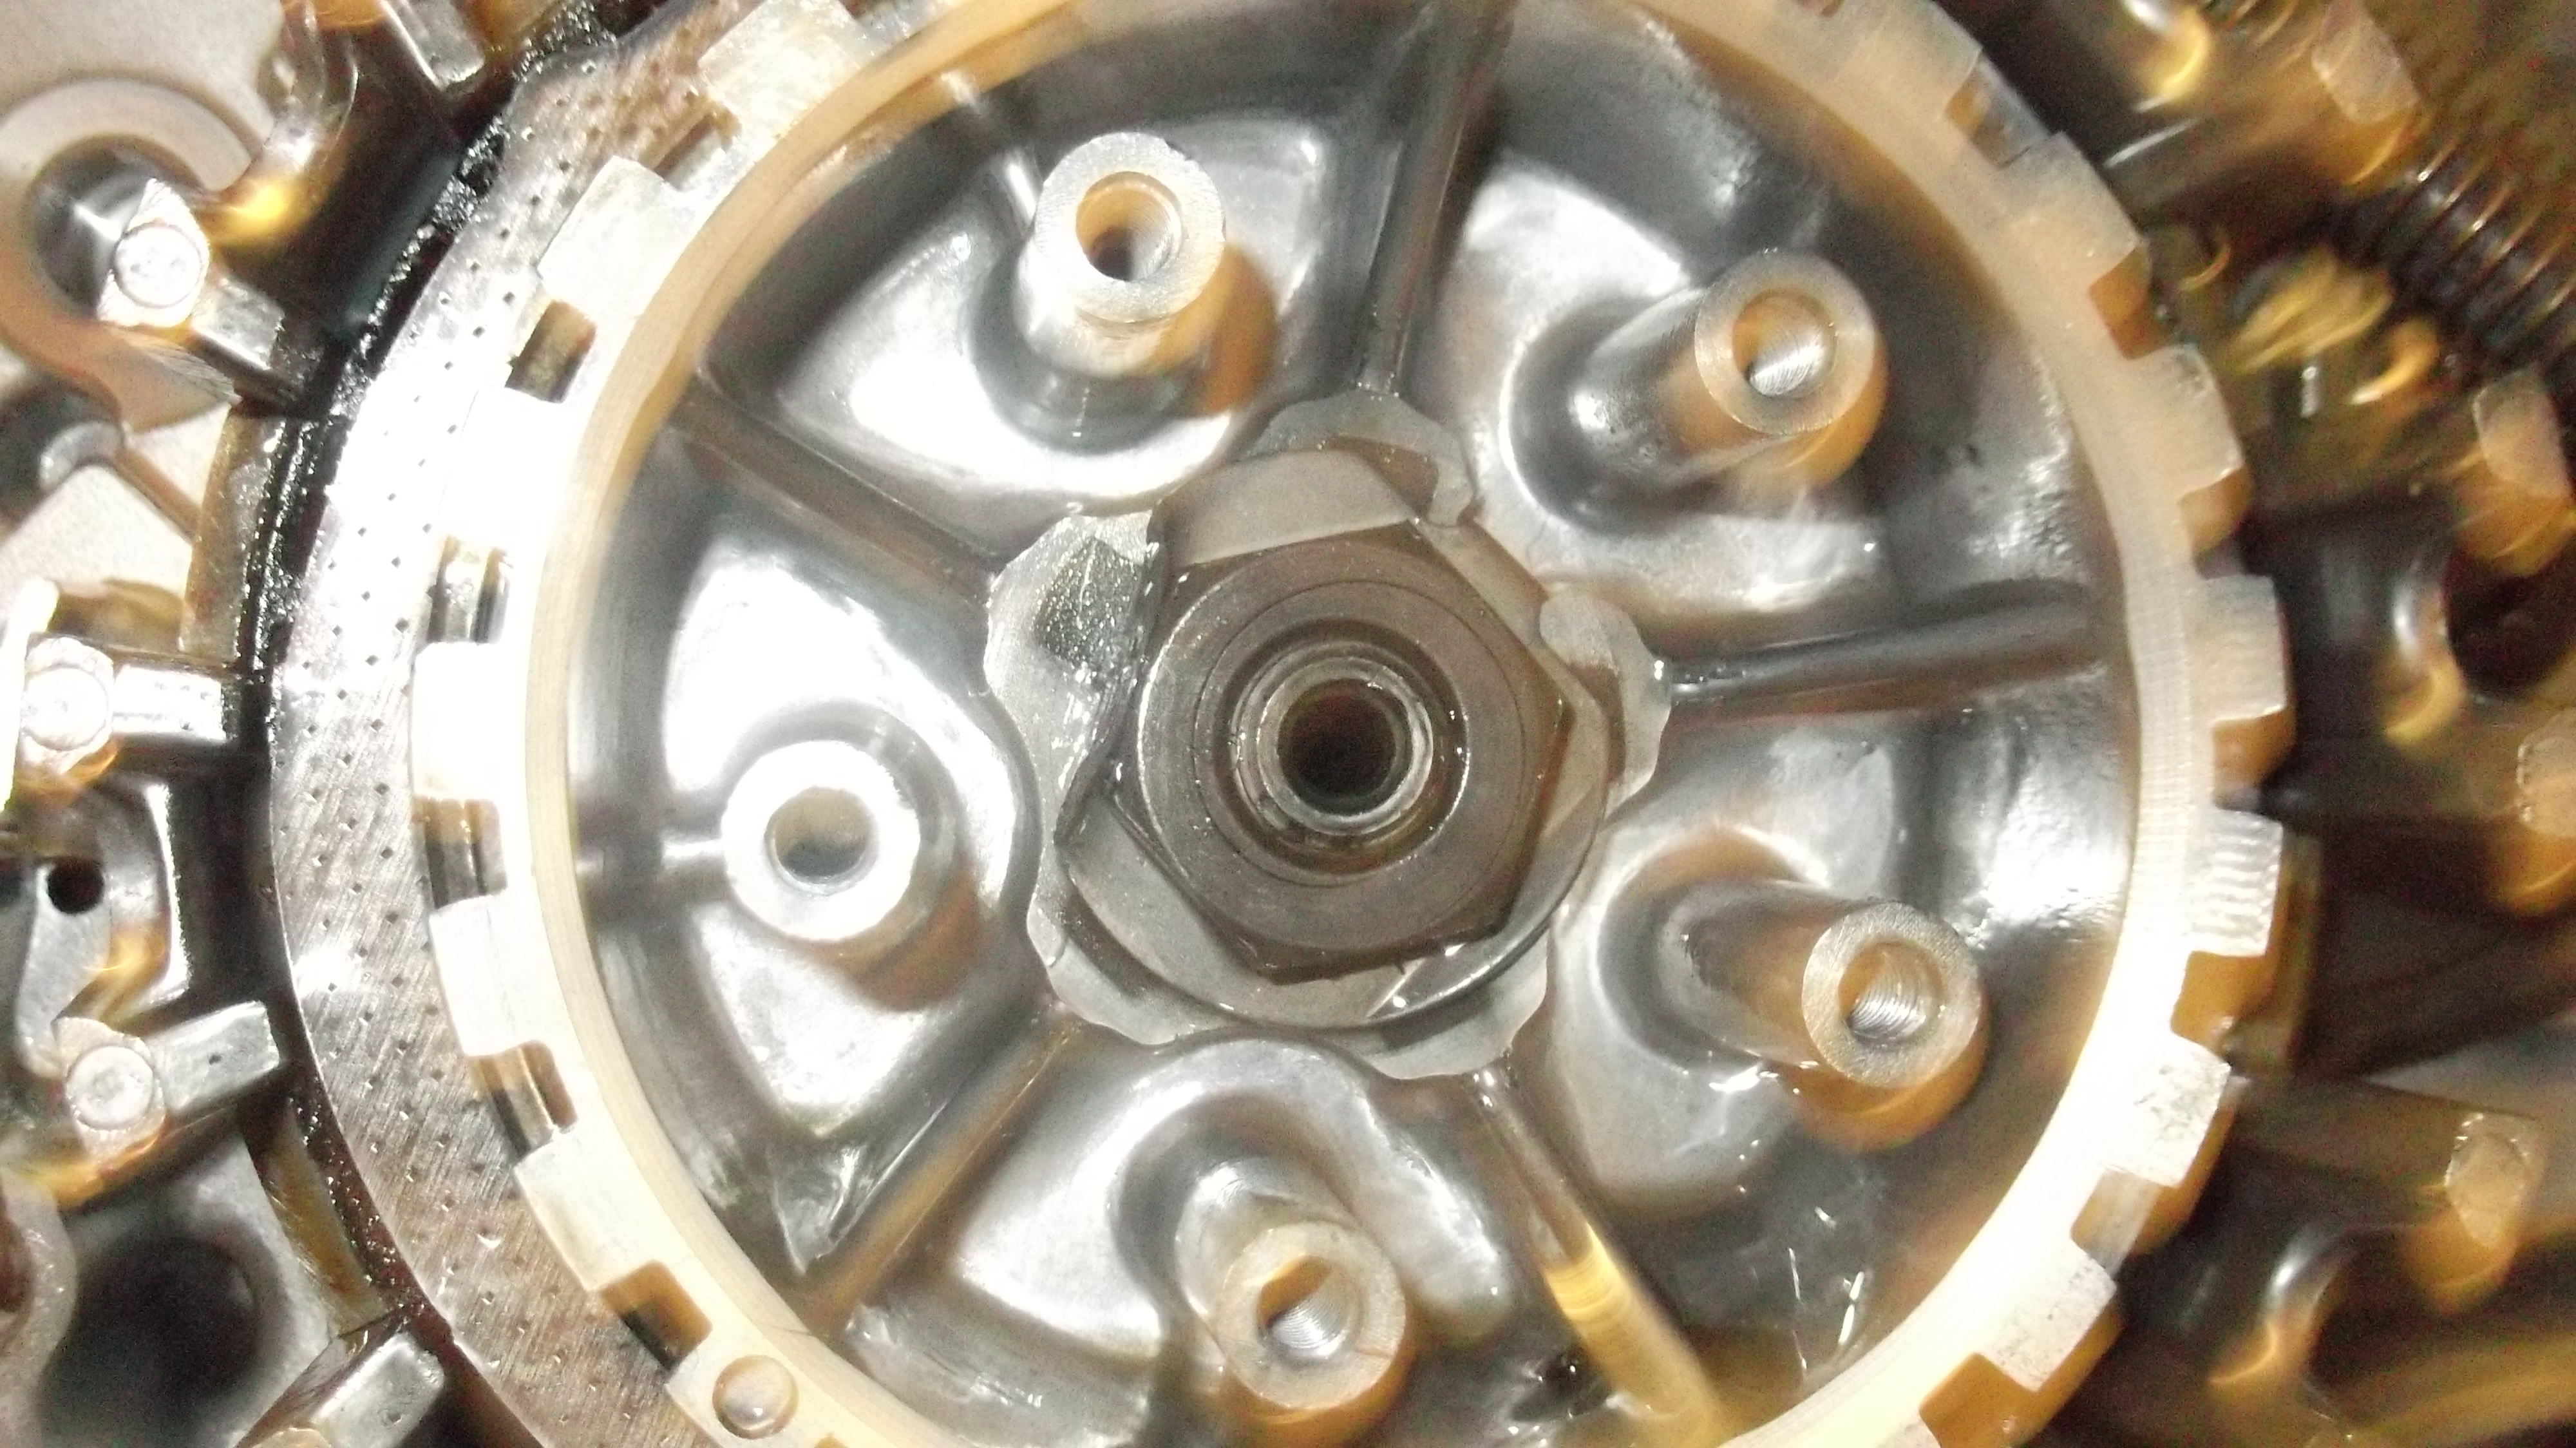
    Evenly unscrew the clutch springs in a diagonal pattern. DO NOT UNFASTEN ONE WITHOUT UNFASTENING THE OTHERS. Like I said evenly unscrew each clutch spring in a diagonal pattern. It may help to leave the push rod as it is. Remove the clutch pressure plate. Be careful when removing the push rod as a small ball bearing may fall out which is required when reassembly. If it does fall out then re-grease it and return it to the centre of the clutch. Grease up the push rod. Remove the clutch plates and friction plates HOWEVER MAKE SURE THE ORDER REMAINS THE SAME UPON REFITTING!!! You should note that the washer is bent up to the nut. This is normal and will need to be hammered down before the nut can be removed. By using a socket and ratchet remove the nut. The longer the ratchet the better Leverage is your friend.

    0_1502726705554_DSCF0096.JPG

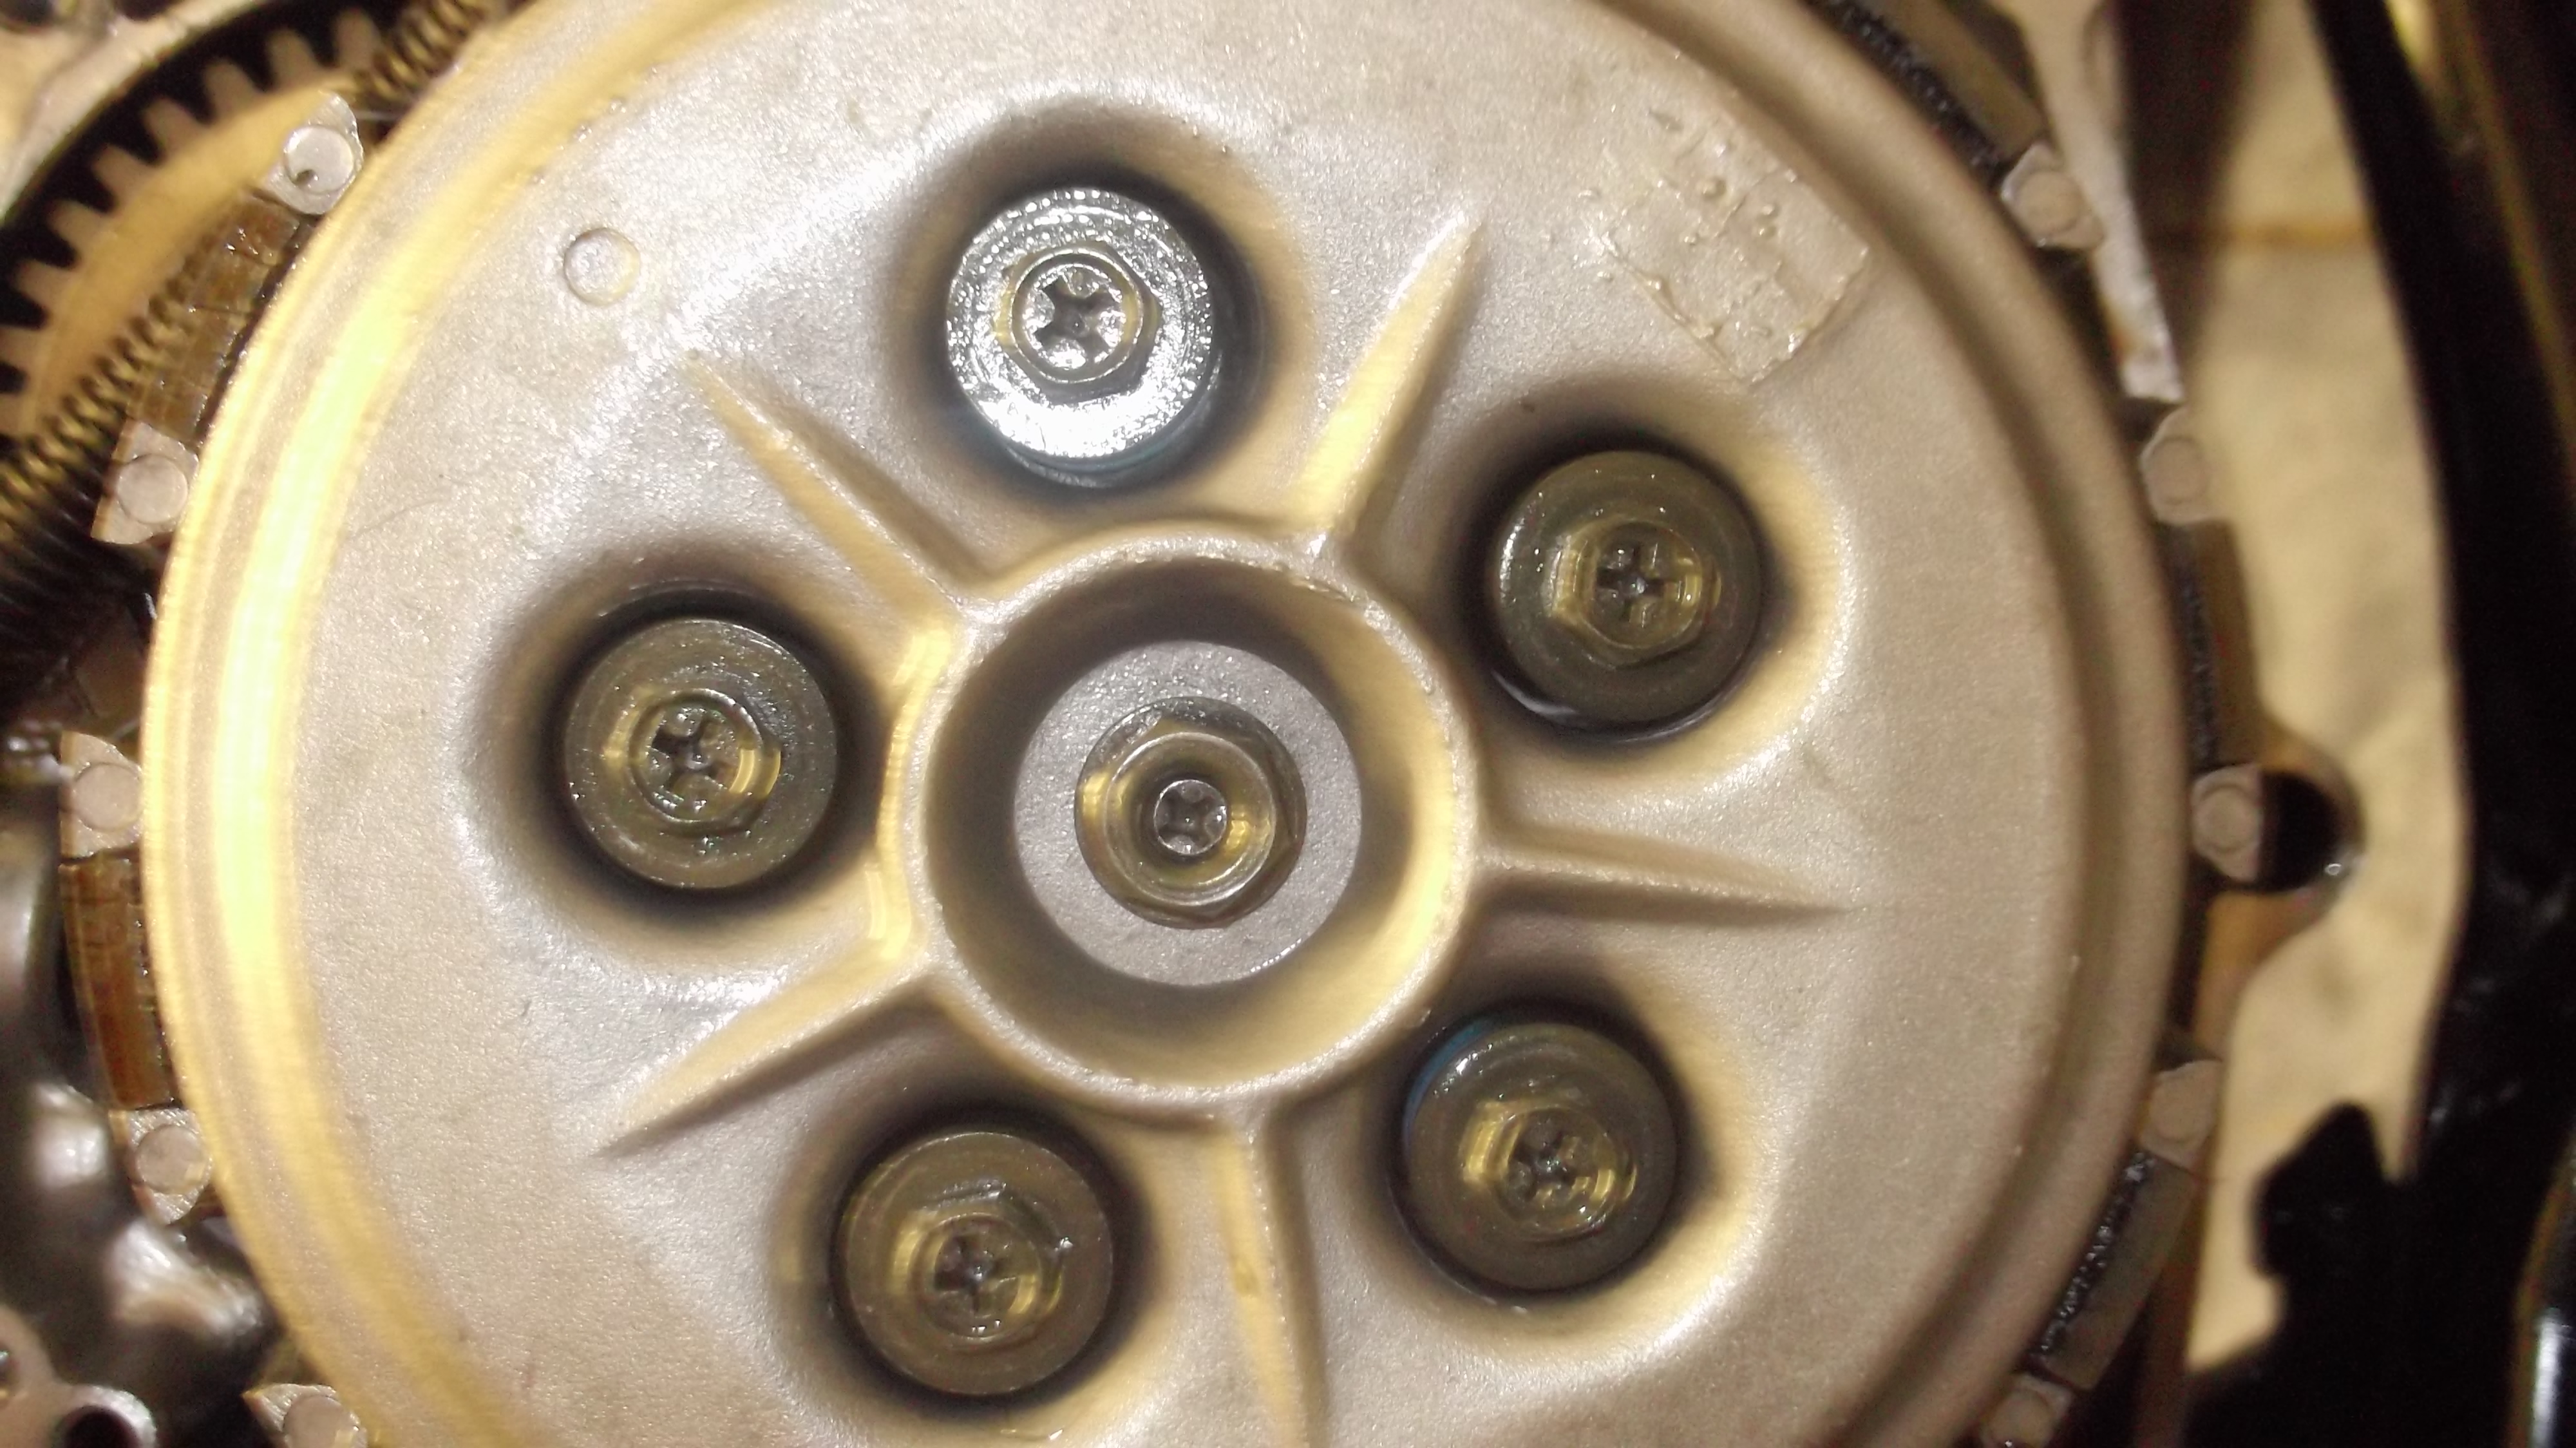
    This nut can be VERY STUBBORN and some improvisation may be required for it to come off. The problem is is that the clutch basket spins as you try to remove the bolt. By using a piece of long metal you could drill through it and secure it to the clutch pillars and add a counter force to it to allow you to release the nut. Or the tool can be used.

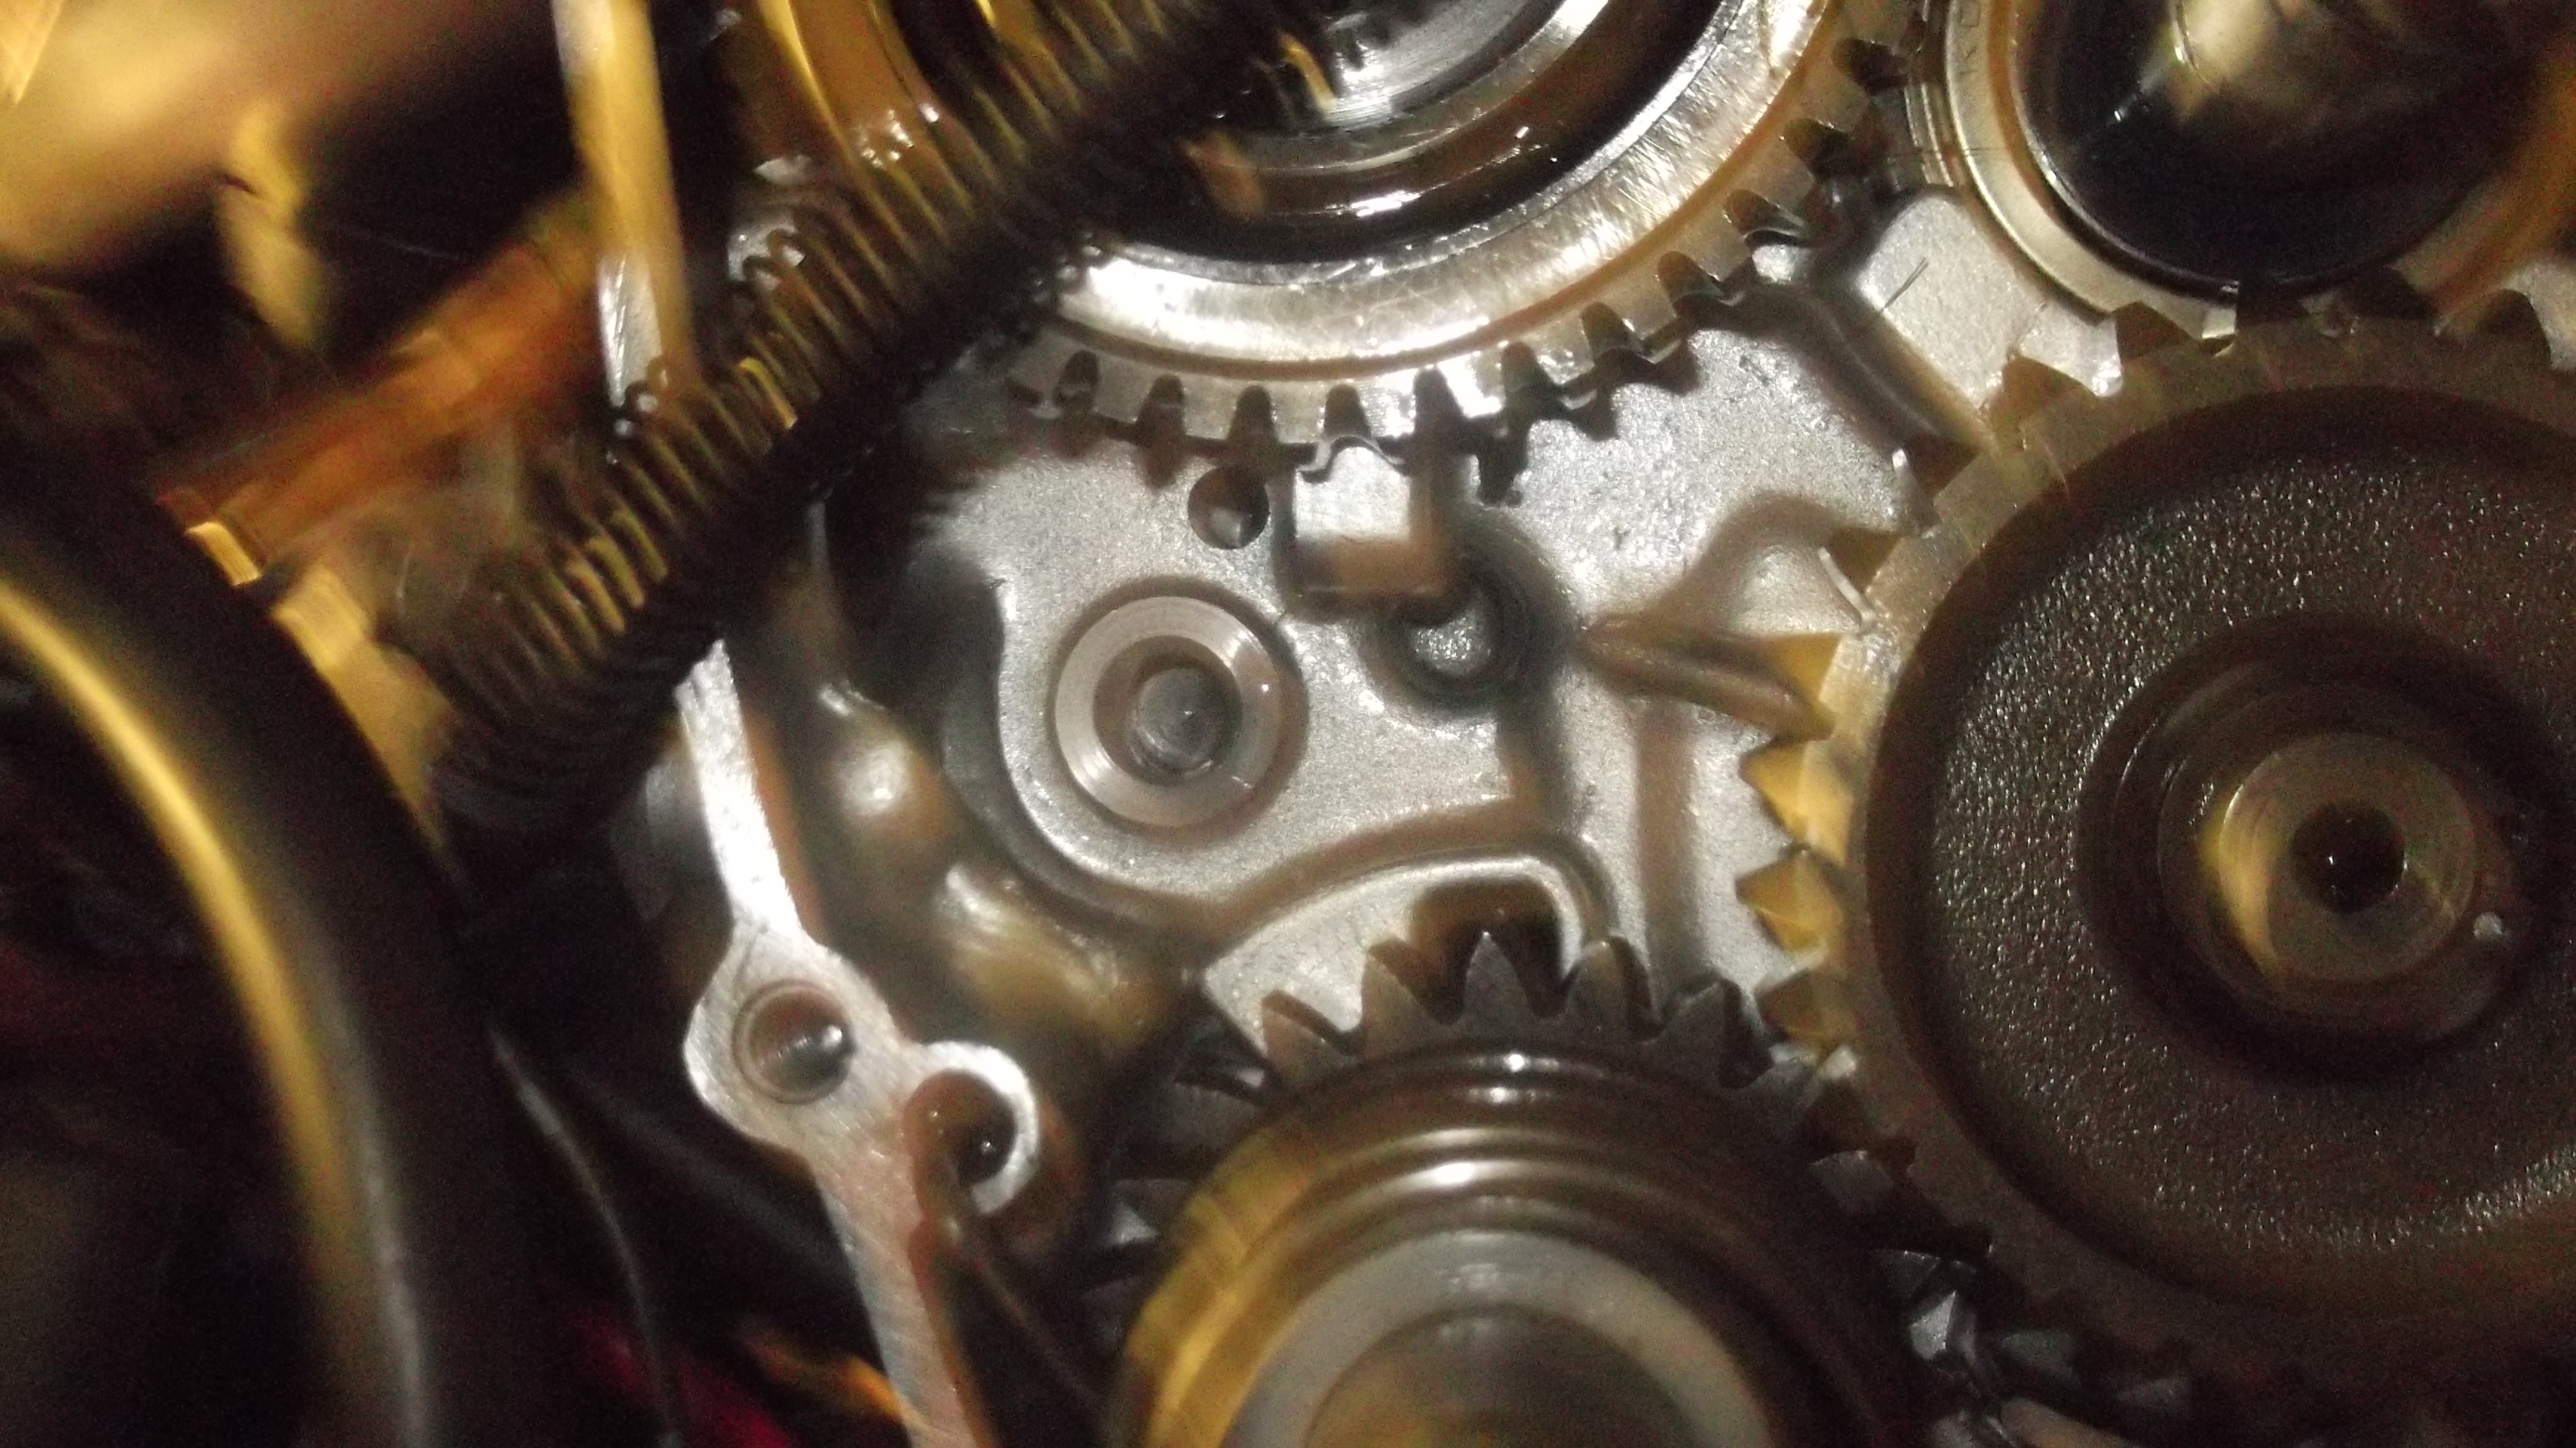
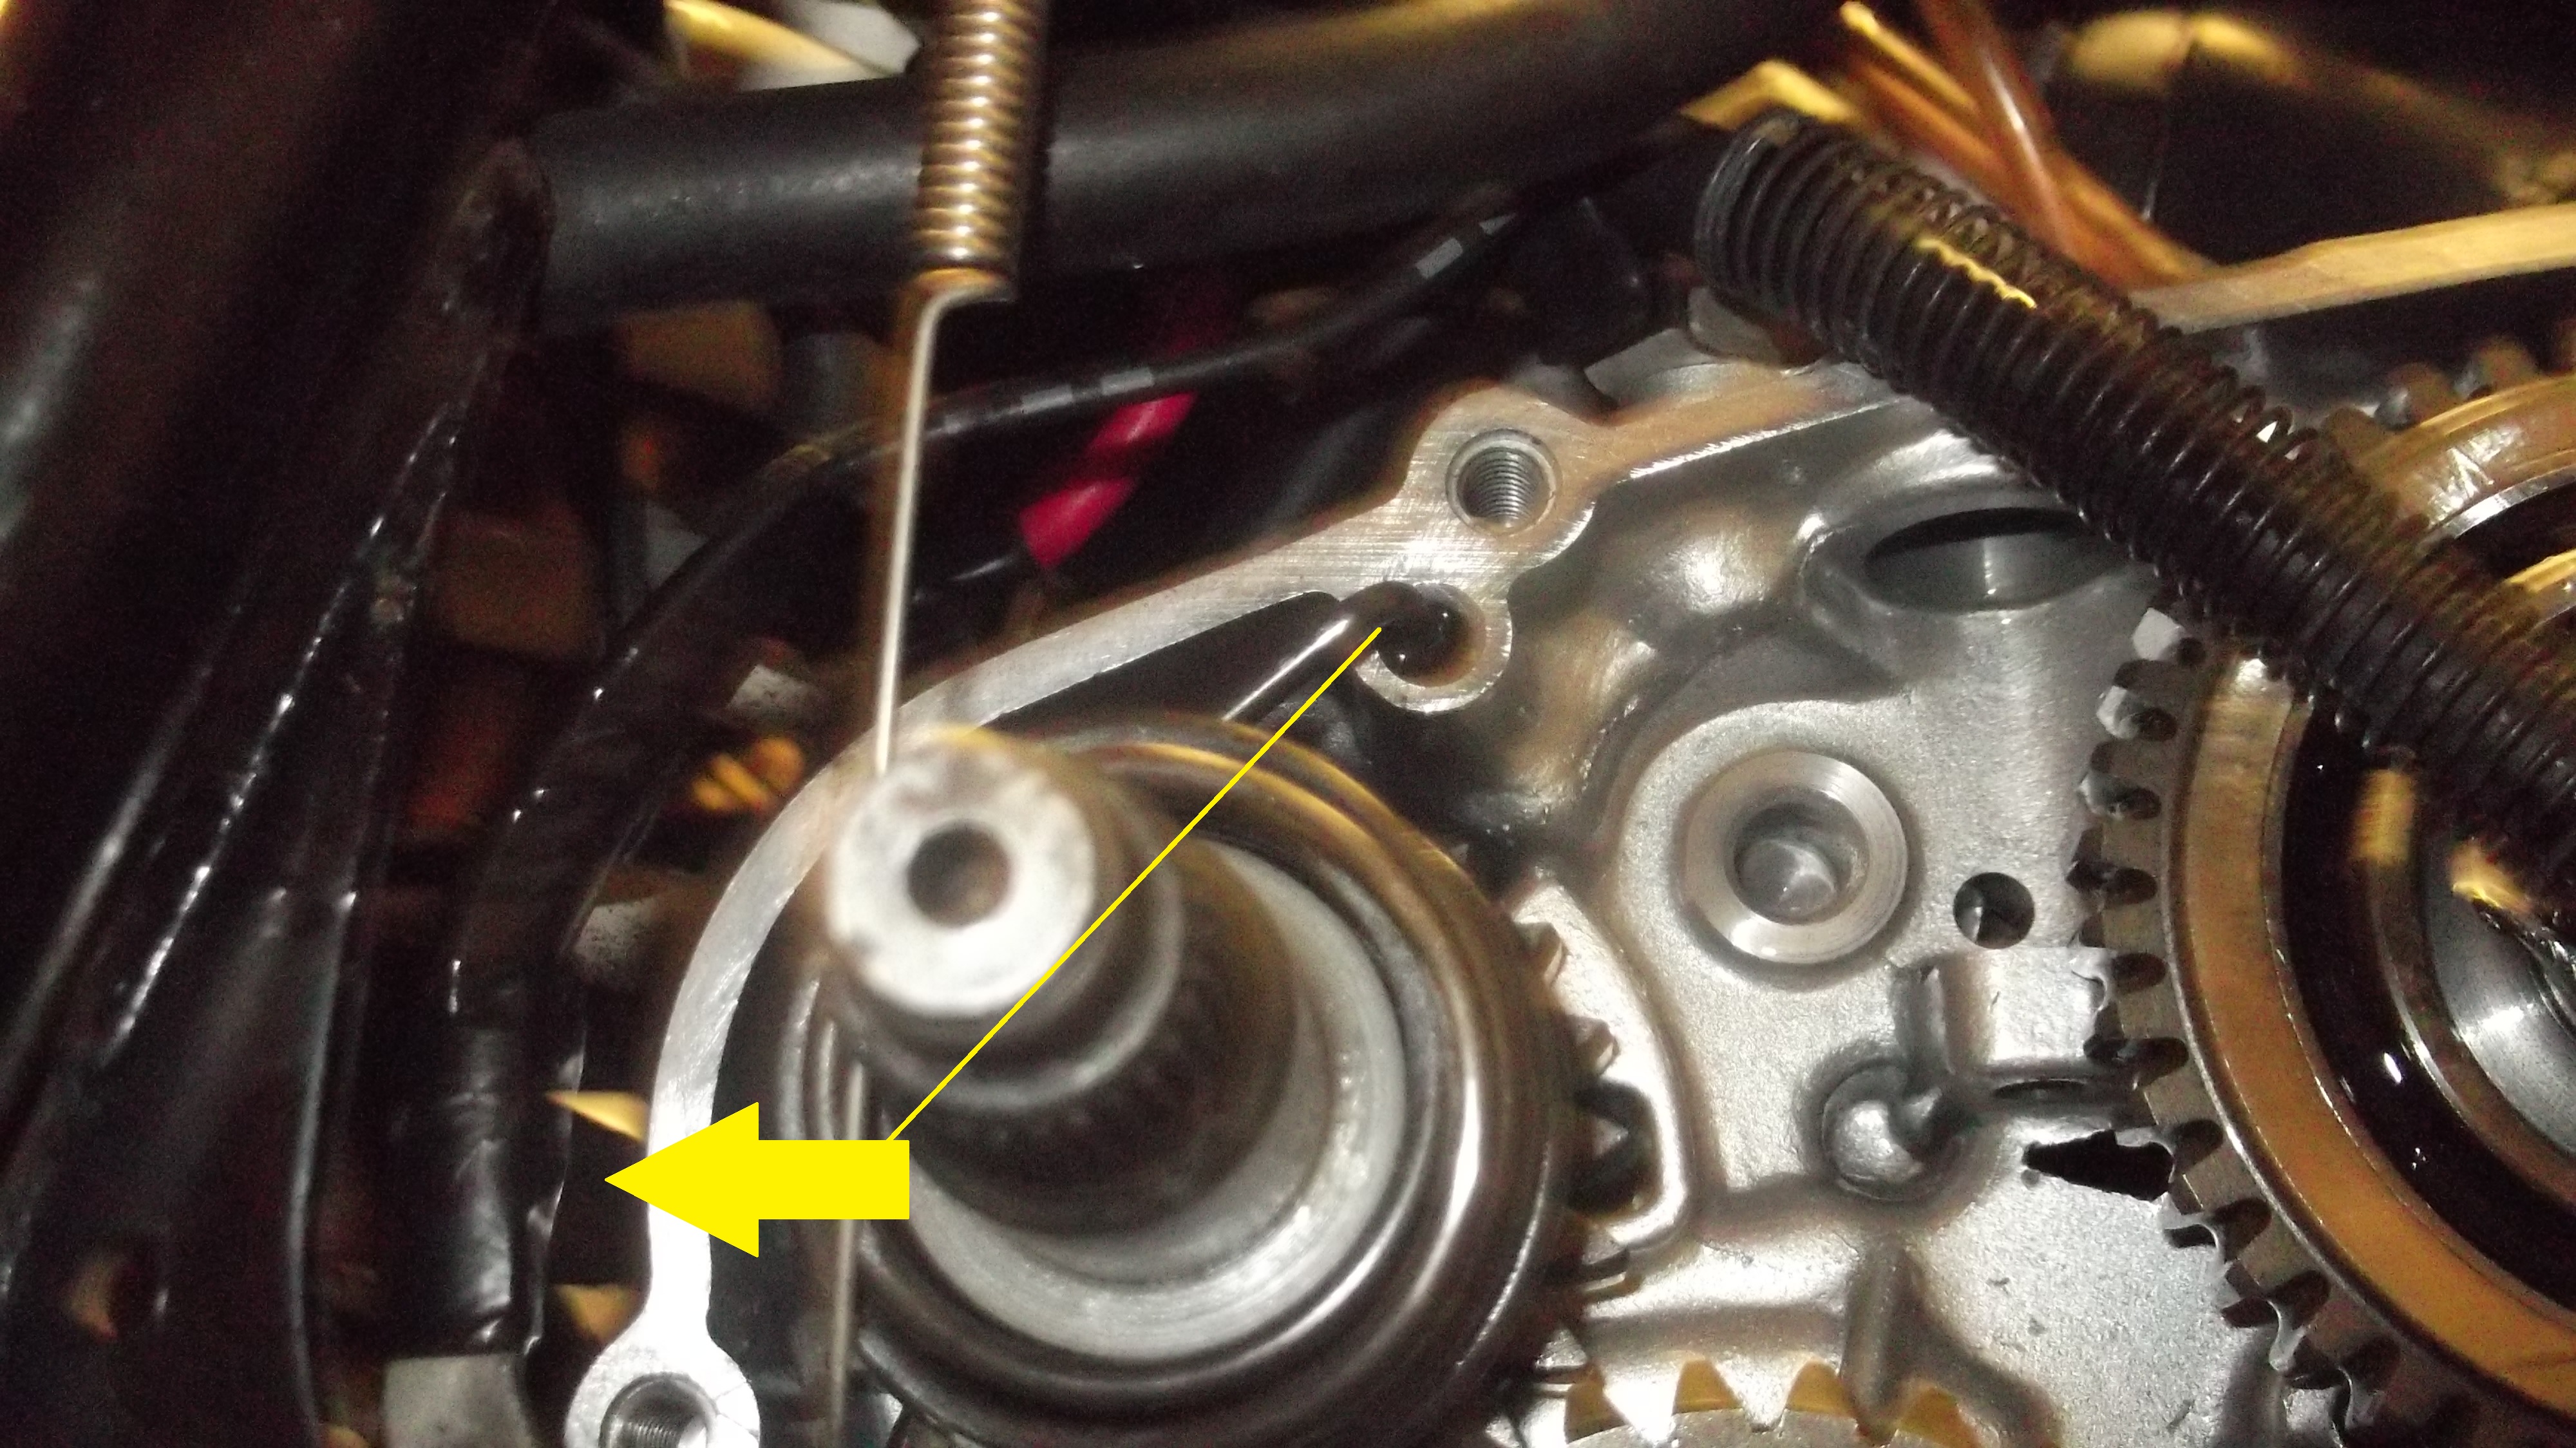
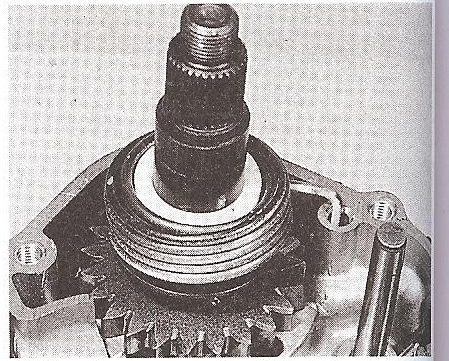
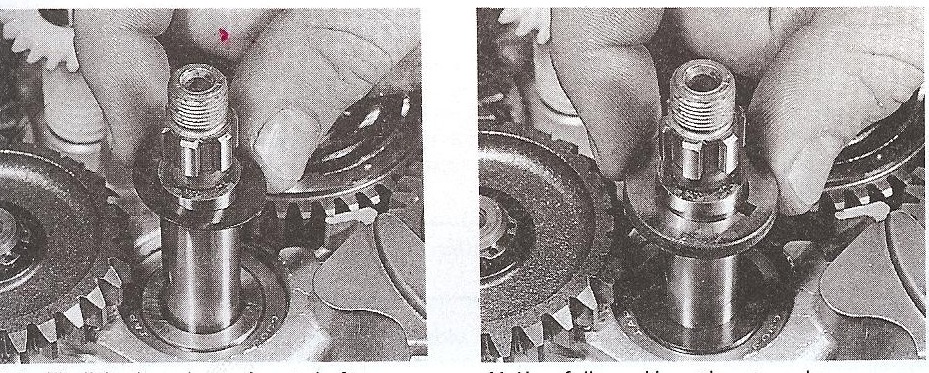
    Once this nut has been removed the clutch basket can come off. It may seem stubborn as the cogs it sits between are curved. By rotating the basket and pulling you can remove the basket. The kick start mechanism can now be installed. By examining the photos install the kick start mechanism. The cog should lift as it rotates so it can engage with the idle gear.

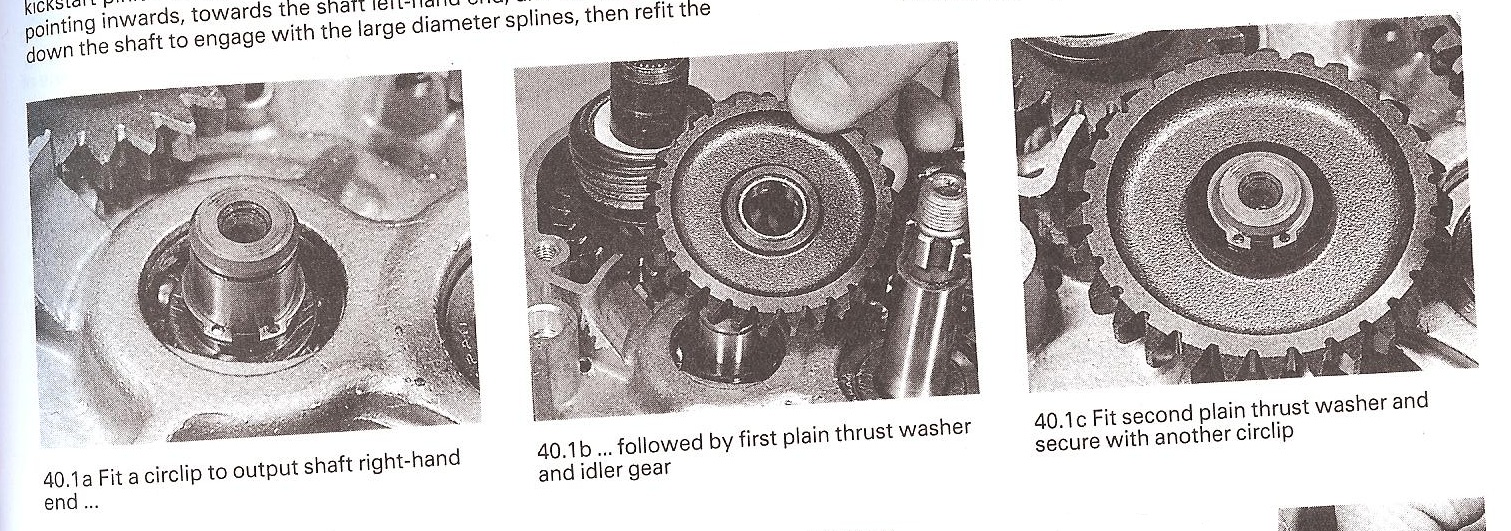
    An exposed beam next to the kick Start mechanism can now be reached. Install the first circlip to this beam, followed by; a washer, the idle gear, the second washer and the final circlip. The idle gear should sit firmly on the beam. Should there be any play side to side I have been told that it shouldnt matter as there wont be a load on the cog when the engines running so it shouldnt be too much trouble. The clutch basket should be inspected for any burs or signs of wear. The friction plates should be examined for any signs of blueing. This will indicate overheating inside the clutch. Also inspect the steel ball to ensure there are no flat spots. Inspect the push rods to make sure they are not bent.

    See diagram:

    0_1502726748375_Idle Gear.jpg

    0_1502726759296_DSCF0087.JPG

    0_1502726716930_DSCF0084.JPG

    0_1502726808395_Kick Start Mechanism.jpg

    See haynes diagram:

    0_1502726849623_Kick Start Placement.jpg

    0_1502726860008_Kick start Placement 2.png

    Once satisfied that parts can now be installed reinstall the clutch basket using the same method you used to dismantle it. If you took the washers off then install thrust washer first followed by the splined one. See diagram below if unsure:

    0_1502726872526_Washer Placement.jpg

    Make sure that the idle gear connects with the primary gear and that the kick start engages the idle gear. Once that is satisfactory you may now start to install the clutch plates. When doing so inspect the clutch plates to ensure there is plenty of life in them. If not its best to replace the set.

    When installing the clutch plates notice how one clutch plate has a larger internal diameter than the others. This clutch plate must be installed second, followed by the damper ring and then the friction plate. Also upon installation notice how the plain plates have a cutaway in them. This makes them unbalanced and the clutch will need to be rebalanced should it to work correctly. They should be equally spaced out by 60o so that it is balanced. Apparently this is done to reduce clutch noise!

    A list of how the clutch should be assembled for reference:
    Friction plate,
    Plain plate (metal) 12 o'clock,
    Friction plate with damper ring,
    Plain plate (metal) 2 o'clock,
    Friction plate,
    Plain plate (metal) 4 o'clock,
    Friction plate,
    Plain plate (metal) 6 o'clock,
    Friction plate,
    Plain plate (metal) 8 o'clock,
    Friction plate,
    Plain plate (metal) 10 o'clock,
    Friction plate,

    Or see the Haynes manual picture:

    0_1502726884809_Clutch Placement.jpg

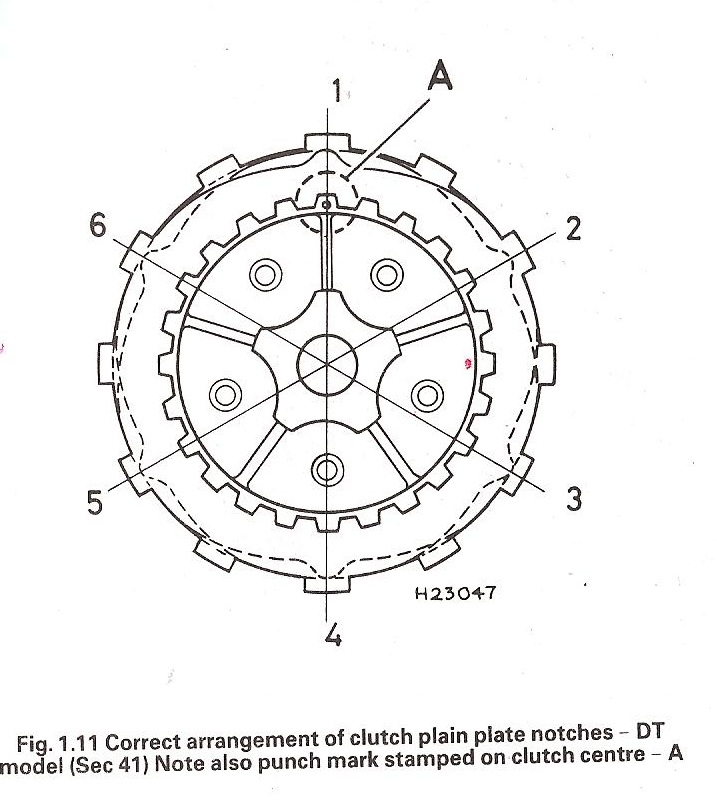
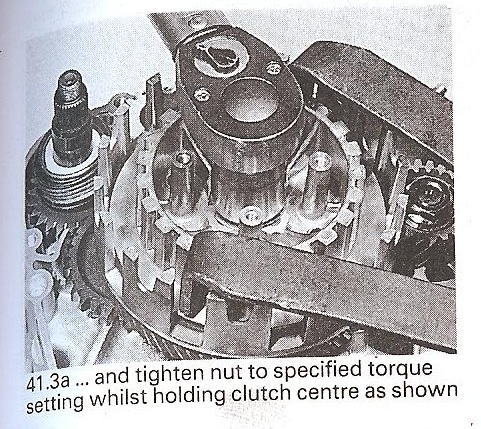
    When installing the clutch springs ensure that they are with the handbook specified relax length. If not then the whole lot should be replace. When installing them do as you did when removing them and tighten them equally in diagonals until all are tight. Ensure that the push rod is secured in its place and make sure that the punched mark on the pressure plate sits above punched mark on the basket. This punched mark may also be an arrow. See Haynes diagram if unsure:

    0_1502726904451_Clutch Installment.jpg

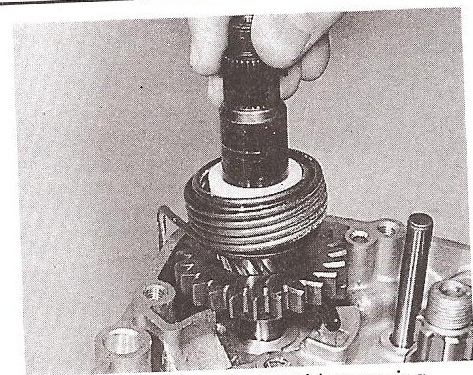
    Go to the casing. Where it says Kick starter that seal must be removed. By using a socket, pressure can be applied to its reversed side and hammered out of place. Install the new oil seal using a tool that only bears against the outer surface, a socket of the same diameter will do. Replace the gearbox case to the bike ensuring that the alignment dowels are in place and that the new gasket is fitted. Ensure it lines up correctly and fasten up to the engine ensuring not to over tighten and cross thread or snap the bolts. If the oil pipe has been removed then this will need to be bled again.

    Install the kickstart lever and bolt and the kick start should now be working!

    0_1502726922782_Kick Start Placement.jpg

    Remember to top up the gearbox oil, 750ml and to refill the coolant. It's a good idea to leave the bike ticking over with the radiator cap off to allow water to be pumped through the system and then add more coolant as it circulates around the engine.

    If there are any problems with this tutorial or corrections that need to be made or rewording of any sort then please leave a comment so I can correct it.

    I hope this helped thanks!

    Sources:

    Haynes Manual, Personal Experience, XGINCATX, NORFE

    ##24/06/15

    Wow I wrote this tutorial back in 2012 and was one of the first modifications I done to my DT. It got me out the shit more times than I care to remember and is well worth doing should you be considering it for your own machine. This document I have referred to in the past, and now I am much more experienced, I can say it is correct.

    Tutorials

  • Scheduled Outage
    CalumC Calum

    So there was actually quite a few issues, and upon resolving these issues my IP address has been changed.

    So for anyone having issues accessing this site on certain platforms, it's because your machine is using cached DNS settings for the old address. Since we have a new address you will need to refresh the DNS. This should expire in due course time and sort itself out anyway..

    They have supplied me with a new router. I've been told it could take up to 10 days for all the changes to propagate through and I must reboot the router then as well. I am told the issues have been identified and are being resolved, which is good news.

    Sorry for the inconvenience, hopefully service will be resumed.

    Announcements

  • Outage
    CalumC Calum

    @Jens-Eskildsen I do it because each and every single one of you make it worth it.

    A big thank you to everyone who contributes to the site. You guys make it all worth while.

    Announcements

  • Outage
    CalumC Calum

    Alright fine I will ring virgin tomorrow as this is unacceptable now.

    Announcements

  • Happy New Year 2025
    CalumC Calum

    @HOTSHOT-III Glad to hear it, your help is invaluable.

    Announcements
  • Login

  • Don't have an account? Register

  • Login or register to search.
  • First post
    Last post
0
  • Recent
  • Tags
  • Popular
  • Users
  • Groups