Yamaha DT125R '01 - Running Project
-
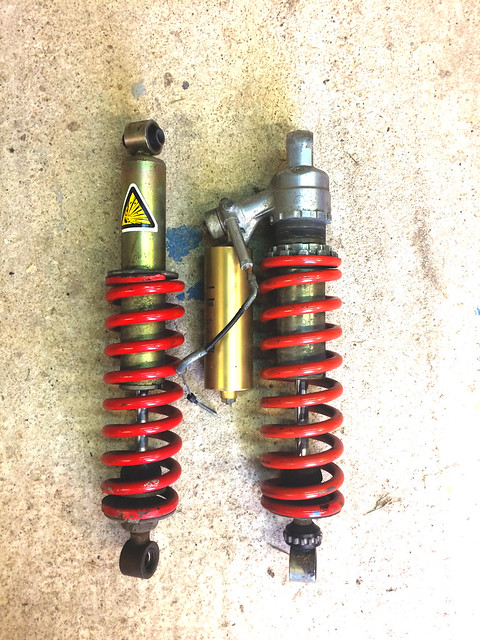
@Zrako Its from a 1987' YZ490.
Minor Update bits
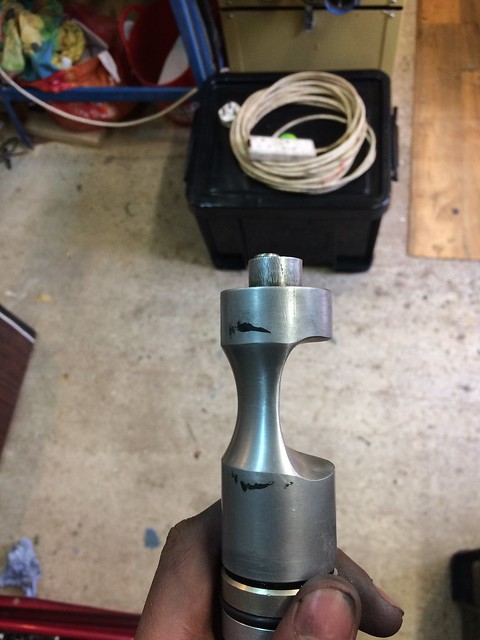
Hand sanded and Polished.
Ducati 899 Brembo Master Cylinder - 5 minutes to splice the old DTR Brake switch plug on, same coloured wires to.
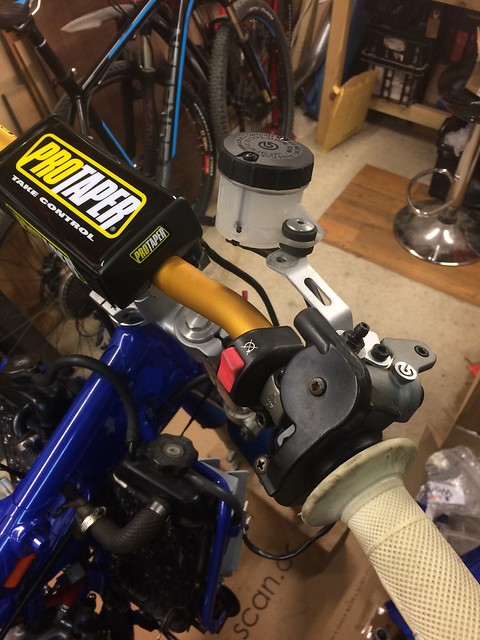
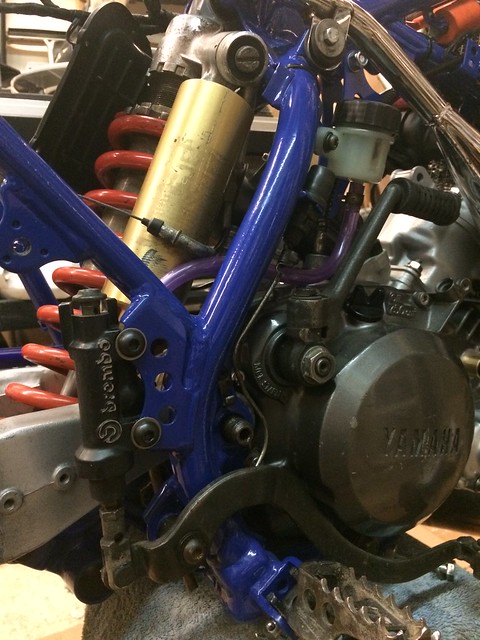
Yamaha TDM900-5PS Brembo Master cylinder - Fits perfect. Frame mounts needs drilling out to M8 is all.
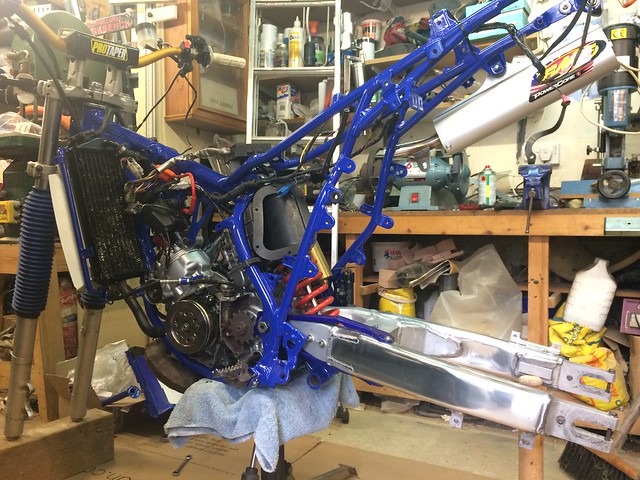
Thought I'd post some engine picys.
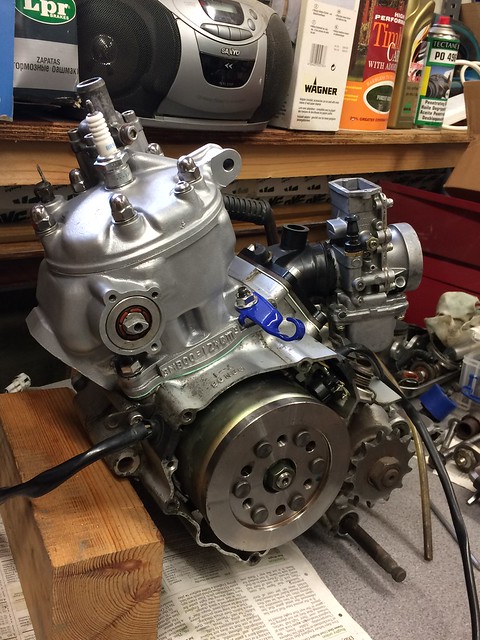
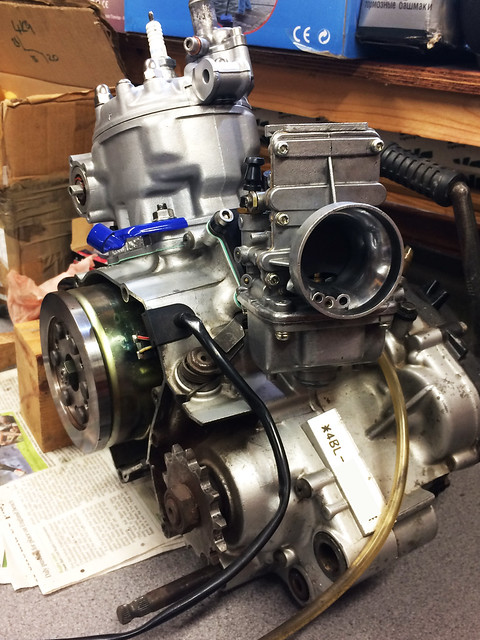
134cc TZR 4DL Topend - Mikuni TM32.
1987' YZ125 Airboot - The original DTR Airbox needs only simple modification.
@Louis-James Cheers man, I know what you mean about using any other Carb except a TMSS with an angled Venturi. I couldn't run the TM32 to start with.
I'll use the WR200 Inlet instead, that solves the fitment issues, I use a Reed spacer on the standard inlet and that makes it work well.
The WR200 Inlet helps to level out the Carb to something pretty good.
Keep it real
-
@Zrako Its from a 1987' YZ490.
Minor Update bits
Hand sanded and Polished.
Ducati 899 Brembo Master Cylinder - 5 minutes to splice the old DTR Brake switch plug on, same coloured wires to.
Yamaha TDM900-5PS Brembo Master cylinder - Fits perfect. Frame mounts needs drilling out to M8 is all.
Thought I'd post some engine picys.
134cc TZR 4DL Topend - Mikuni TM32.
1987' YZ125 Airboot - The original DTR Airbox needs only simple modification.
@Louis-James Cheers man, I know what you mean about using any other Carb except a TMSS with an angled Venturi. I couldn't run the TM32 to start with.
I'll use the WR200 Inlet instead, that solves the fitment issues, I use a Reed spacer on the standard inlet and that makes it work well.
The WR200 Inlet helps to level out the Carb to something pretty good.
@Darty that's a good plan, I had thought of a wr200 manifold but that was before I knew you could get new parts for such old bikes haha.
There are a few pictures of the YZ airbox rubber Installed on my bike on the old forum somewhere -
@Zrako Its from a 1987' YZ490.
Minor Update bits
Hand sanded and Polished.
Ducati 899 Brembo Master Cylinder - 5 minutes to splice the old DTR Brake switch plug on, same coloured wires to.
Yamaha TDM900-5PS Brembo Master cylinder - Fits perfect. Frame mounts needs drilling out to M8 is all.
Thought I'd post some engine picys.
134cc TZR 4DL Topend - Mikuni TM32.
1987' YZ125 Airboot - The original DTR Airbox needs only simple modification.
@Louis-James Cheers man, I know what you mean about using any other Carb except a TMSS with an angled Venturi. I couldn't run the TM32 to start with.
I'll use the WR200 Inlet instead, that solves the fitment issues, I use a Reed spacer on the standard inlet and that makes it work well.
The WR200 Inlet helps to level out the Carb to something pretty good.
-
The wr200 manifold won't fit unless you cut the back off it as it's too big to fit the dt case's also the holes look to be in slightly different places
-
@Zrako Its from a 1987' YZ490.
Minor Update bits
Hand sanded and Polished.
Ducati 899 Brembo Master Cylinder - 5 minutes to splice the old DTR Brake switch plug on, same coloured wires to.
Yamaha TDM900-5PS Brembo Master cylinder - Fits perfect. Frame mounts needs drilling out to M8 is all.
Thought I'd post some engine picys.
134cc TZR 4DL Topend - Mikuni TM32.
1987' YZ125 Airboot - The original DTR Airbox needs only simple modification.
@Louis-James Cheers man, I know what you mean about using any other Carb except a TMSS with an angled Venturi. I couldn't run the TM32 to start with.
I'll use the WR200 Inlet instead, that solves the fitment issues, I use a Reed spacer on the standard inlet and that makes it work well.
The WR200 Inlet helps to level out the Carb to something pretty good.
-
@andrewj1680 I know it's not perfect, cutting stuffers off is a big compromise to inlet air speed when using the standard Reed block.
So to avoid that I'm using a VFORCE Reed block, still have to modify the mounts and cut the stuffers off, but the VFORCE will take care of the inlet volume and should give much better Midrange,
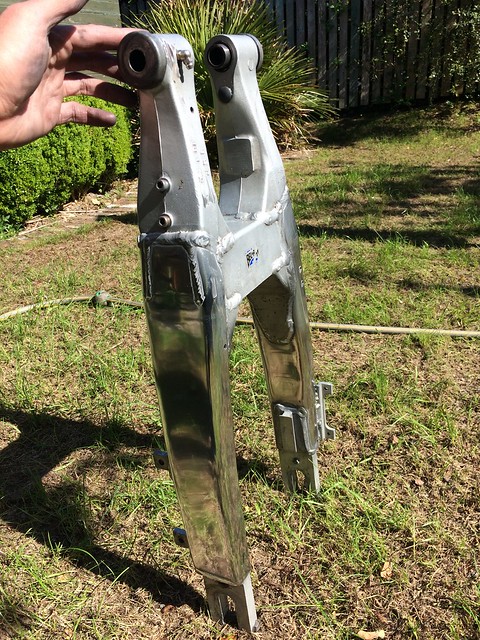
@CYBER-NINJA Actually I did use a Orbital sander with 120 - 400 grit because these older swingarms have huge extrusion depressions under the thick paint, it looked very clumsy before, alot of material had to come away.
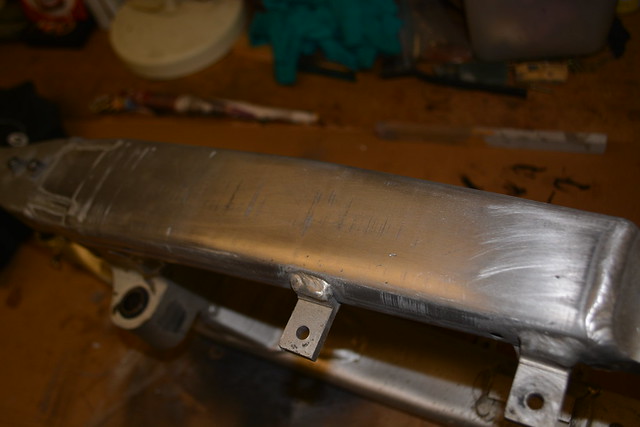
hand sanded in between and to Wet n Dry 600-800 grit, 1200 would be too anal.
-
@andrewj1680 I know it's not perfect, cutting stuffers off is a big compromise to inlet air speed when using the standard Reed block.
So to avoid that I'm using a VFORCE Reed block, still have to modify the mounts and cut the stuffers off, but the VFORCE will take care of the inlet volume and should give much better Midrange,
@CYBER-NINJA Actually I did use a Orbital sander with 120 - 400 grit because these older swingarms have huge extrusion depressions under the thick paint, it looked very clumsy before, alot of material had to come away.
hand sanded in between and to Wet n Dry 600-800 grit, 1200 would be too anal.
-
@Darty Came out damn good tho in the end, well worth the time and effort IMO.

I need to do the same on my MX, I started with some wet & dry just to test it out, TBC..................
-
@Darty Yeah lotsa elbow grease know doubt. I find using a good paint stripper with some steel wool works really well and also limits the scratches, then some wet & dry to smooth it all off, before you start on the polishing. All in all that method works very well and also it makes short work of the polishing.
")
-


I did the whole polishing thing when I first started building my cr but by the time I finished I had decided I didn't wanna polish after every ride so I powder coated it black instead, did look the part tho -
I did the whole polishing thing when I first started building my cr but by the time I finished I had decided I didn't wanna polish after every ride so I powder coated it black instead, did look the part tho@andrewj1680 Bang on! That would of looked mint, it's a shame alloy has to oxidise so quickly,
-
I did the whole polishing thing when I first started building my cr but by the time I finished I had decided I didn't wanna polish after every ride so I powder coated it black instead, did look the part tho@andrewj1680 Oh man, that sure looks damn sweet, and such a shame to do all that work and then get all that lovely shiny metal blacked out. But hey-hoo I get why and it was your choice.
-
@andrewj1680 Oh man, that sure looks damn sweet, and such a shame to do all that work and then get all that lovely shiny metal blacked out. But hey-hoo I get why and it was your choice.
@CYBER-NINJA I preferred the polished look but I'd of spent more time polishing it than riding it every time I took it out, Can you imagine trying to avoid every puddle you came across lol that wasn't for me if it's there I'm gonna ride it
-
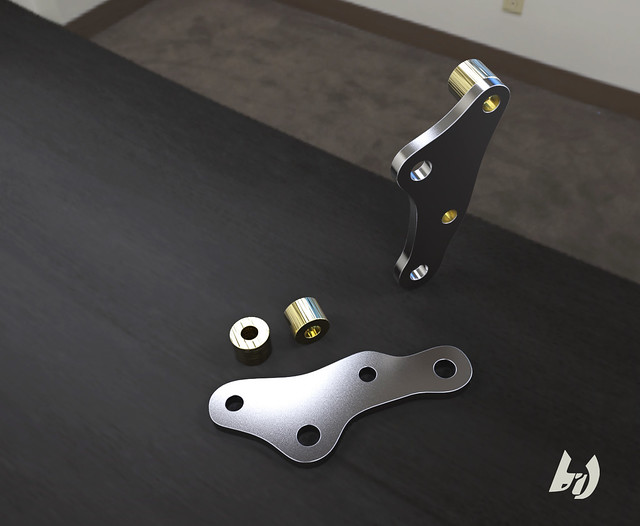
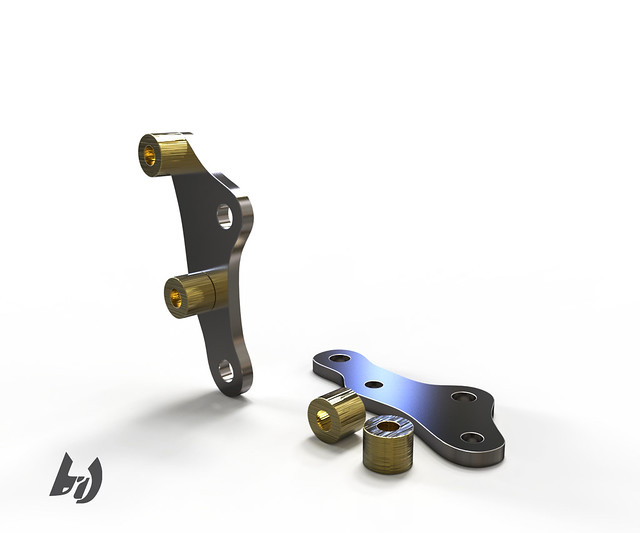
(6mm Stainless Steel - Brass 13-14mm spacers)
I made DXF files for Waterjet cutting - for a Stainless Calliper adapter and spacers for a SM conversion using the 'YZF125' Brembo calliper.
If there are a few members here looking to do SM conversions, I could get a few kits together with bolts,
Just a limited run as I have the time for the moment.
-
32 degrees, sticky rubber, cotswold country lanes, 2strokes and considerable beer intake on par with University life.
I ride this thing 22 miles a day as a daily to go work, built this thing to be used and I just 'turn it up' a little on the Laptop for a blitz on the weekend somewhere.
Drawing this project to a close, and enjoying the result, or atleast this iteration of it so far...
I had some clearance issues with the Powervalve under expansion. I removed material in increments by machine sanding.
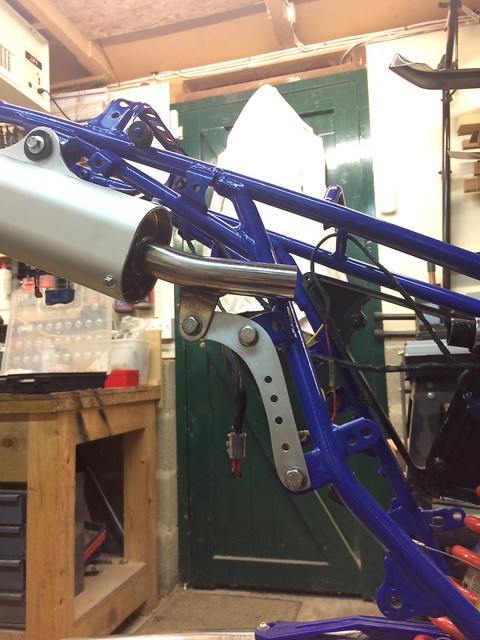
Custom bracket for the FMF Powercore1 can. Fits on a DTR well.
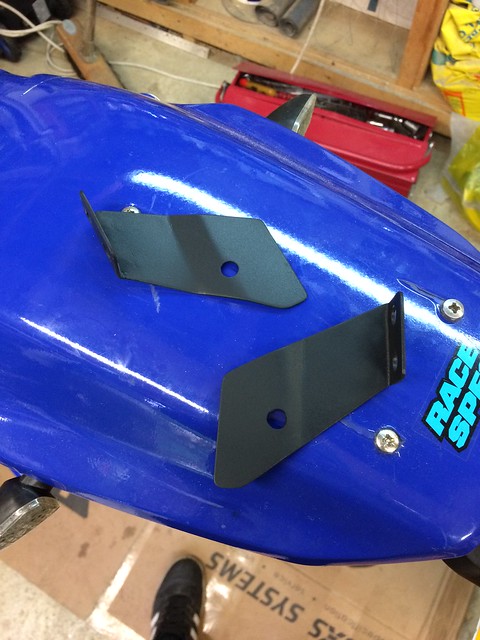
Built the headlight brackets,

WR400 Face swap.
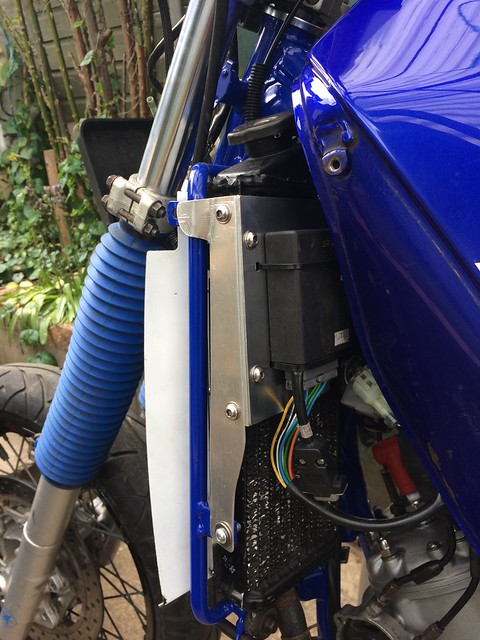
There is no room left on this bike. Made a mount for the Ignitech Ignition, secure, doesn't suffer from heat exposure and most importantly it's accessible.
As for cooling, air flow is fine still.
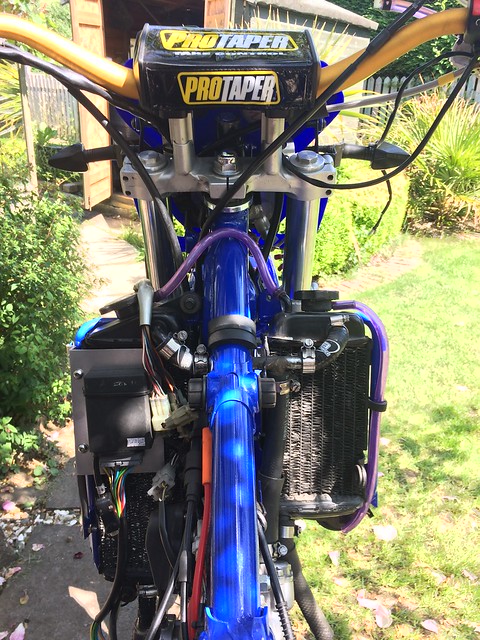
Modified AS3 Silicone WR200 radiator hose's to suit this mongrel application.
This leads me to something interesting I found,
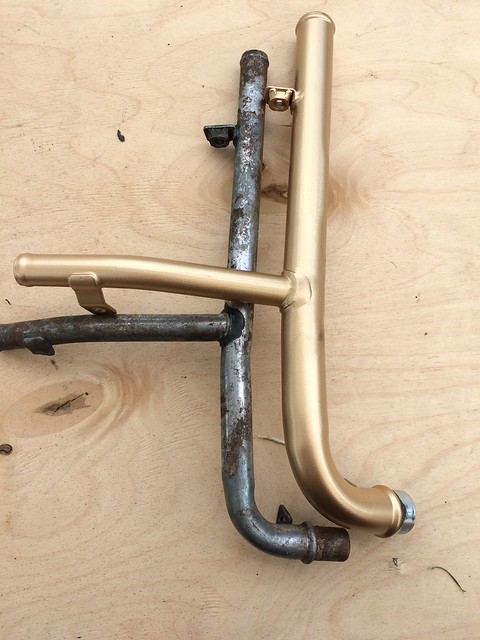
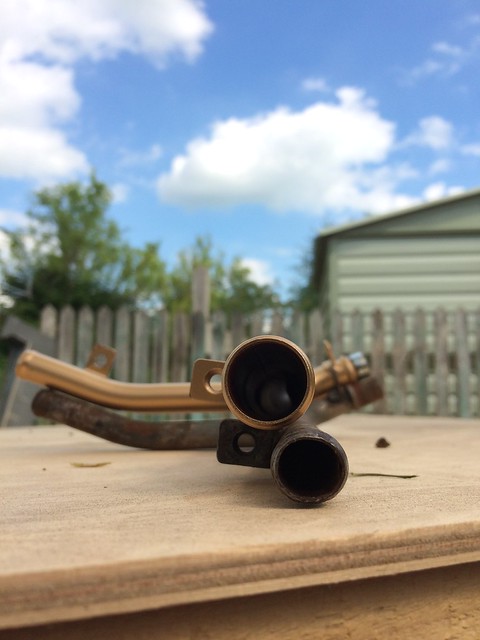
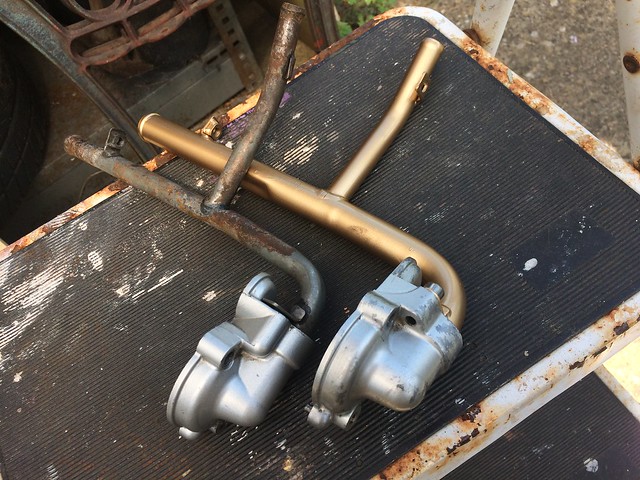
I needed a new WR200 coolant pipe, turns out later 4BF4 1995' WR200s use a larger 18mm bore coolant pipe.
I got one brand new old stock from Japan. I've rust protected it, primer and a Gold top coat for a little bling.
Then of course a 4BF4 Waterpump cover is required.
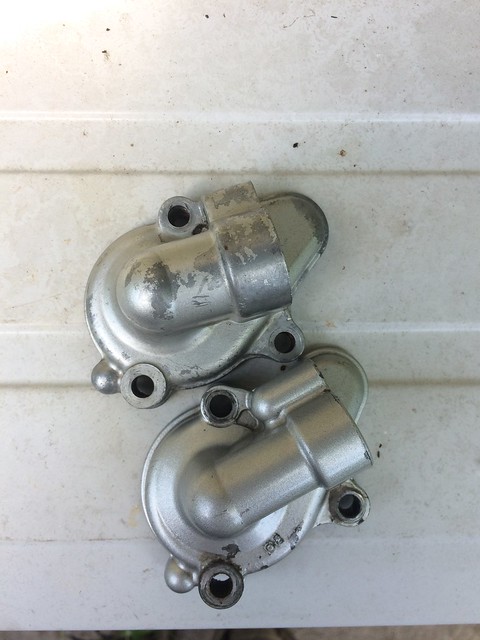
4BF4' Pictured above vs 125R/200R
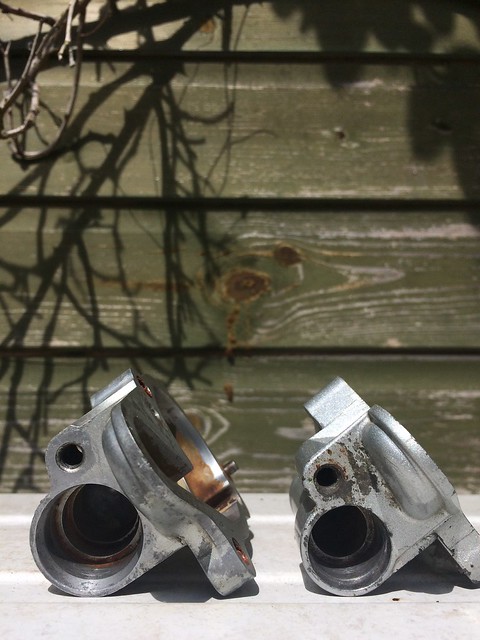
I never knew Yamaha updated the cooling for the WR200, so I had help getting a used one.
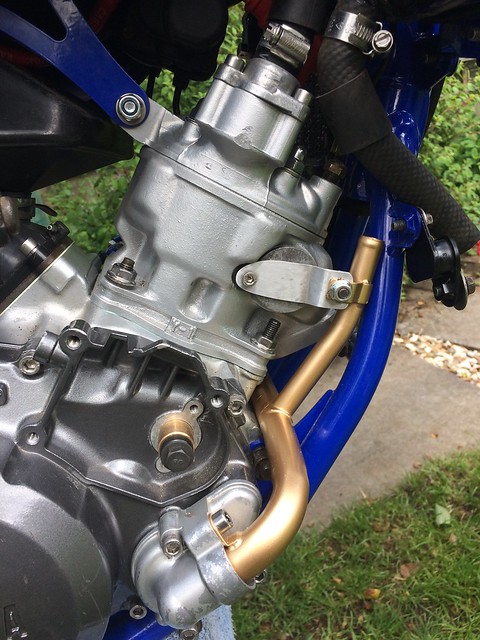
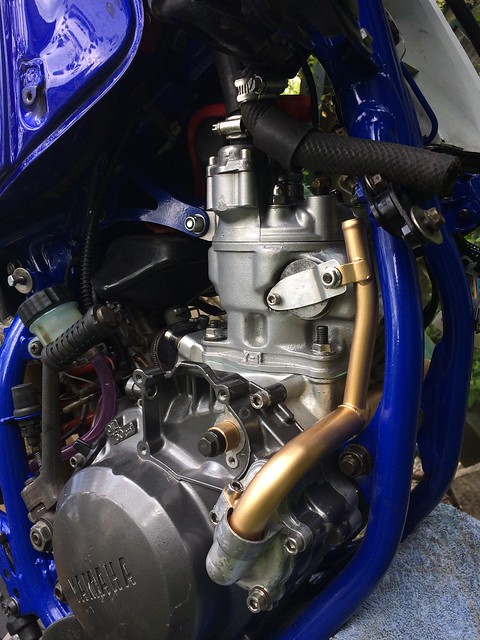
IT ONLY JUST FITS... Tight bruuuh. I made a brace for the coolant down pipe as it's just a braised joint and I managed to split my last one like a clot.
Originally this mounts onto the WR200 Cylinder, so ideally this has to be done to the 125R barrel.
Cooling is now more than adequate,
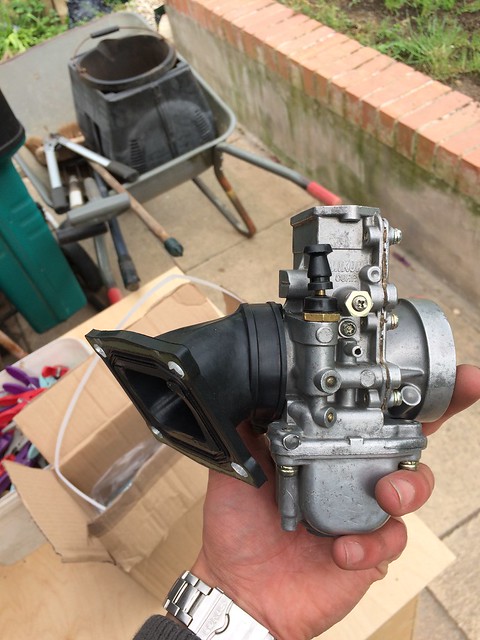
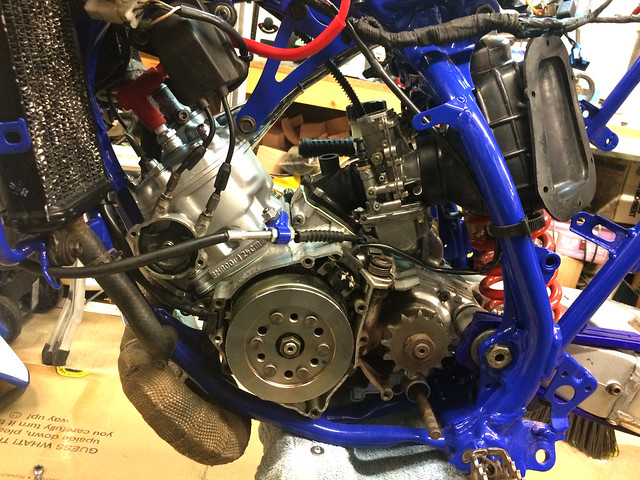
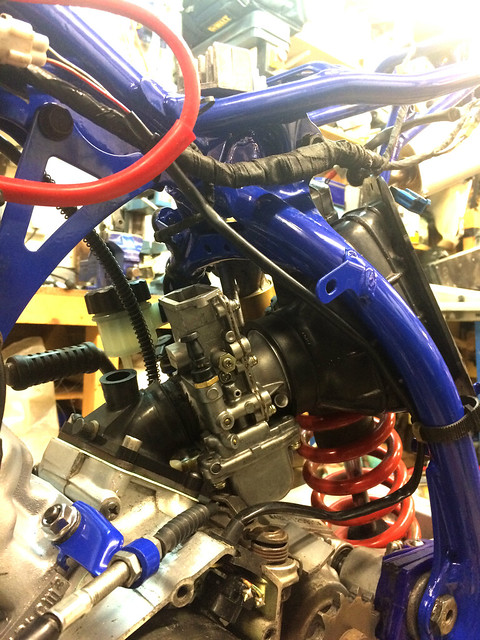
WR200 Inlet, TM32 fitted. This inlet gives you more angle to use larger carburettor bodies.
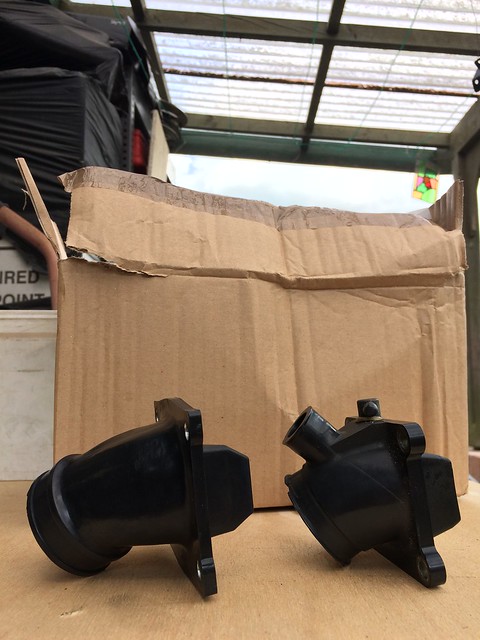
WR200 vs DT125R. Inlet tract a little longer, Mounting points have to be modified and crankcase stuffers removed.
New YZ braided brake lines and removable exhaust joint to get the FMF onto the DEP.
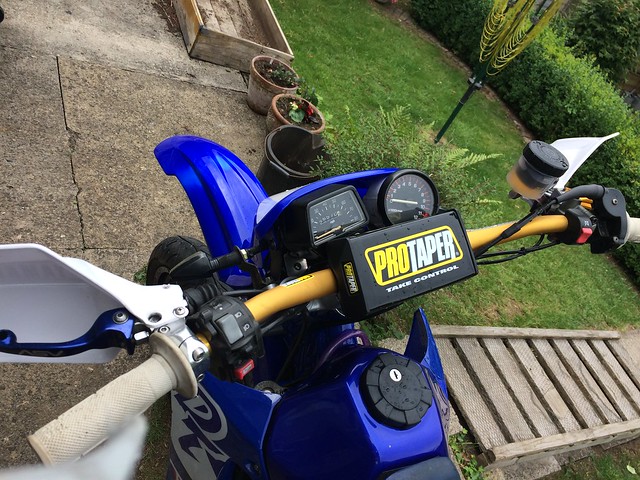
(An oldschool mechanical display setup. Dorky but I love this older stuff.
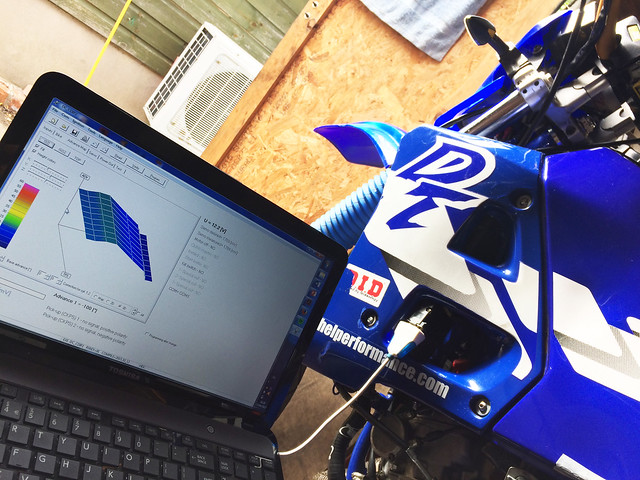
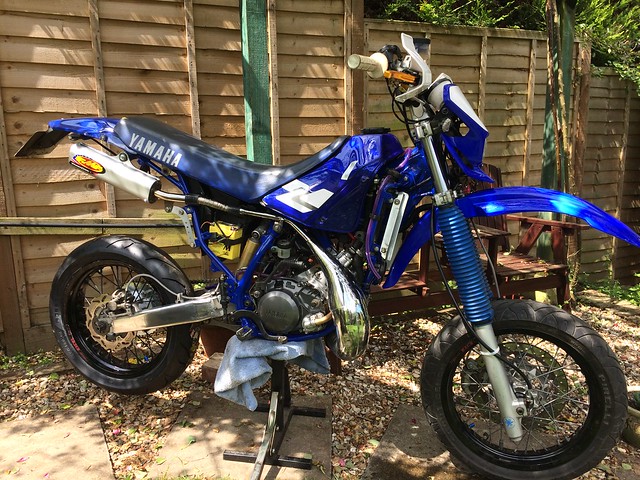
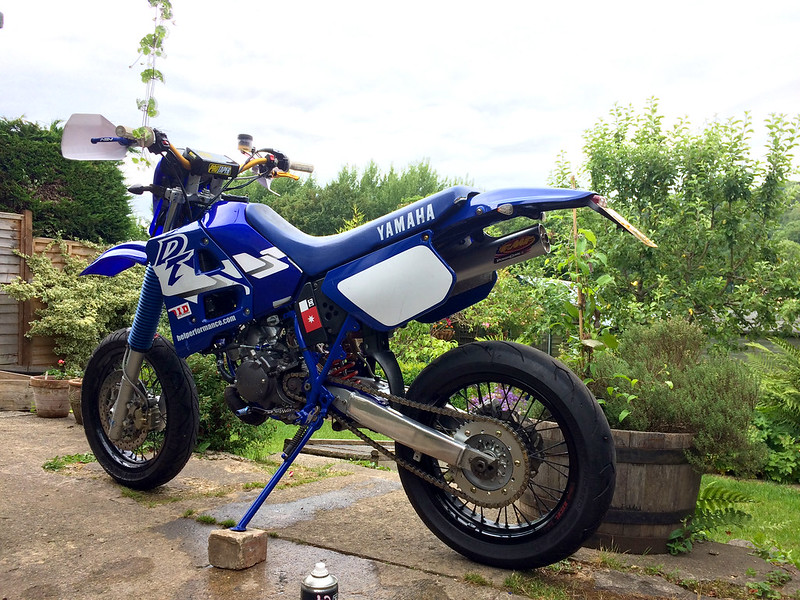
The fun bits. Built to be ridden alot!
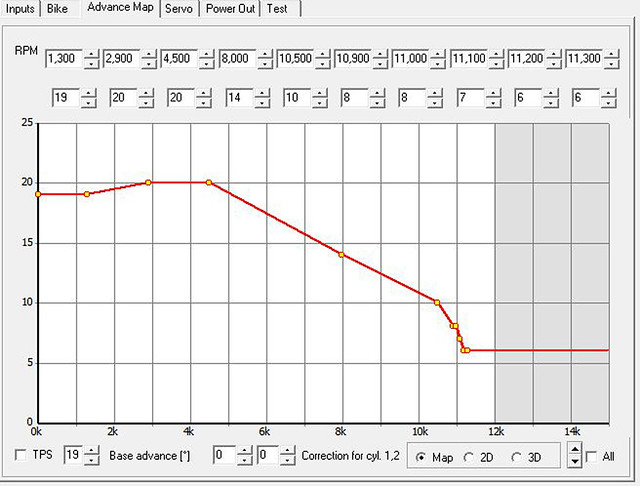
Using a base map close to a TZR125 4DL SP, It runs particularly well under 6K.
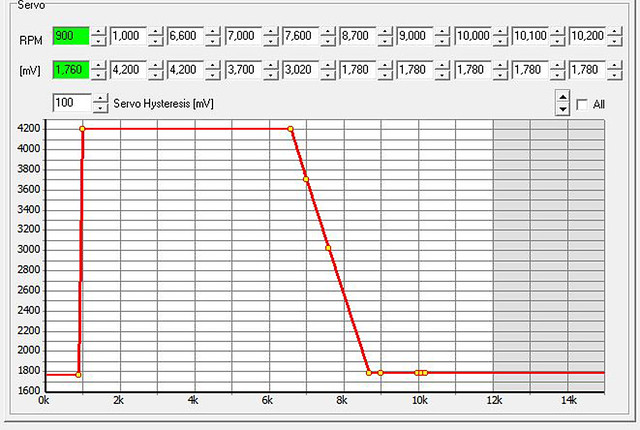
This DT now shifts.. I use a 4DL servo setting which utilises the PV opening later than the DT or TDR 3SH.
It's far from perfect, but a safe base tune to run on as this is my daily as the weather is so good.
It's run in properly now, and it is glorious. It sounds fantastic over 10,000rpm.Powerband is up at 9,500rpm and it pulls hard to 13,000.
DTR Gear ratios are perfect for this TZR head and it's acceleration characteristic is spot on, 0-62 less than 6 seconds.
More to come, more bits from Japan to arrive and then finally a Dyno session with a TM34ss fitted.
Stay safe!
Keep it real
-
32 degrees, sticky rubber, cotswold country lanes, 2strokes and considerable beer intake on par with University life.
I ride this thing 22 miles a day as a daily to go work, built this thing to be used and I just 'turn it up' a little on the Laptop for a blitz on the weekend somewhere.
Drawing this project to a close, and enjoying the result, or atleast this iteration of it so far...
I had some clearance issues with the Powervalve under expansion. I removed material in increments by machine sanding.
Custom bracket for the FMF Powercore1 can. Fits on a DTR well.
Built the headlight brackets,
WR400 Face swap.
There is no room left on this bike. Made a mount for the Ignitech Ignition, secure, doesn't suffer from heat exposure and most importantly it's accessible.
As for cooling, air flow is fine still.
Modified AS3 Silicone WR200 radiator hose's to suit this mongrel application.
This leads me to something interesting I found,
I needed a new WR200 coolant pipe, turns out later 4BF4 1995' WR200s use a larger 18mm bore coolant pipe.
I got one brand new old stock from Japan. I've rust protected it, primer and a Gold top coat for a little bling.
Then of course a 4BF4 Waterpump cover is required.
4BF4' Pictured above vs 125R/200R
I never knew Yamaha updated the cooling for the WR200, so I had help getting a used one.
IT ONLY JUST FITS... Tight bruuuh. I made a brace for the coolant down pipe as it's just a braised joint and I managed to split my last one like a clot.
Originally this mounts onto the WR200 Cylinder, so ideally this has to be done to the 125R barrel.
Cooling is now more than adequate,
WR200 Inlet, TM32 fitted. This inlet gives you more angle to use larger carburettor bodies.
WR200 vs DT125R. Inlet tract a little longer, Mounting points have to be modified and crankcase stuffers removed.
New YZ braided brake lines and removable exhaust joint to get the FMF onto the DEP.
(An oldschool mechanical display setup. Dorky but I love this older stuff.
The fun bits. Built to be ridden alot!
Using a base map close to a TZR125 4DL SP, It runs particularly well under 6K.
This DT now shifts.. I use a 4DL servo setting which utilises the PV opening later than the DT or TDR 3SH.
It's far from perfect, but a safe base tune to run on as this is my daily as the weather is so good.
It's run in properly now, and it is glorious. It sounds fantastic over 10,000rpm.Powerband is up at 9,500rpm and it pulls hard to 13,000.
DTR Gear ratios are perfect for this TZR head and it's acceleration characteristic is spot on, 0-62 less than 6 seconds.
More to come, more bits from Japan to arrive and then finally a Dyno session with a TM34ss fitted.
Stay safe!


Hello! It looks like you're interested in this conversation, but you don't have an account yet.
Getting fed up of having to scroll through the same posts each visit? When you register for an account, you'll always come back to exactly where you were before, and choose to be notified of new replies (either via email, or push notification). You'll also be able to save bookmarks and upvote posts to show your appreciation to other community members.
With your input, this post could be even better 💗
Register Login